Patriotic Pinwheel Cupcakes – how to make fondant pinwheel cupcake toppers in red, white and blue.
So much fun for the Fourth of July!
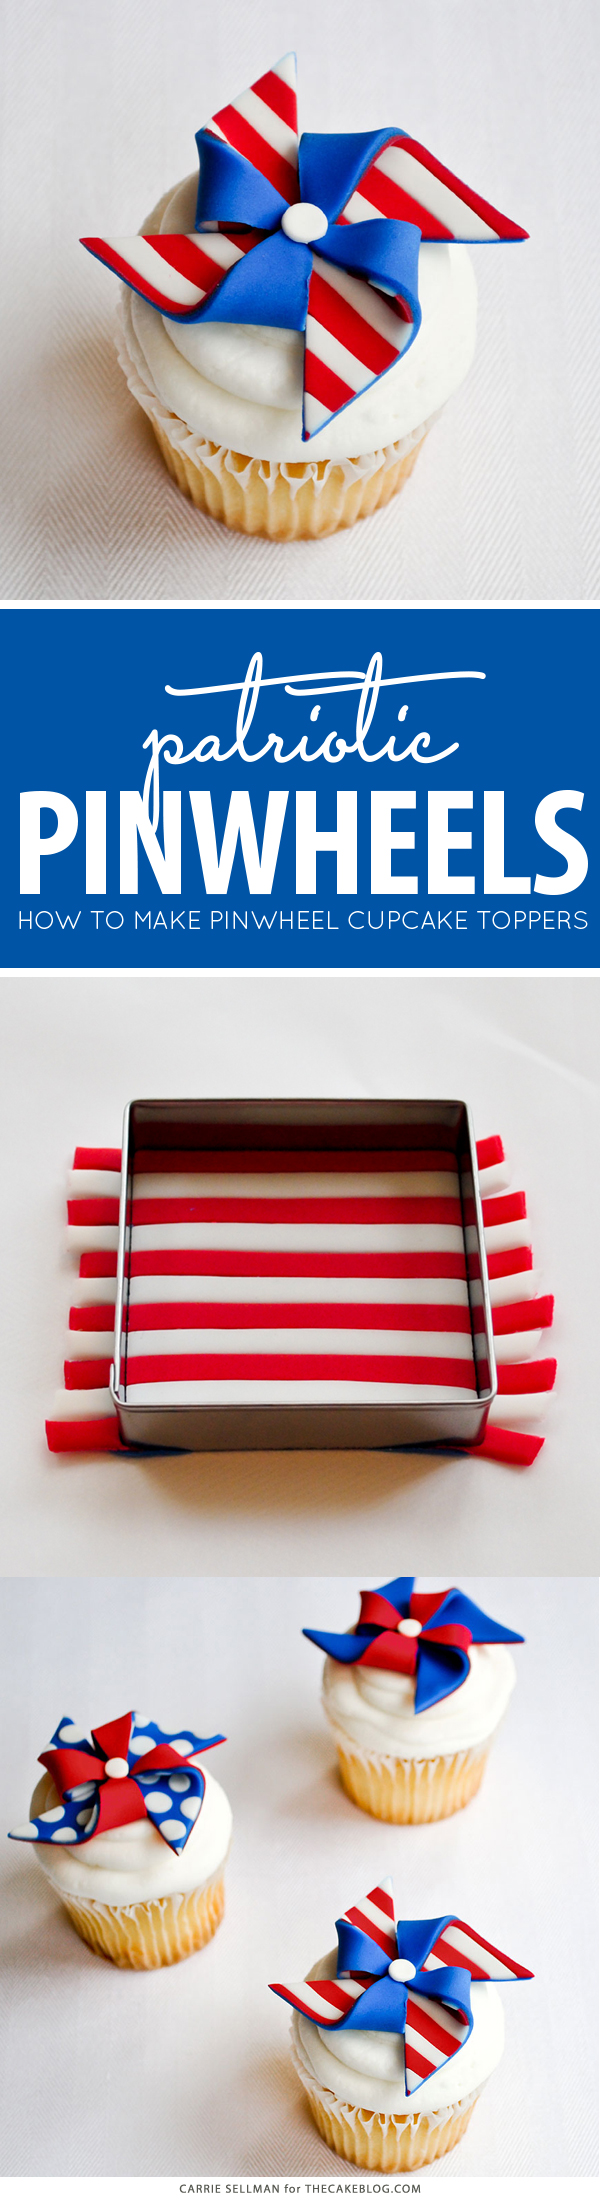
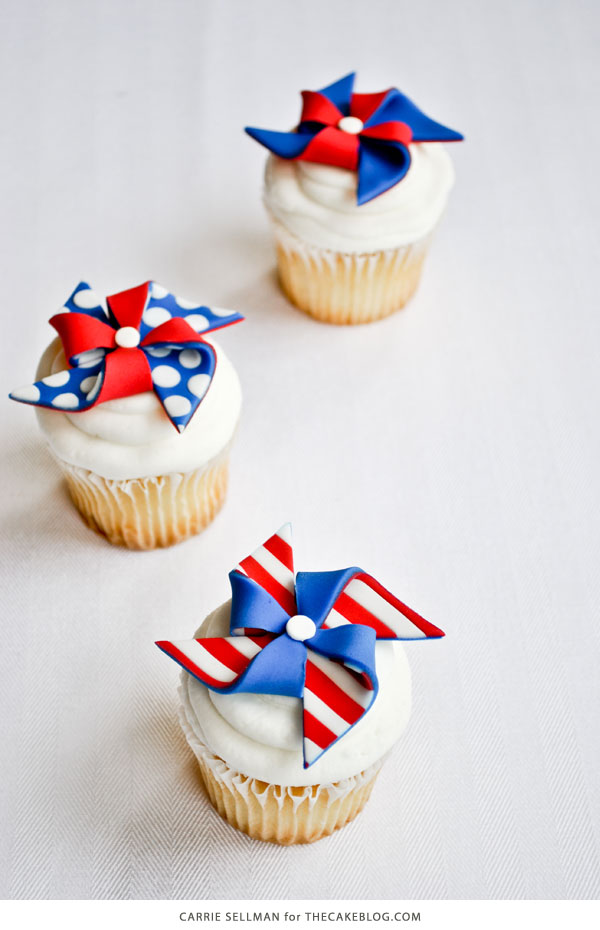
Last Monday, I shared a fun new tutorial as a guest post over on The TomKat Studio. My Patriotic Pinwheel Cupcakes! Your response to these fondant pinwheel toppers has been wonderful! I shared the step by step instructions to make the basic solid colored pinwheel {here} but many of you have asked about the peekaboo patterns. The bold stripes and playful dots add a festive touch to these pinwheels, making them perfect for Memorial Day and the 4th of July! Or any other special occasion that deserves a whimsical cupcake! So, today it’s round two for the DIY pinwheel cupcakes…. I’m going to show you how to make them pretty with polka dots and stripes!
To simplify this tutorial, I’m using pre-colored, store-bought fondant, available at most craft stores. A small multi-color pack, like this one, contains both the red and the blue we’ll need. (Plus some yellow and green you can save for a later project.) Obviously, you can color your own fondant or easily change the entire color scheme of these pinwheels. They would also be perfect for birthday cupcakes!
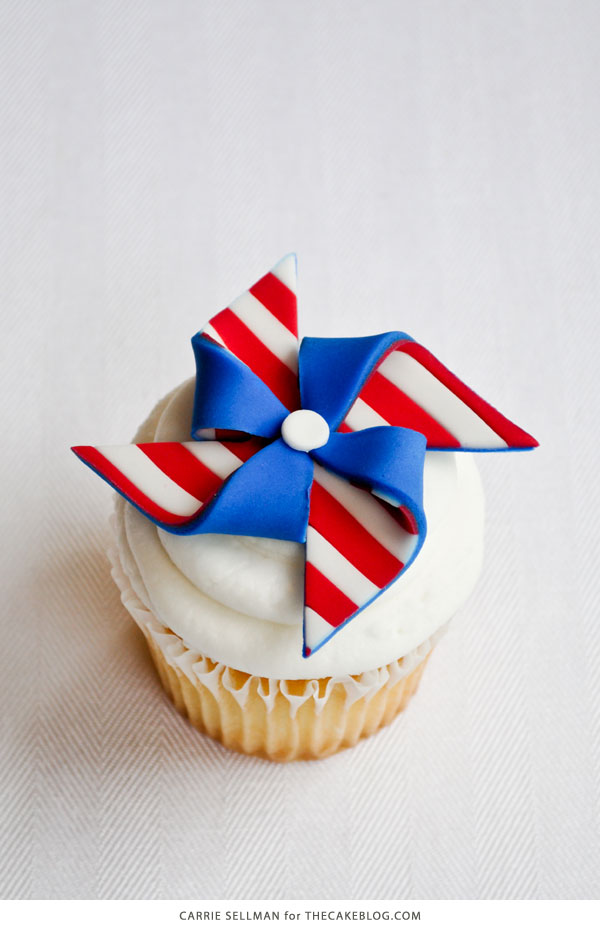
STRIPED PINWHEEL CUPCAKES
a DIY by Carrie Sellman
Supplies:
Your Favorite Cupcakes
Fondant in red, white and blue
Rolling pin
Parchment paper
Square cookie cutter or ruler
Sharp knife
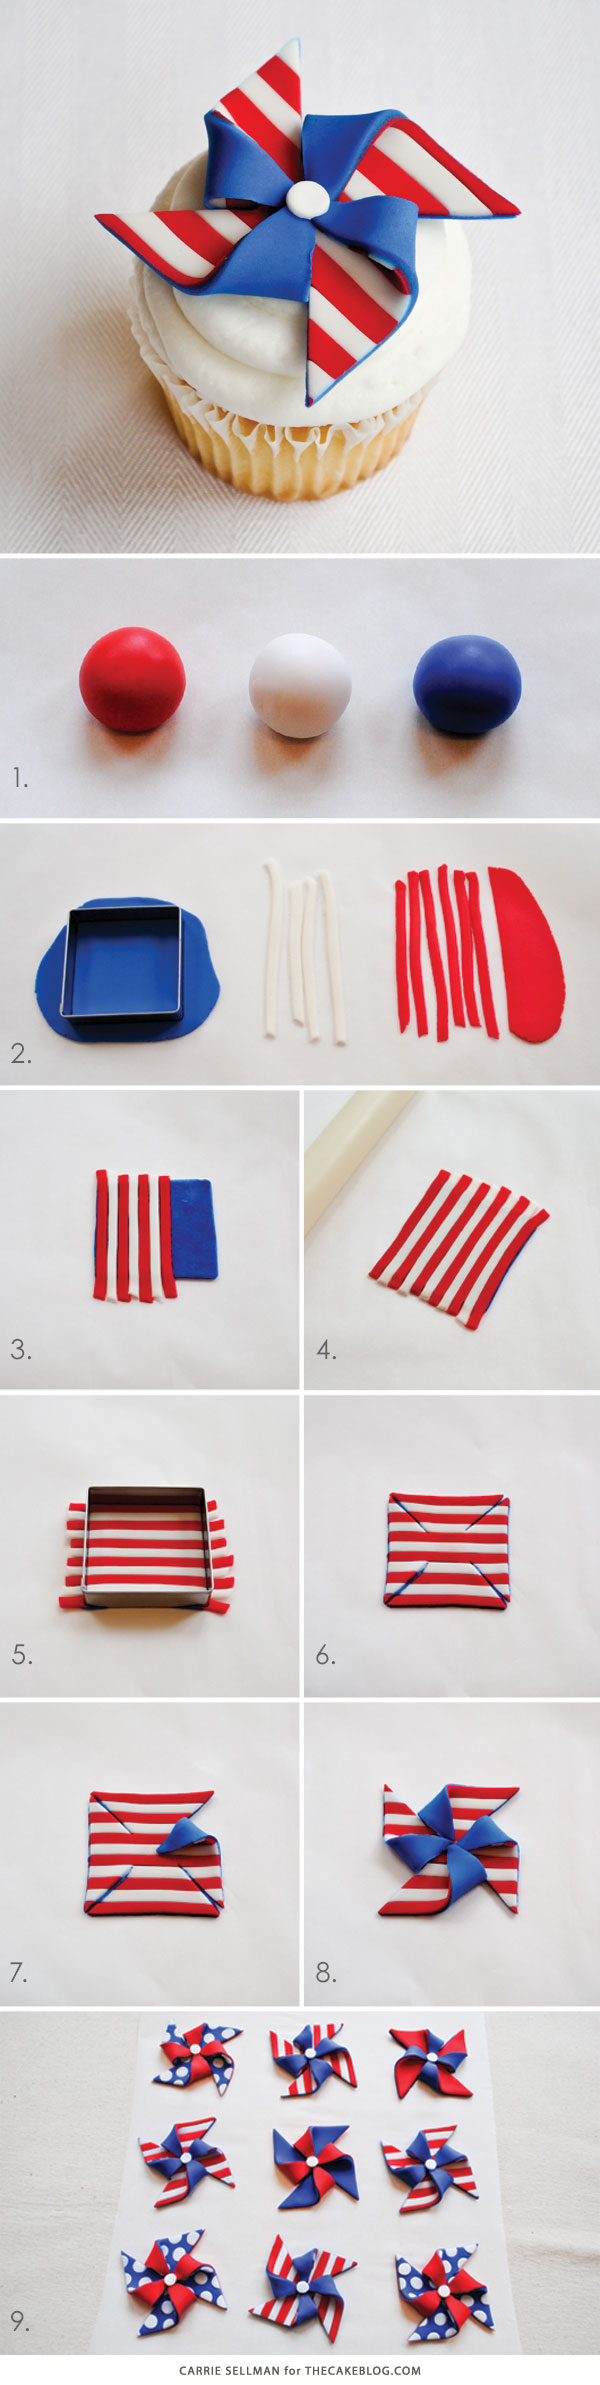
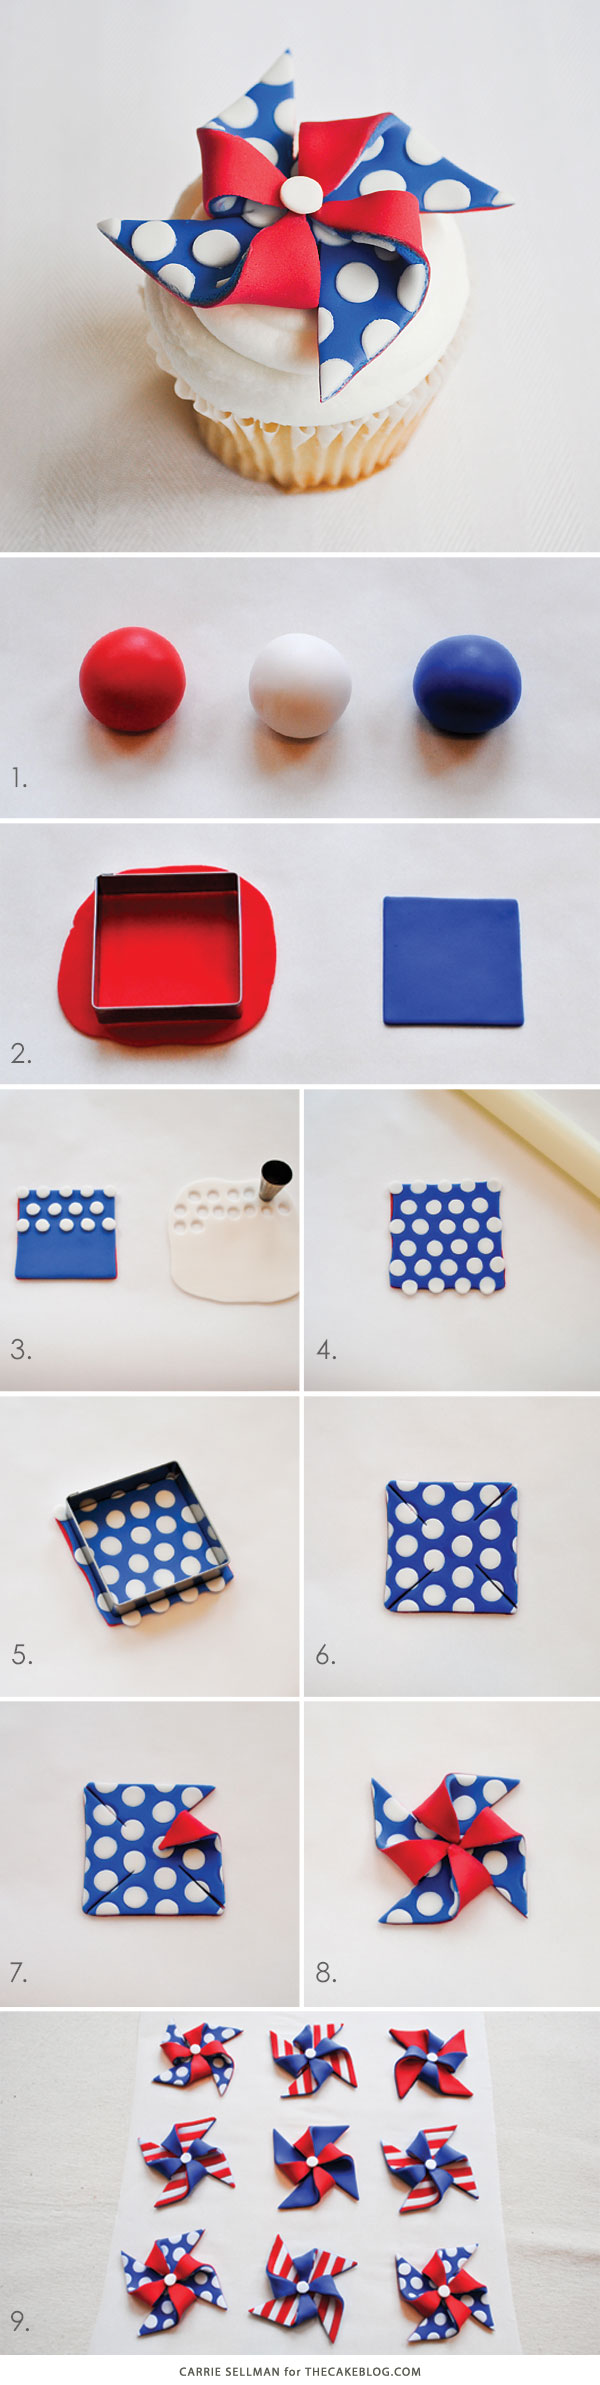
STEP 1: Kneed fondant in hands until soft and smooth.
STEP 2: Take a small amount of blue and roll it out onto parchment paper using a rolling pin. Roll it out thin. About 1/4 of an inch or thinner. Cut a square using a square cookie cutter or a ruler and sharp knife. Roll out small amounts of both red and white. Cut strips of both red and white, about 1/4 inch wide and slightly longer than your square.
STEP 3: Lightly brush a few drops of water onto the blue square. (Go easy with the water, you only need to lightly dampen the fondant.) Place red and white strips on top of blue square. Line them up side by side, as straight as you can. Cover the entire blue square.
STEP 4: Gently roll again with your rolling pin to flatten your stripes and seal these two layers. Don’t worry that it is no longer a perfect square.
STEP 5: Use your cookie cutter to trim the excess edges, leaving behind a straight square. (Discard your trimmings or save for a purple project later). You now have one square that is blue on bottom, striped on top.
STEP 6: Using your knife, make diagonal slits cutting from each corner towards the center. Lightly moisten the very center with a dab of water.
STEP 7: Gently pick up one corner and bend it in so that the point reaches the center. Press down gently so the point sticks to the center.
STEP 8: Repeat Step 7, folding in every other corner until you have a pinwheel shape.
STEP 9: Roll or cut a tiny ball of white fondant for the center. Attach to center with a light drop of water, if needed. Push down gently to seal. Let pinwheels dry on parchment paper overnight or until completely dry and firm. Place on top of cupcakes when ready to serve.
Okay, now that you’ve seen how to do the stripes, the polka dots should be a piece of cake! Here we go…
POLKA DOT PINWHEEL CUPCAKES
a DIY by Cupcakes
Fondant in red, white and blue
Rolling pin
Parchment paper
Square cookie cutter or ruler
Small circle cutter or #12 tip
Sharp knife
STEP 1: Kneed fondant in hands until soft and smooth.
STEP 2: Take a small amount of red and roll it out onto parchment paper using a rolling pin. Roll it out thin. About 1/4 of an inch or thinner. Cut a square using a square cookie cutter or a ruler and sharp knife. Roll out and cut a blue square, just as you did for the red. You now have two squares.
STEP 3: Lightly brush a few drops of water onto the red square. (Go easy with the water, you only need to lightly dampen the fondant.) Place blue square on top of red square. Roll out a small amount of white and cut out dots. I used the small end of a #12 piping tip. Attach dots to blue square with a small dab of water, if needed. Cover the entire square with dots, staggering the rows.
STEP 4: Gently roll again with your rolling pin to flatten your dots and seal these two layers. Don’t worry that it is no longer a perfect square.
STEP 5: Use your cookie cutter to trim the excess edges, leaving behind a straight square. (Discard your trimmings or save for a purple project later). You now have one square that is red on bottom, blue and white polka dots on top.
STEP 6: Using your knife, make diagonal slits cutting from each corner towards the center. Lightly moisten the very center with a dab of water.
STEP 7: Gently pick up one corner and bend it in so that the point reaches the center. Press down gently so the point sticks to the center.
STEP 8: Repeat Step 7, folding in every other corner until you have a pinwheel shape.
STEP 9: Roll or cut a tiny ball of white fondant for the center. Attach to center with a light drop of water, if needed. Push down gently to seal. Let pinwheels dry on parchment paper overnight or until completely dry and firm. Place on top of cupcakes when ready to serve.
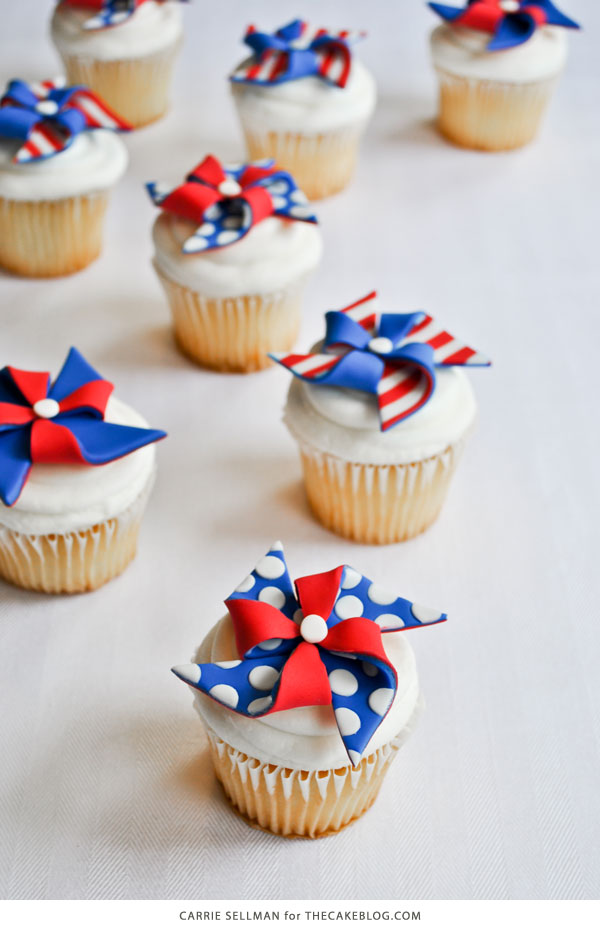
Whether you stick to the solid colors or go bold with the stripes and polka dots, I hope my Patriotic Pinwheel Cupcakes are a fun addition to your Independence Day!
YOU MAY ALSO ENJOY:
Stars and Stripes Cake
Patriotic Cheesecake Shots
Red White and Blue Desserts
Berries and Cream Cupcakes
Eaton Mess Cake

So beautiful!
Thank you Kathy!
Amazing! Thank you so much for this lovely tutorial 🙂
You’re very welcome Ella! Hope you give it a try sometime!
They look so sophisticated and yet they’re so easy to make. I love it!
Thank you Julia! Definitely a win-win!
Thank you so much for this. What a fun idea. I was looking at the other ones the other day and wondering how to get the dots and stripes and this is what I was thinking but thanks for doing this. You are awesome. Thanks again.
Thanks Shannon! Happy to share and hope you give them a try!
These are just amazing!!! You took something that seemed so complicated and broke it down into such easy steps!!! I have never worked with fondant as I have always been intimated by it but I think I just might tackle this project! Thanks for all the tips! If they come out nearly half as nice as yours, I’ll be so pleased! (And I’ll be sure to tag you on Instagram if I post them!) Thanks again!
Thanks for the kind feedback Jennifer. There’s a whole world of fondant fun waiting for you… go for it!
Hi these look fab, do you just use ordinary fondant or do you add a hardener??
Thanks I will definately be giving these a go xx
Just ordinary fondant, rolled thin!
Beautiful!
Thank you!
These are beautiful!
Thank you Sophie!
Thank you so much! these are gorgeous, can’t wait to make them 🙂
Wonderful, thanks Rosana!
Hi there! I love these and just made one using fondant for the very first time in my life!! Your tutorial was so outstanding! I tried to tag you on Instagram but am not finding anything under the name “thecakeblog”. I really wanted to thank you for this and let people know where they could find out more! I hope you get lots of traffic – you deserve it!!!! (I’m @beginingbaker on Instagram if you want to let me know your username and I can then tag you! You deserve all the credit!!!!!)
So glad you gave it a try Jennifer! And even happier to know they turned out nicely for you!
I think these are adorable already made some for my co-workers and they all loved them. Thank you.
Fabulous Isabel! I’m planning to make some again this year for our 4th of July at home.
I love these!!! I’m making them with pink and purple for my daughter’s birthday 🙂 Thanks for the easy directions for this novice baker.
I love it Valerie! These will be too cute for a pink and purple birthday!
Those look so good!
LOVE these!!!
What a fab decoration. Adding to my to do list!
They are very beautiful and simple! Ty for sharing!
Your very welcome Maria! Enjoy!
this is awesome. Will be so great for July 4th treats.
These are just super cute! I would love to make these for the 4th of July, but don’t think I will have time this year. Thanks for the idea and the instructions.
There’s always next year Donna! Or maybe Labor Day!
What size is the square used to create the size for a cupcake?
Thanks again for a great tutorial.
The square cutter I used measures is just slightly larger than 2 x 2 inches. About 2 1/4 inches. It fit on the cupcakes perfectly but you could also go a little bigger if needed.
Thanks for reading!
I just love this tutorial! I might have to make them for this Friday!
How far in advance can I make these?
The pinwheels will dry and you can easily store them for several weeks until ready to use. Just keep them out of direct sunlight so that your colors don’t fade. Then place on top of your cupcakes when ready to serve.
Hi! Great tutorial!
I made them but when I bend the corners the base square cracks a little!
Can you give me a tip for that?
Thanks!
Thanks Francisca! If your fondant cracks a little, it’s because the fondant has become too dry. The key is to work fast when going through all of these steps!
If your fondant is just a little dry in general, you can knead in a small dab of vegetable shortening or food grade glycerine to bring it back to a smooth texture.