As seen on the cover of Country Living Magazine, October 2013!
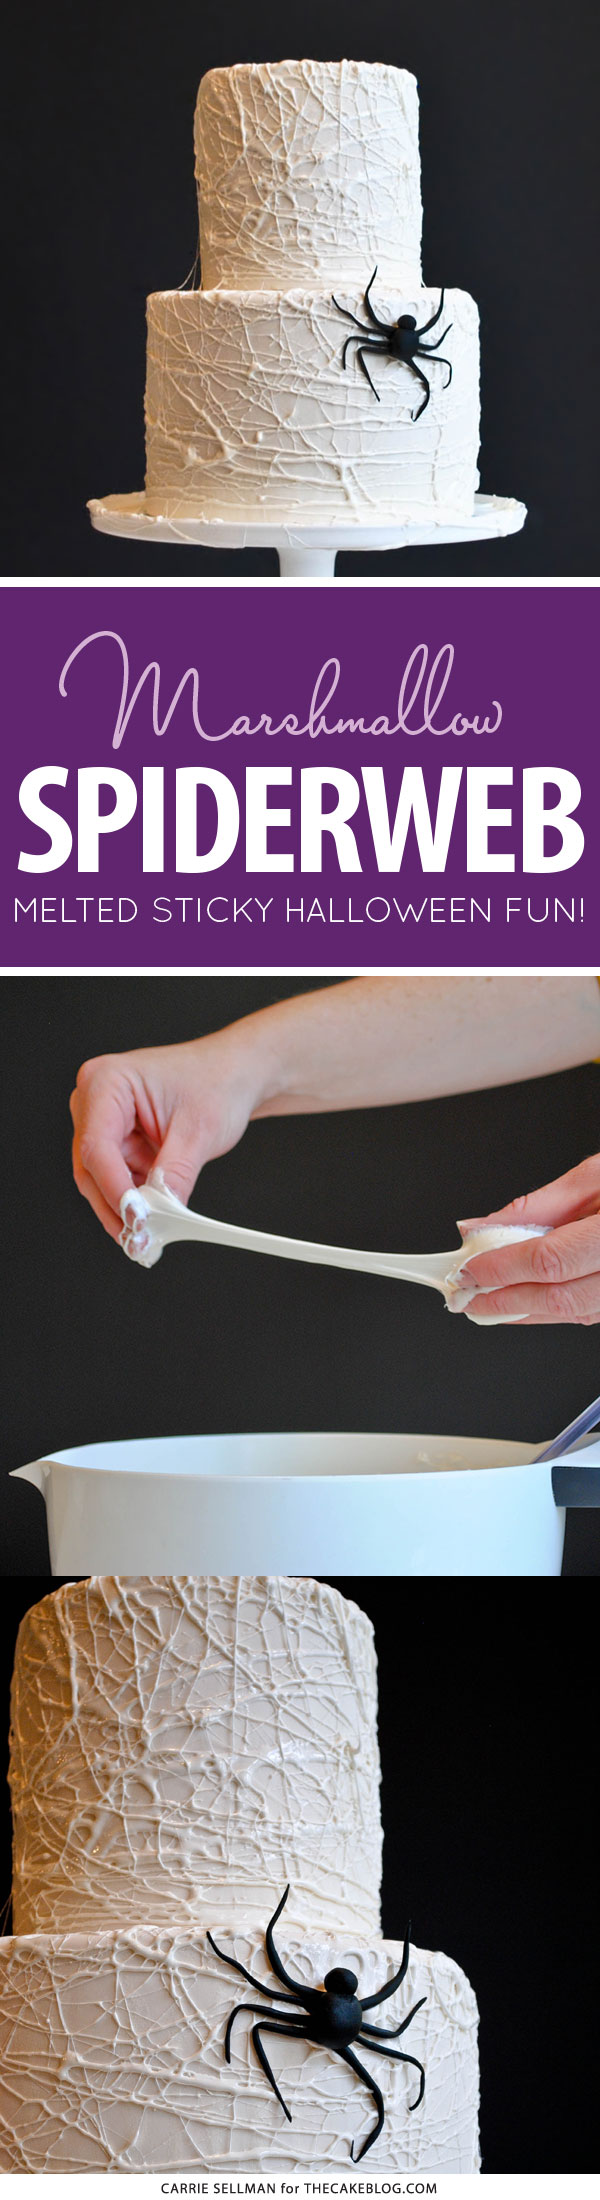
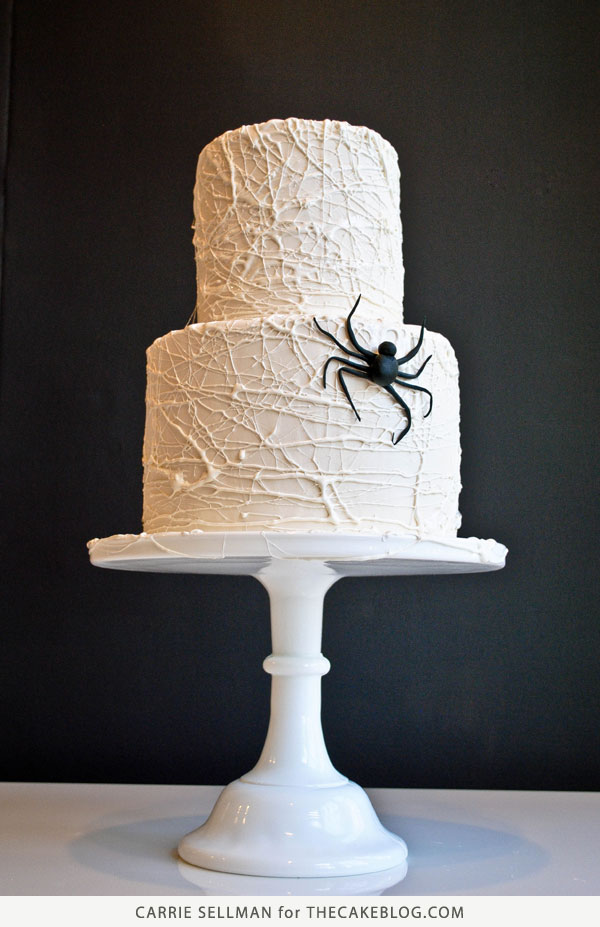
Now that we’re officially in the Halloween spirit and inspired to bake, here is a super easy DIY for you to try at home. There’s no piping, no painting and no wrong way to do it! You just need marshmallows, two hands and some imagination! It’s a creepy, crawly Marshmallow Spiderweb Cake! And I have a simple tutorial to show you how to do it!
You know how marshmallows get stringy when melted? Well that makes for a super sticky, super easy spiderweb!
I think this cake would be a fun project, no matter your experience or skill level. If you’re a medium to advanced baker, this cake will seem super easy and you’ll be finished in no time flat. Beginners…. your end result will look more challenging than it actually was. Bonus for you! And you certainly don’t have to tell anyone how easy it was. And if you really just don’t bake at all, why not try out the marshmallow technique on a plain white cake from the market. It could be a fun way to get your hands a little sticky and surprise everyone, including yourself. There’s really no right or wrong way for a spiderweb to look… so just go for it!
MARSHMALLOW SPIDERWEB CAKE
a DIY by Carrie Sellman
Supplies
- Cake
- White Fondant
- Marshmallows (8 oz)
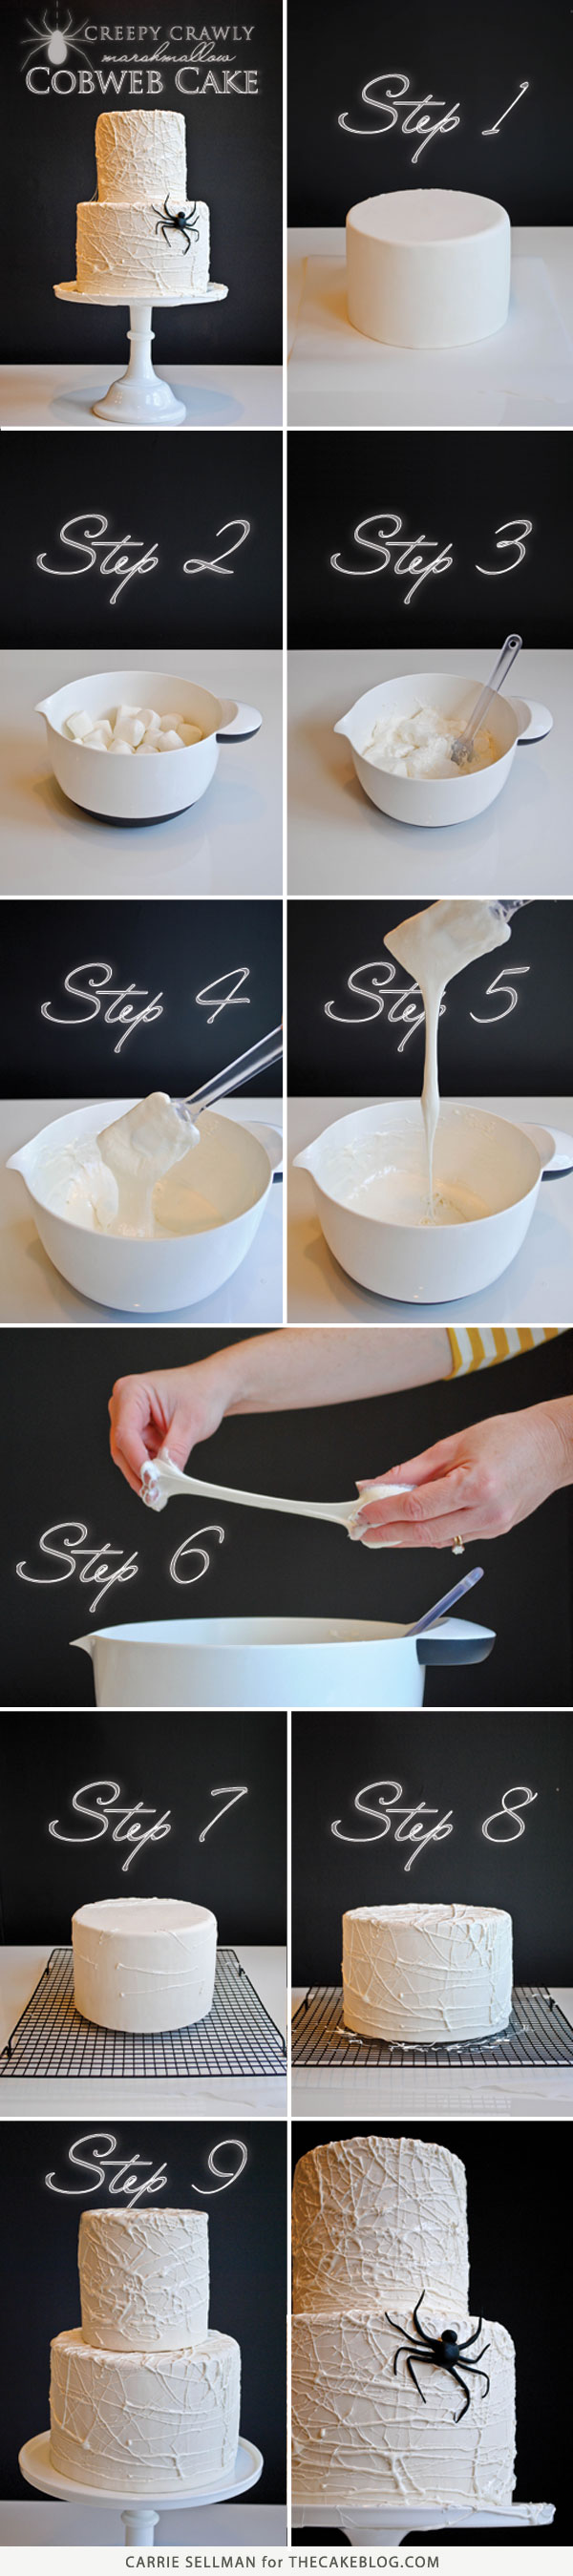
STEP 1 : Cover your cake(s) in white fondant.
STEP 2 : Place marshmallows into a microwave-safe bowl. Heat for 30 seconds.
STEP 3 : Stir marshmallows. {Warning. Hot marshmallows will burn. And it hurts!}
STEP 4 : Keep stirring.
STEP 5 : Stir, stir, stir some more! Stir until marshmallows are cool enough to touch.
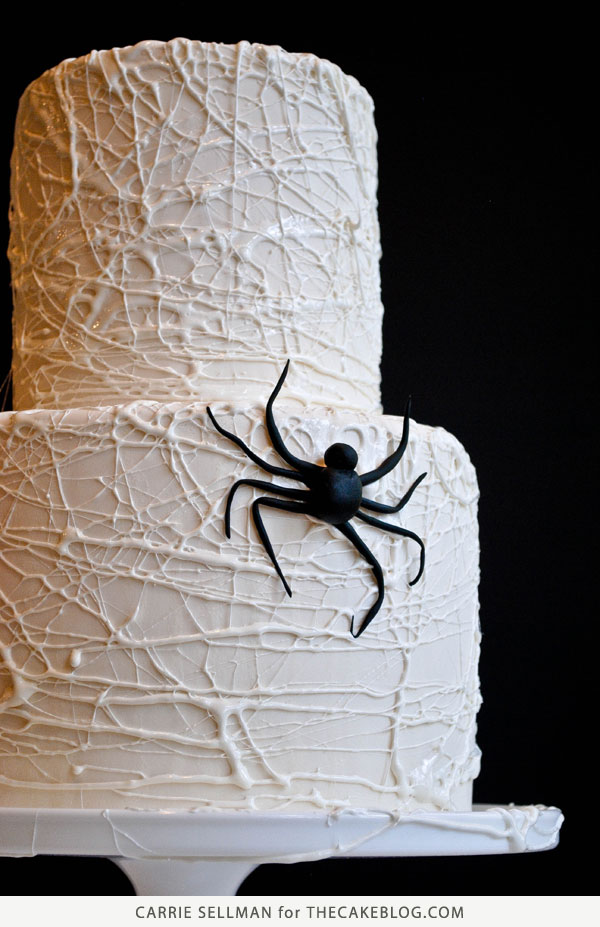
STEP 6 : This is where it gets messy. Or fun, depending on how you look at things. Using both hands, stretch a small glob of marshmallow out into a long, thin, stringy strand. Way, way longer and thinner than what is shown above (it was hard to get a picture of this exactly… especially with marshmallow covered hands).
STEP 7 : Start wrapping the stringy marshmallow around your cake. Go up, down, around and around. Diagonal. Every which way. There is no right or wrong way for a spider web to look. Just start wrapping. Go light at first until you get the hang of it. Less is more! And thinner strands look better in the end.
STEP 8 : Continue to pull, stretch and drape marshmallow strings. Going every direction way you possibly can.
STEP 9: Cover second tier in marshmallow strings. Stack both tiers together.
STEP 10 : Add additional marshmallow strings to both tiers, draping some from one tier to the next. Add a spider with long, spindly legs. And you’re done!
BAKERS NOTE : I should have taken pictures while making the spider. My bad. But he’s made of fondant and very straightforward. One oval for his body. A smaller circle for his head. And eight very long, exaggerated legs to make him extra creepy! Hey, a big spider had to be responsible for such a crazy cobweb!
ADDITIONAL NOTE : I realize I could have written this tutorial with much fewer steps. But I was having fun with sticky marshmallows and my new chalkboard backdrop! What to do you think? Do you like it? Want to see more of it in future posts?
I hope you give my creepy, crawly Marshmallow Spiderweb Cake a try! I think even the kiddos would enjoy this tutorial. Just make sure the marshmallow is cool enough for them to handle safely and be prepared to clean up some sticky hands. And faces. And tables. You get the idea!
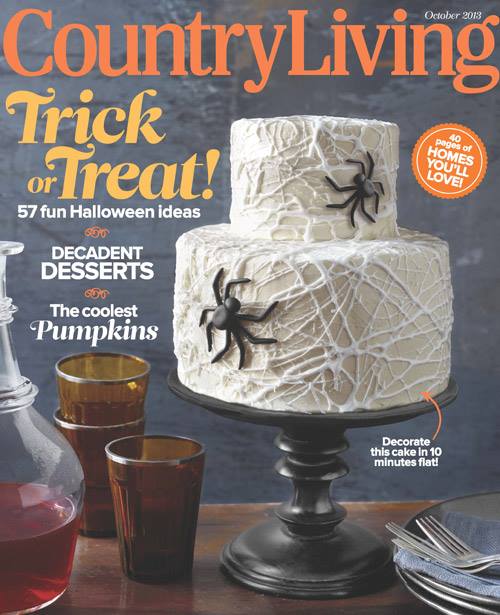
UPDATE: I was tremendously honored to work with Country Living Magazine on their 2013 October issue. As it turns out, they enjoyed playing with melted marshmallows too! I’m honored that my sticky spiderweb concept made the cover!
YOU MAY ALSO ENJOY:
Poison Apple Cake
Black Cat Cake
Monster Eye Cake
Mini Mice Cakes
The Birds Cake

Really love your creepy cake, its easy and awesome !!!
What a brilliant idea, I can’t wait to try this….maybe on top of some chocolate cookies. The cake is lovely as well!
carrie! this is an awesome idea… !!! simple and spooky and modern and artful, too. ^__^
This looks Wonderful Love the marshmallow spider webs. Would they attach to a cake iced in chocolate buttercream? Or even on a plain Chocolate or Angelfood Ring cake? Love the ideas<3 Thanks.
Love the spiderweb concept. Do you think it would work on like hardened chocolate? Would like to do a mimi pumpkin patch with cobwebs. Thanks for the ideas, love your page.
Carrie, LOVE IT!!! And love the chalkboard backdrop. And to answer your questions, YES AND YES!! Yes do use the chalkboard backdrop again. And Yes, please more tutorials. This tutorial was one of the best, excellent pics to show and excellent directions. One can never ever have enough pics and directions, the more, the better the tutorial. THANK YOU!
From one of your devoted followers.
Happy Halloween.
Love it! Thanks for sharing. The chalkboard backdrop really does the trick too!
This is AWESOME!!!! I wish I would have known about this a week ago! I just had a Halloween themed birthday party yesterday…. There is always next year though 🙂
Sooo glad I came across this! My niece’s 3rd birthday party is this Saturday, she wants cupcakes, but this is perfect for the adults cake!! Great idea! Thanks so much for posting it!
LOVE this! Such a great idea…think I’m gonna have to try this one! Thanks for sharing. 🙂
SO, SO COOL. I’ve been having a kind of love affair with marshmallows lately and this looks so good/fun/awesome.
A marshmallow web, love it! Making Halloween cakes this weekend, cant decide what to do there is just so much choice! I think more than one cake will need to be made.
This looks amazing.
Thank you for extra tutorial, love your backdrop 😉
Thank you so much for sharing. I love, love this cake. I can’t wait to get my hands all gooey.
What a great idea, ..design can still be used even if it’s not halloween!! Thank you
Tried this today! Thank you so much for the idea! Pictures posted on my fb page!
https://m.facebook.com/?refsrc=http%3A%2F%2Fwww.facebook.com%2F&_rdr#!/BunnsBakery?__user=1140967612
What a great idea with a really effective finish.
WOW! AMAZING! Thank you for sharing!
Hi Carrie, this is wonderful. Such a great idea to use the marshmallow. The backdrop is perfect for this cake!
LOVE the cake and ADORE the chalkboard backdrop. What a GREAT idea. I am always looking for portable multi-purpose backdrops and this ticks all the boxes. I am wondering about making something like this and on the reverse side covering that in a corkboard….2 for 1 in a portable package
This is great idea for decorating halloween cakes I have only ever used Marshmallow as a complete topping or a biscuit filler. Pinned for next experiment.
Asking if do like it is an understatement am in love so much in love wif that sexy creepy cake of urs Lol
Hi – love this, saw it a while ago and its just come up on my facebook feed again. Can I ask how you made the spider, as I tried making one a while ago and had all sorts of problems with the legs! Thanks.
Soooo this is on the cover of Country Living October 2013 – have you seen it?! It looks JUST like your cake. Did they steal your idea?! I didn’t notice a blogger attached the recipe in the article… you might want to look into that because girl, this is too awesome not to get credit for. Just saying… good luck and keep caking!
Thanks for looking out for me Melissa!
I actually worked with Country Living for the October issue. I’m credited in the print issue and on their website. It’s an honor to have my concept on the front cover!! Still in shock every time I see it.
I bought the magazine because of the cake! It looks great!
Awesome, thanks T.C.!