Easter is just a few days away but there’s still plenty of time for today’s DIY. Who can resist an adorable bunny tail, all fluffy and white? Especially when it’s ridiculously cute like today’s featured tutorial! This little cupcake garden is filled with whimsical fondant bunnies, frilly cabbage and carrots. And dare I say, it’s hoppin’ with fun.
It all comes to us from the fabulous new book, Sweet and Unique Cupcake Toppers by Lynlee Beckett of Lynlee’s Petite Cakes. Lynlee is a talented fondant artist and party stylist, known and loved for her creative cupcake toppers and fondant tutorials. Her work has been popping up in beautiful parties for years, to include some of our favorites here on the blog (like this one and this one). Lynlee can transform just about anything into fondant, crafting pieces of edible art and elevating cupcakes to a whole new level. And lucky for us, we can now learn Lynlee’s techniques in her new book! With over 80 step-by-step tutorials for fabulously fun cupcake toppers, your cupcakes will never be boring again. Lynlee covers all of the basics for working with fondant, from tools and materials to invaluable lessons, learned from her years of experience. Each tutorial is rated for skill and difficulty and is totally customizable, with advice on how to simplify the project, if you’re just getting started or short on time. Just one of many things to love about this thoughtfully written book, sure to become your go-to guide for cupcake toppers.
So let’s take a peek inside the pages…. with Lynlee’s Easter Bunny Garden tutorial!
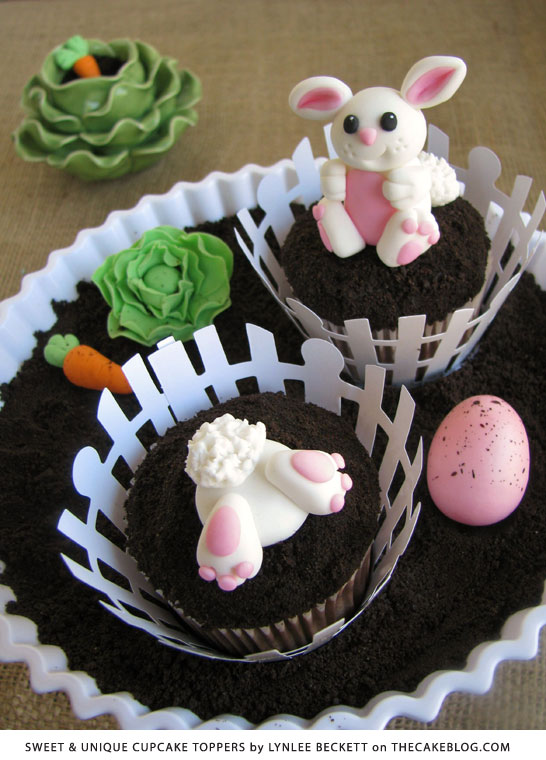
DIY EASTER BUNNY GARDEN
a tutorial from Sweet and Unique Cupcake Toppers by Lynlee Beckett
Materials Needed:
- fondant (white, pink, orange, light green and black)
- raw spaghetti
- Tylose powder
Cutters Needed:
- 1¼-inch round cutter
- round tips #7 and #12
- small circle cutter
- small, medium and large teardrop cutters
- small and medium flower cutters
Tools Needed:
- rolling pin/1/8-inch and 1/16 inch guide rings
- 2 wooden dowels
- knife tool
- modeling tool
- small modeling stick
- food scissors
- small spatula
- medium/large ball tool
- thin foam
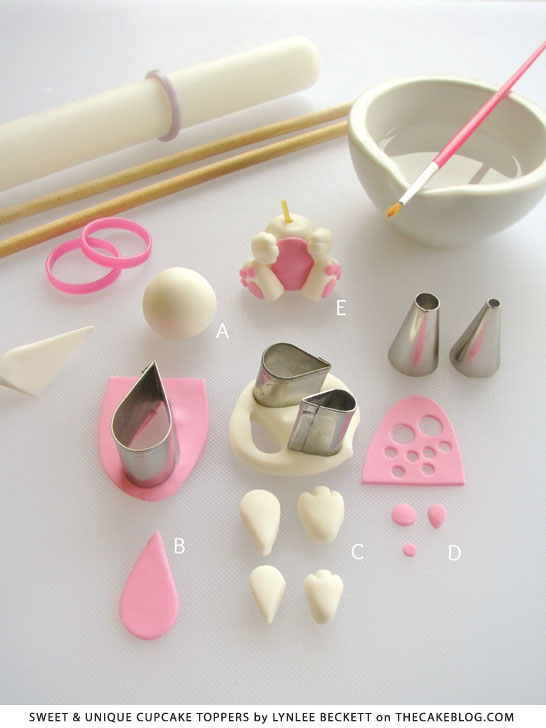
Kneed Tylose powder into white fondant and roll it into a 1-inch ball. Shape it into an oval for the bunny’s body (A). Carefully insert a raw spaghetti through the center by slowly twisting it in, leaving enough protruding to hold the head.
Roll out pink fondant with the rolling pin 1/16-inch thick and cut out a large teardrop cutter. Glue it to the front of the bunny’s body, tucking the pointed side underneath (B).
Roll out white fondant thick with the rolling pin and wooden dowels. Cut out 2 medium teardrop shapes and 2 small teardrop shapes with the respective cutters. Round out the sides of the shapes and use the knife tool to make 2 indentations on the wide end of each to form the hands and feet (C). Shape the feet in front of the body slanted outward and the hands around the top.
Roll out pink fondant with the rolling pin 1/16-inch thick. Cut out two circles with round tip #12 and shape them into a teardrop shape. Glue them to the narrow end of the bunny feet. Cut out an additional 6 circles with round tip #7 and glue 3 on each feet at the toes (D). Glue the hands and feet to the bunny’s body (E).
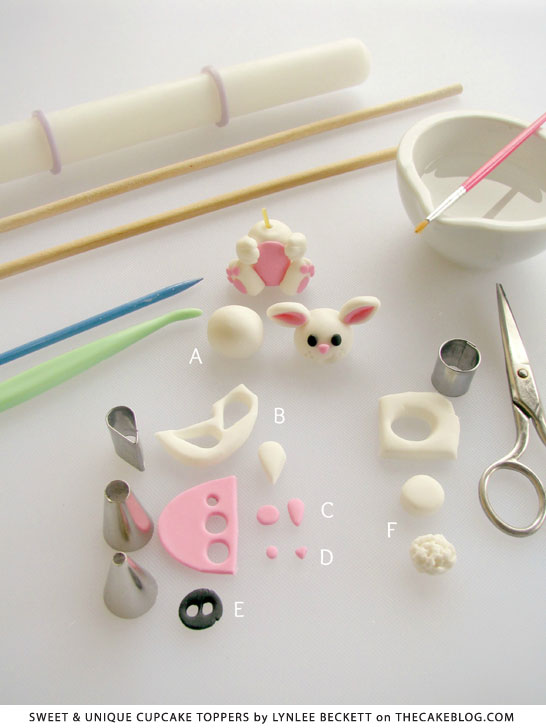
Roll white fondant into a ball (approximately 2/3-inch) for the bunny’s head. Fit it over the raw spaghetti protruding from the body to ensure it fits prior to drying. Use round tip #12 to indent a smile on the bunny’s face and the small modeling stick to make whisker dots (A).
Roll out white fondant thick with the rolling pin and wooden dowels and cut out 2 teardrop shapes with the small cutter to form the bunny ears. Use the modeling tool to indent the center of the ears (B).
Roll out pink fondant with the rolling pin ⅛-inch thick and cut out 2 circles with round tip #12. Shape them into teardrops and glue them to the center of the white ears. Use the modeling tool to indent the center again and insert two small raw spaghetti pieces to the bottom of the ears by slowly twisting them inside. Gently fold the two sides of the ears inward and insert them into the bunny’s head (C). Use tools and/or cutters to prop the ears up to allow them to dry in place.
Cut out a circle out of the pink fondant with round tip #7 and shape it into a rounded triangle to shape the bunny’s nose. Glue it to the center of the bunny’s face (D).
Roll out black fondant with the rolling pin ⅛-inch thick and cut out two circles with round tip #7. Shape them into ovals and glue them to the bunny’s face (E).
Roll out white fondant thick with the rolling pin and wooden dowels and use the small round cutter to punch out a circle. Use the food scissors make cuts around the entire circle and on its sides to shape the bunny tail. Glue the tail to the back of the bunny (F).
When the ears are sufficiently dry, glue the head to the body.
To make a bunny bottom, roll out white fondant thick with the rolling pin and wooden dowels and punch out a 1¼-inch circle. Round out the sides to form the bottom. Follow the steps above to make the bunny feet and tail and glue them onto the bottom.
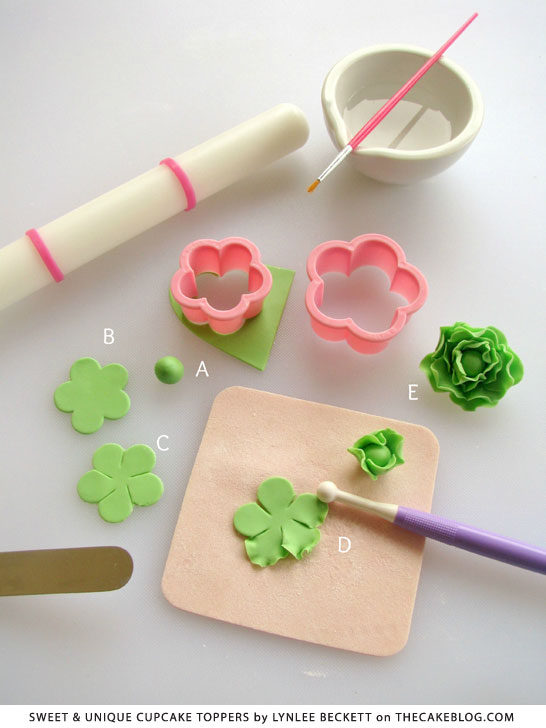
To create the lettuce, roll light green fondant into a ball (approximately ½-inch) and set it aside to dry (A).
Roll out more green fondant with the rolling pin 1/16-inch and cut out 3 small and 3 large flowers with the cutters (B). Use the small spatula to make small slices where each petal connects to make them longer (C).
Spread a bit of powdered sugar on the thin foam and place the flower on it. Pick up one petal with your fingers on one hand and with the other, thin out the edges by slowly turning the ball tool around the petal. Do the same for all the petals, which should look ruffly. Repeat this step with the rest of the flower shapes (D).
Once all flowers are ruffled, take one of the small flowers, spread glue over the center and insert the ball in the center. Fold up the petals, one at a time and repeat with the remaining small flowers first, then large flowers. Use a modeling tool to spread out any of the ruffled edges as needed (E). Allow to dry thoroughly.

Excerpted from Sweet and Unique Cupcake Toppers, by Lynlee Beckett. Copyright © 2014 by Lynlee Beckett. Published by Cedar Fort, Inc. Used by permission of the publisher and author. All rights reserved.
RESOURCE LINKS
Book : Sweet and Unique Cupcake Toppers
Author : Lynlee Beckett of Lynlee’s Petite Cakes

