Valentine’s Day is quickly approaching, and I think we can all agree… chocolate reigns supreme when it comes to Valentine’s sweets. So I have a chocolatey cupcake created just for you. In a few easy steps, your cupcakes will be all dressed up and ready for Cupid’s holiday. What better way to give hugs and kisses than these Chocolate Kiss Cupcakes!
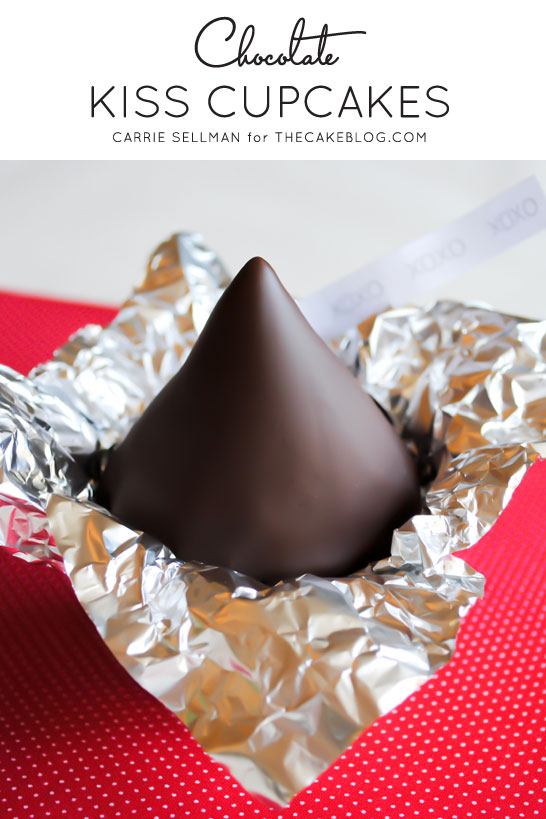
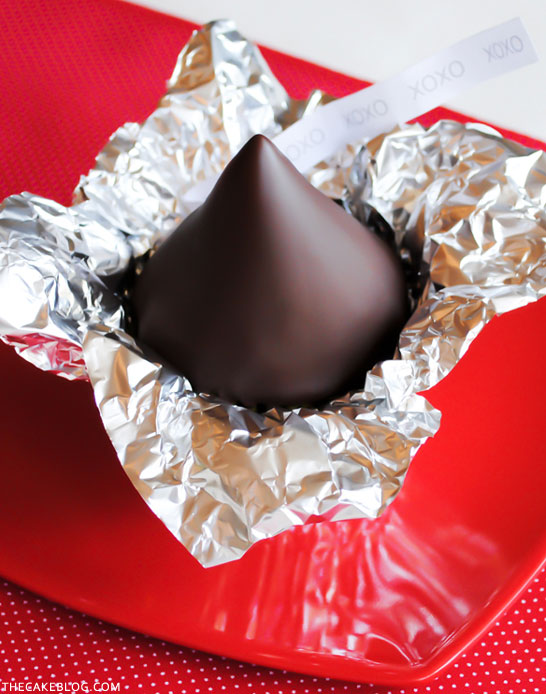
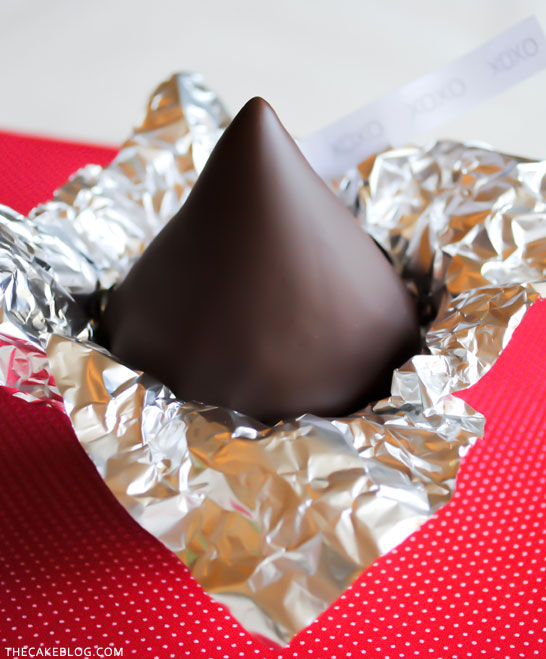
Inspired by those bite-sized candies we all know and love…. little drops of milk chocolate, twirled up in a tiny foil wrapper. Only these cupcakes aren’t so tiny. These cuties are actually full-sized cupcakes, in disguise!
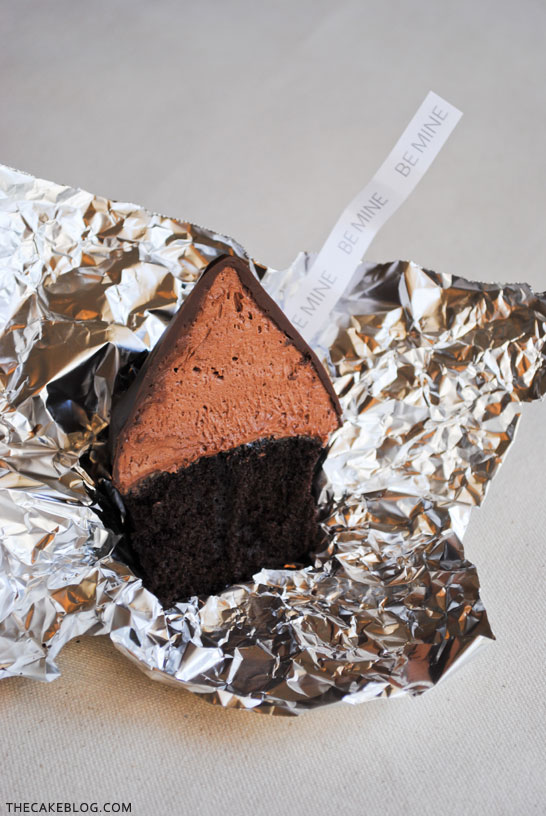
I’ve been wanting to experiment with Martha’s High-Hat Cupcake Recipe for a while now and thought this was the perfect opportunity. I followed the same basic concept. Swirl the icing up high and then dip it into a chocolate coating. Only, I went for a smooth dollop of icing, similar in shape to the chocolate candy. An inside shot might make this more clear…
Fun right? Wrapped in a square of tin foil and finished with a paper flag, these chocolate cupcakes would perfect for a Valentine’s Party or a chocolate dessert table. Or make a batch for your family and share some chocolatey cupcake-love for Valentine’s Day dessert.
Chocolate Kiss Cupcakes
a DIY by Carrie Sellman
Supplies:
- Chocolate Cupcakes, baked without liners or liners removed
- Chocolate Buttercream Frosting
- Chocolate Coating (recipe below)
- Pastry Bag, fitted with a large round tip
- Tin Foil, cut into 8 x 8 inch squares
- Paper Flags (free printable here)
For the Chocolate Coating:
Melt 24 oz of chocolate chips with 6 tablespoons of vegetable oil, in microwave for 30 seconds. Stir. Microwave for another 30 seconds. Repeat until completely melted and smooth. Pour into a deep bowl or cup. Cool slightly before dipping cupcakes.
To Assemble:
STEP 1 : Using a pastry bag fitted with a large round tip, pipe chocolate buttercream into a large mound on cupcake.
STEP 2 : If needed, use an offset spatula or knife to gently smooth out any ridges in your icing, moving from bottom to top to keep the nice dollop shape.
STEP 3 : Put cupcakes into freezer for 15 minutes while preparing chocolate coating.
STEP 4 : Hold cupcake upside down by its bottom and dip into chocolate coating, until all of the icing is covered. Hold upside down to allow excess chocolate to drip off. Turn upright and allow to chocolate to set. {approx 15 mins)
STEP 5 : Wrap bottom half of cupcake in tin foil square. Crinkle and smush tin foil to make it look like an unfolded wrapper.
STEP 6 : Refrigerate cupcakes until ready to eat.
STEP 7 : Add paper flags when ready to serve. Slightly fold paper flag back and forth to give it a rippled shape. Tuck into back side of foil wrapper, so that it stands upright behind cupcake.
TIP: Keep refrigerated until ready to serve.
I think these would be adorable as mini cupcakes as well! Sending you chocolatey love and sweet thoughts this Valentine’s Days. Enjoy!


Totally inspired Carrie! LOVE these!!
Absolutely the cutest cupcake ever.
Thank you so much for sharing this and I can’t wait to make them!
These look wonderful. How many does it make?
I was just wondering what chocolate you used for the chocolate coating. It looks so smooth. Great Job! Thank you, Crystal
So cute! Can’t wait to give these a shot!
How do I get the recipe to print all Igot were the advertisments. Where was the
choc mouse recipe? Pl e mail me This came to me from someone else.
This has got to be the best cupcake idea . Ever!
This is a great idea. Do you think I can swith chocolate buttercream with chocolate mousse?
So I made these and I don’t know how you got your frosting so smooth but it was a little difficult. They still came out looking nice but not as nice as yours 🙂
These cupcakes are SO cute! I love high-hat cupcakes so I can’t wait to give these a try. Thanks for sharing 🙂
Hi I am Filipina…. Thank you for this free tutorial… im so inspired and i love it…
Hi! I’m a Filipina.. thank you for this free tutorial.. i super love and like it..
I saw these cupcakes today and thought i would give them a go at weekend thanks for the free tutorials iv never been on your site before but will definately go on it again thanks Lorraine
I have no clue what I did wrong, but I didn’t even finish my attempt; I just iced the cupcakes normally and took them to the party after a full hour of trying. I couldn’t get the icing smoothed into a nice peak at all–my peaks were short and lopsided and bumpy. Some photographs of the smoothing process would be very helpful. Maybe my icing was too soft? Does it not need to be perfectly flat?
This is really a good idea and very innovative too.thanks for sharing your idea with us…looking forward for more..
What a cute idea!
Excelente e impecable presentación!!! Felicitaciones y muchas gracias por sus valiosos aportes.
Carlos V.