Decorating a cake is sort of like solving a puzzle. There are numerous pieces that have to come together, just so, for everything to align beautifully. The process itself can be exciting, challenging and even a little exasperating at times. But when the last piece is finally placed, you can step back and smile at what you’ve accomplished. So today we’re taking a look at some of the basic fundamentals of a gorgeous cake. These building blocks apply to cakes of all shapes and sizes and will help you create beautiful cakes, each and every time you bake.
It all comes to us from the new book, Great Cake Decorating, written by our very own contributor, Erin Gardner of Wild Orchid Baking Co. Erin has been wowing us with her stylish designs and teaching us her techniques for several years now. So needless to say, we are thrilled to see her new book out in stores for all to enjoy! Filled with hundreds of creative ideas, tips, and techniques, Erin’s book has something for everyone. Beginners will find what they need to get started with recipes, tools of the trade, and the basics thoroughly explained and paired with gorgeous images by Mark Davidson Photography. More advanced decorators will find inspiration and step-by-step tutorials to create countless designs including some of Erin’s most popular cakes here on the blog, like her Rainbow Hearts Cake and her Stars and Stripes Cake originally create for our 4th of July cake series back in 2012. If you ever wondered how Erin created that beautifully swagged bunting, now you can learn how. Within the pages of Great Cake Decorating, Erin is helping us solve the cake decorating puzzle. And today, we’re excited to share a little peek inside this new book!
So let’s get to the tutorial. We’re learning how to level, split and fill a cake like a pro!

Erin Gardner, author of Great Cake Decorating, tells us about today’s tutorial:
“The best decorating idea in the world will be lost on your guests if they are distracted by a cake that is lopsided, lumpy, or bulging at the sides. Take time to build a great cake base, and decorating will be so much easier. For simplicity’s sake, the cakes shown are baked in round pans, but the level-and-split method words for any cake shape.”
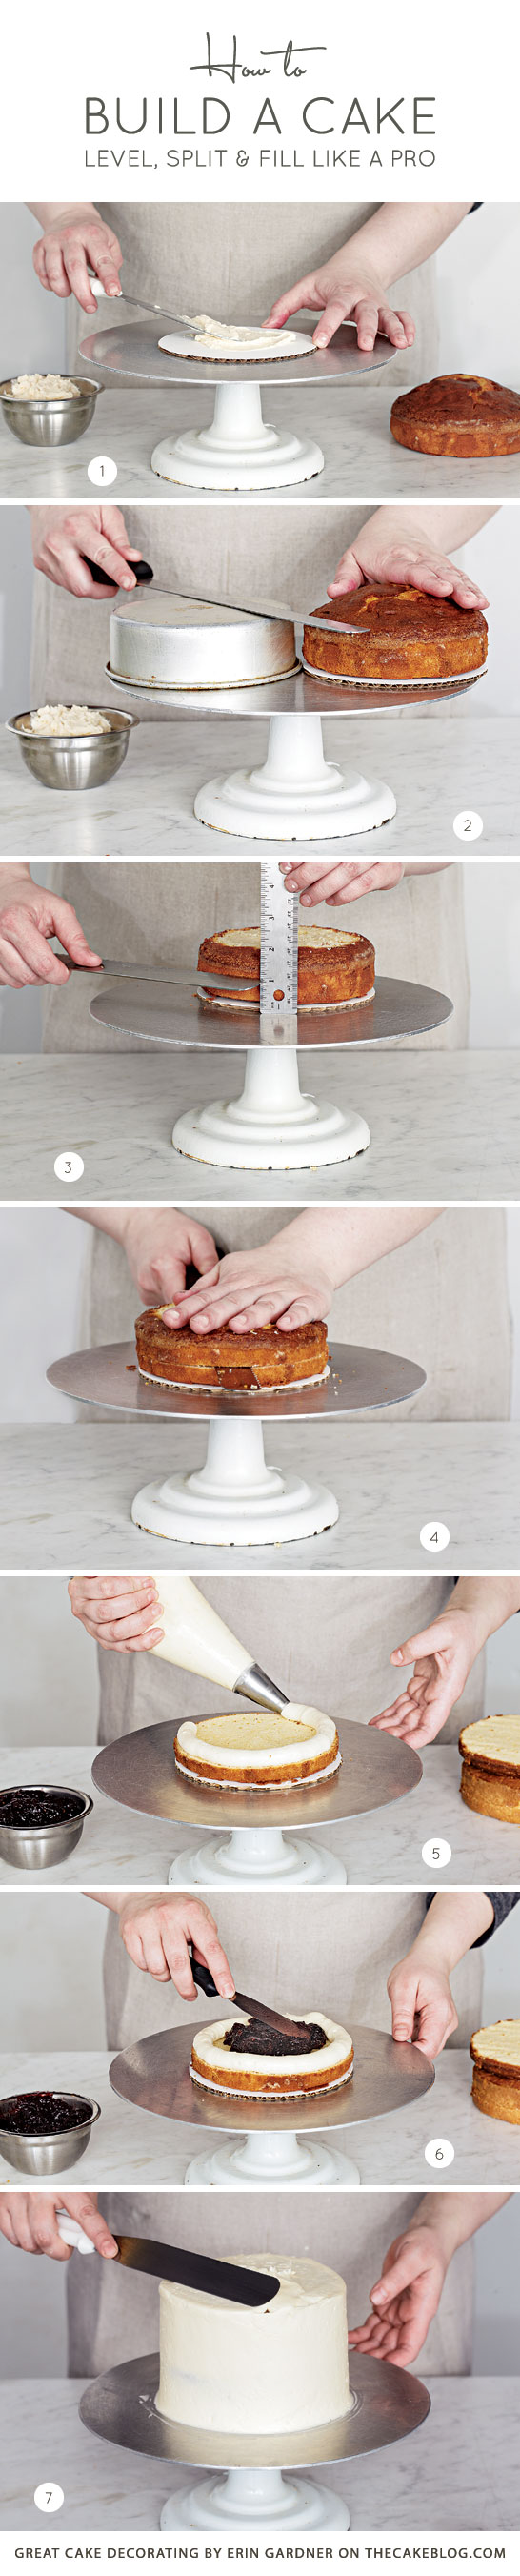
HOW TO BUILD A CAKE
a tutorial from Great Cake Decorating, by Erin Gardner
Splitting The Cake
Once the cake has cooled all the way through, you will need to level its domed top.
STEP 1 : Apply a small smear of buttercream (about the size of a half dollar for a regular-sized cake, more for larger cakes) to a cake board that’s the same diameter as the cake round. This ensures that the cake will stick when placed on the board.
STEP 2 : Place the cake on the board. Turn the pan that the cake was baked in upside down, and place it near the baked cake. Use the pan as your guide and run a serrated knife across the top of the cake to cut it level.
STEP 3 : Once the cake is leveled, use a metal ruler to find the center point around the outside of the cake, and mark it by lightly scoring the cake with a knife. Set the ruler aside.
STEP 4 : With the knife in one hand and your other hand flat on top of the cake to keep it steady, use a smooth sawing motion to slowly cut around the cake from the outside edges toward the center until the knife is all the way through.
Filling The Cake
No matter how many layers your cake will be, you always want the filling layers to be about half as high as your cake layers. I typically do four layers of cake with three layers of filling to achieve tall, beautiful slices. Take time to fill and chill the cake properly in order to avoid what I call the cake “muffin top.” That’s when the layers of filling haven’t been done properly or the filling is too soft for the weight of the cake, causing the cake to get those unsightly little bulges between each layer.
If you’re filling the cake with a buttercream frosting only, spread or pipe the buttercream (using a large round decorating tip size #789 or similar) on top of the first cake layer and stop 1/4 inch away from the edge.
When you place the next round of cake on top, press down starting from the center and moving out towards the edges – this forces the buttercream to fill in the space without going over the edge. Repeat with each cake layer until all the layers have been stacked. Use the level to check that the top and sides of your cake are straight.
How To Use a Softer Filling
STEP 5 : If adding a softer filling like jam or cream cheese frosting, pipe a dam around the top outer edge of the cake round with a firm-setting buttercream.
STEP 6: Fill the center with the filling, and top it with the next cake round. Place the cake in the fridge, and allow it to set completely, at least 2 hours but up to overnight, before finishing.
STEP 7: Frost as desired.
TIP : Save That Cake Top!
If you don’t immediately give in to the temptation of snacking on the little domed piece of cake you just cut off, you can use it to create “sand” or “dirt” for your next cake design. Learn how with this step-by-step tutorial!

Excerpted from Great Cake Decorating, by Erin Gardner. Copyright © 2014 by Erin Gardner. Published by The Tauton Press. Used by permission of the publisher and author. All rights reserved. Photography © 2014 by Mark Davidson.
RESOURCE LINKS
Book : Great Cake Decorating
Author : Erin Gardner of Wild Orchid Baking Co.
Learn More : Erin Gardner’s Cake Class online at Craftsy