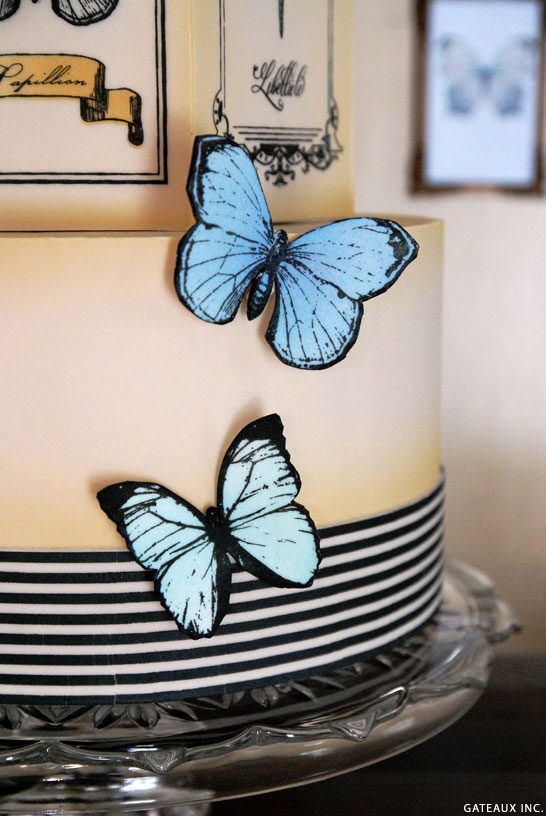
Today is the second half of a fabulous tutorial we brought to you a few weeks ago. Remember this gorgeous Vintage Butterfly Cake, with its amazing 3-d butterflies, in shades of pale blue and black, fluttering about? And its antiqued ecru-colored fondant, accented with black and white striped ribbons? We were beyond thrilled to learn how to make these incredible butterflies, in just a few easy steps, with the help of a custom mesh stencil. If you missed this tutorial post, by Robin Martin of Gateaux Inc., you should definitely hop back and check it out now…
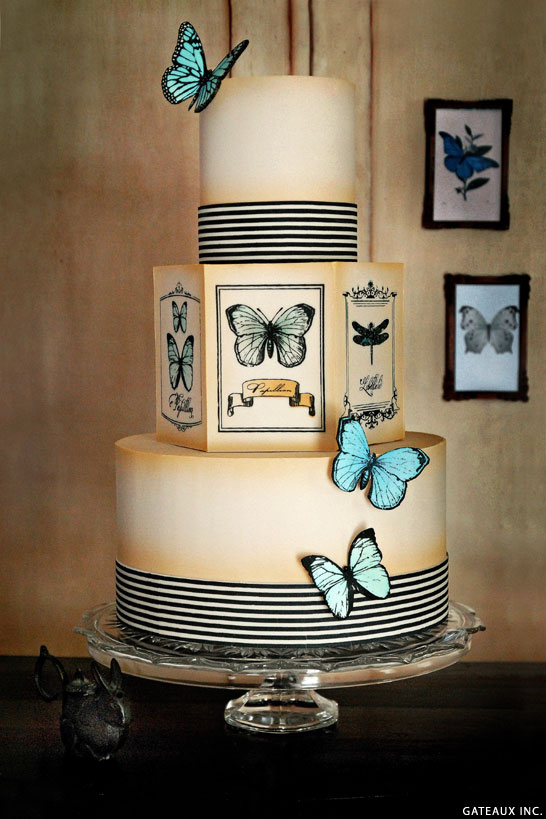
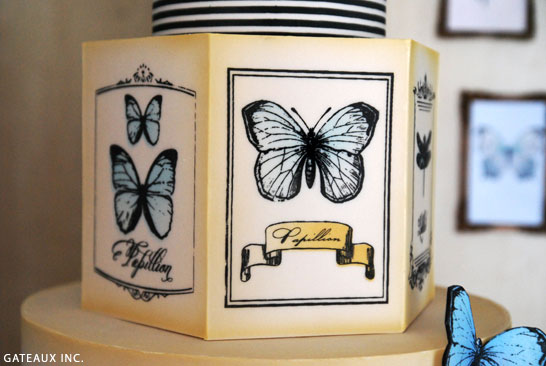
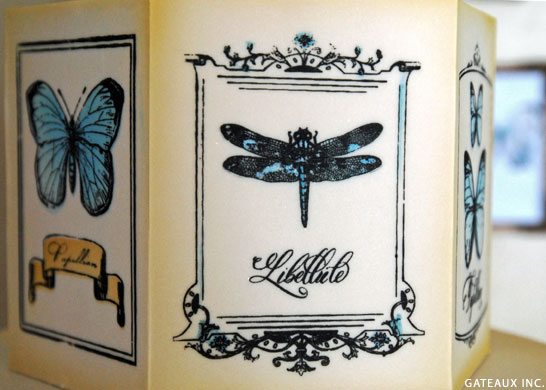
Now we can move on to part two of this Vintage Butterfly Cake Tutorial. Today we’re learning how to create the fabulous fondant appliques seen on the middle hexagon tier. These beautifully detailed panels resemble the pages of an old Entomology book, filled with inticate drawings of insects, paired with their Latin names. And while they may look time-intensive, they could not be simpler to create. Robin Martin of Gateaux Inc. is back again to show us how it’s done! It all comes to life with the help of her very own line of custom mesh stencils.
Let’s take a few close up looks and then get right to the learning!

FONDANT BUTTERFLY PANEL
a Cake Tutorial by Robin Martin of Gateaux Inc.
Supplies:
- Fondant
- Petal dust or airbrush color of choice
- Framed Butterfly Mesh Stencil Set
- Black royal icing – thinned
- Bowl scraper
- Craft knife
- Plastic wrap
STEP 1 : Cut a piece of fondant that is 1” taller and wider than the estimated size of the side panels on your crumb coated hexagon tier. Center the Masking Stencil on this fondant panel.
STEP 2 : Cover the exposed edges of the fondant with plastic wrap to prevent overspray.
STEP 3 : Using an airbrush or a puffy brush with petal dust color, tint the openings in the mask.
STEP 4 : Use masking tape to extend the edges of the Mesh Stencil
STEP 5 : Align the Mesh Stencil with the colored butterfly and banner. Hold the Mesh Stencil firmly to prevent movement, and spread thinned Royal Icing over the stencil.
STEP 6 : Spread the Royal Icing over the entire area of the stencil being careful not to move the stencil.
STEP 7 : Use a bowl scraper to remove all excess Royal Icing.
STEP 8 : Immediately remove the Mesh Stencil. Allow the panel to dry completely.
STEP 9 : Once all panels are stenciled and dry, frost the cake in buttercream or ganache. Trim each panel to the exact size of each side of the cake and attach with a thin layer of buttercream.
A special thank you to Robin Martin of Gateaux Inc for teaching us something new today and inspiring us to get stenciling. Make sure you hop back to this post to learn how to make the easy peasy stenciled butterflies. You can find Robin’s step-by-step tutorial tutorial here, along with a short video clip of the stencil in action!
VENDORS & CREDITS
Cake : Gateaux Inc.
Framed Butterfly Mesh Stencil Set : Evil Cake Genius


Wow, that is beautiful! (And looks like so much fun!)
well that just blew my mind. i never thought to “screenprint” fondant like this! and it’s much easier than I could ever have imagined it to be. Great tutorial, thanks!
WOW ! its amazing and graceful butterfly cake. Looking for good!
Unbelievable, I used to ice cakes and seeing this cake makes me want to start up again, sheer elegance