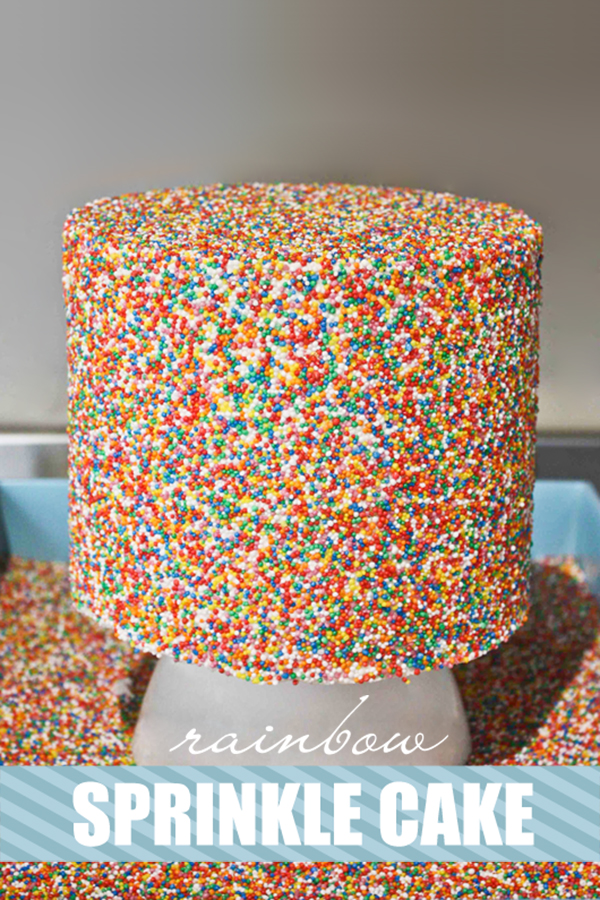
Oh how I love sprinkle cakes! These whimsical cakes are the ultimate treat for the ultimate sprinkle lover! And I’m pretty positive you’re smitten with them too. So I must warn you that today’s post might induce some squealing! Kate Wagner of The Greedy Baker is sharing a fabulous sprinkle cake tutorial! YES! Step by step instructions and photos to help you create your very own sprinkle cake. Kate’s method is super easy and most importantly nice and clean. Packed with great tips and tricks to save you time and heartache… and spilled sprinkle mayhem! The end result is one spectacular sprinkle cake! It’s a DIY Rainbow Sprinkle Cake Tutorial!!

SPRINKLE CAKE TUTORIAL
by Kate Wagner
Supplies:
8″ Round Layer Cake
Buttercream Icing
Rainbow Sprinkles (roughly 2 pounds or 1 kg)
Turntable
Angled Spatula
2 Cardboard Cake Circles (1″ smaller than cake size)
Cake Lifter
Large Shallow Tray
Small Bowl
Spoon
STEP 1: Stack and fill cake layers, building your cake on one of the cardboard circles.
STEP 2: Frost the sides of the cake with a reasonably thick layer of icing. Bring the icing over the top edge into the center of the cake and remove excess. We are not looking to frost the top of the cake at this stage.
STEP 3: Using the cake lifter, lift the cake off the turntable and chill in the freezer for 15 minutes.
STEP 4: While waiting for the cake to chill, pour the rainbow sprinkles into a large shallow tray.
STEP 5: Remove the cake from the freezer and place the other cardboard circle on top of the cake.
STEP 6: Using the cake lifter, lift the cake and gently lay on its side in the tray sprinkles. Supporting the cake with your hands on either side, roll until you have an even layer of sprinkles adhered to the buttercream.
STEP 7: Place the cake back on the turntable.
STEP 8: Spoon a generous amount of buttercream on top of the cake.
STEP 9: Smooth evenly with the angled spatula, removing any excess. Chill in the freezer for 5 minutes.
STEP 10: Place a small bowl upside-down in the center of the sprinkle tray.
STEP 11: Remove cake from freezer and place on top of the bowl, being careful to balance the cake correctly.
STEP 12: Spoon a large amount of sprinkles on top of the cake and smooth around to edges using the angled spatula, pressing gently as you go to make sure they adhere to the buttercream.
STEP 13: Neaten up any missed areas around the edge using the spoon and spatula as shown.
STEP 14: Admire your finished cake! This fun cake is sure to brighten up any day.
VENDORS & CREDITS
Tutorial : The Greedy Baker
YOU MAY ALSO ENJOY
Chocolate Funfetti Cake
Rainbow Petal Cake
Today Is Your Day Cake
Sprinkle NYE Cake
Banana Split Cake


Do you have a good buttercream frosting recipe that you used for this cake?
I first saw the 100’s and 1000’s cake on pinterest though never knew how to get them to look so neat. You step by step photos and explanations is awesome! I will have to give it a go!
How do you make the colourful rainbow cake on the inside??? Please send my the recipe !!!
When you turn the cake layers sideways to roll them in the sprinkles, don’t the layers slip slide around?
Thank you for this great tutorial! I am using your post as inspiration for my daughter’s birthday cake next week. I hope my cake turns out as beautiful as yours.
This I asking to become a Pinterest fail project. But seriously, looks amazing!
So I made this for a friends daughter’s sweet sixteen very time consuming but fun. Just an fyi to any that attempt this do not use whipped cream frosting as the cake will fall apart when you try to roll it through the sprinkles. Birthday girl loved it though.
Hi there, could this be prepared the day before do you think or would the colours of the sprinkles run into the icing?
Looks totally amazing though! LOVE it!
Is there a photo somewhere where we can see what this fantastic rainbow cake looks like after its been cut?
Bonnie Sandler
Cupertino, CA
can we use whip cream instead of butter cream my husband is not to fond of buttercream
How large are the cakes you bake and do you cut each cake in halve
Ex-pastry chef here. Cute way of doing it, but you do risk the layers coming apart during rolling. An easier way of doing this without having to tip the cake at all is ice the entire thing top to bottom, set the cake up like it is on step 11 on an oversized pan, using an old cardboard paper towel tube taped up at one end and snipped at an angle at the other end and full of sprinkles. You use your fingers to control the flow of sprinkles, and you may have to return the fallen sprinkles into the cardboard tube a few times, so just move the cake out of the way and dump the sprinkles back into the tube. Lining the oversized collection pan with a placemat or similar cloth will make that part easy as pie.
You may be my new BFF…wowzers!
love all the cakes glad you shared I really am going to enjoy making these. you are so creative thanks for sharing
Thanks for great cake. I made it now referring to your tutorial and so easy took longer to make the rainbow cake
Thanks
I made this today for my daughter’s birthday and followed your instructions. It turned out perfectly! I impressed a bunch of unimpressible 11 year olds.Thanks so much for the tutorial!
I’m not sure if I commented before or not, but even if I did, I have to say – its still one of the most gorgeous cake I’ve ever seen!
Baking it this weekend! I just was wondering, do you think it will freeze well? I have to bake it and decorate it on thursday to serve it on sunday ( I know you can freeze a frosted cake) but how about a sprinkled cake? Are they going to survive? or do you think they will bleed and mess up the sprinkled look?
I’ve always wanted to try this but I thought it would fall to pieces rolling it. Thanks for the post.
Thanks a million for sharing. I made it for Easter for my (huge) family. Impossible to eat up 🙂
It takes many hours but you are the hero of the day, so it is a good investment. Great helpful description, thanks again 🙂
What are the ingredients and method for your butter cream? Thanks
Can this be made the day before or will the color from the 100s & 1000s bleed on the buttercream?