Love Bug Cupcakes – a Valentine’s Day dessert recipe that your kids will love! Decorate a cupcake with buttercream frosting and hearts following our picture tutorial.
Valentine’s Day is just around the corner and that means it’s time for some lovely new tutorials and inspiration! Today’s DIY is an idea that’s been floating around in the back of my mind for three years now…. just waiting for me to give it a try. Finally, this silly little idea is making it to the blog. Good news is, I think they were worth the wait. Hopefully you agree!
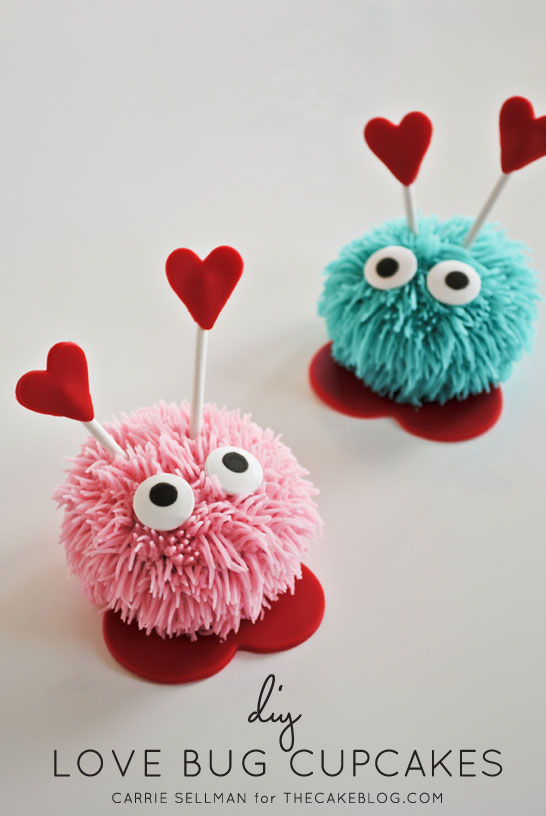
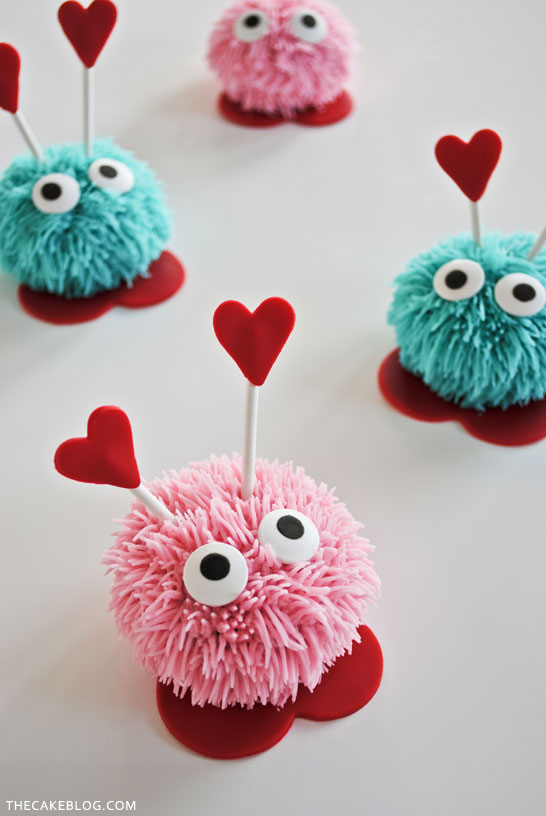
Remember those cute little pom pom art projects you used to make as a kid for Valentine’s day? You know the ones… pom pom bodies, googly eyes and little antenna ears. Well, that childhood favorite is becoming a sweet little cupcake project. Super easy. Super simple. And fun enough to get the kids involved. It’s Love Bug Cupcakes!
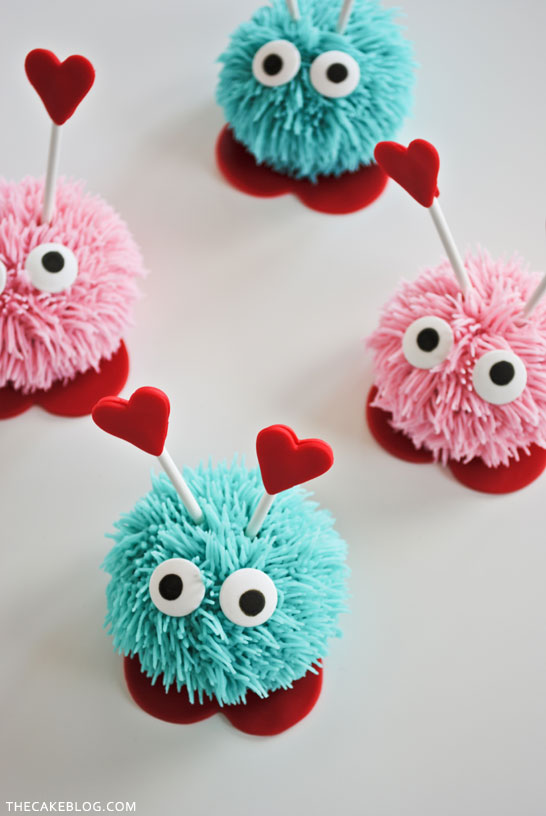
Hold tight because these little furry guys are about to invade the blog…. it’s an attack of the Love Bug Cupcakes! And they’re here to kill you with cuteness.
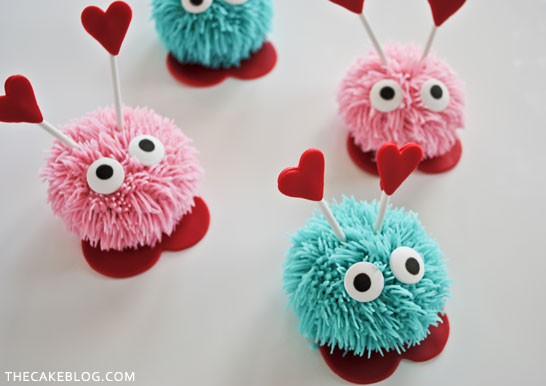
Scurrying this way and that way… these Love Bug Cupcakes are just dying to ask you…
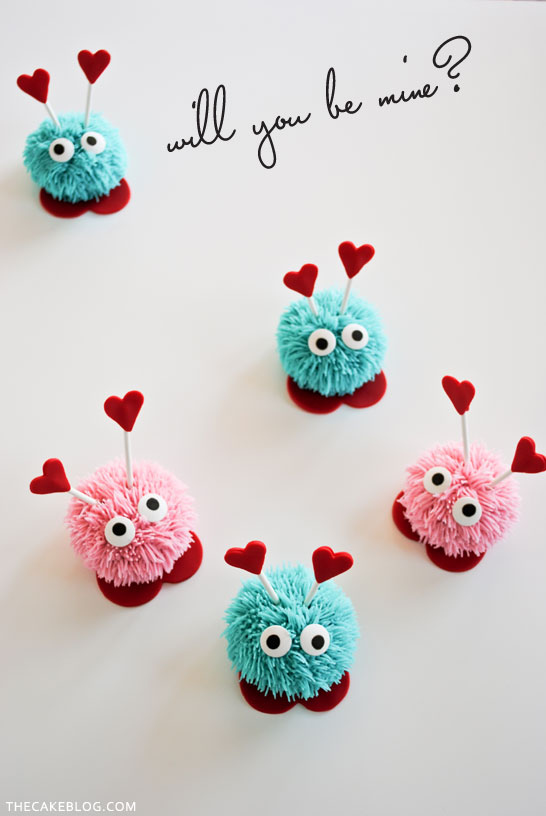
I obviously had way too much fun photographing these cupcakes! But I love their cute little faces and how their eyes can say so much, just by how you position them on the cupcake. Okay, let’s get to the tutorial, shall we?

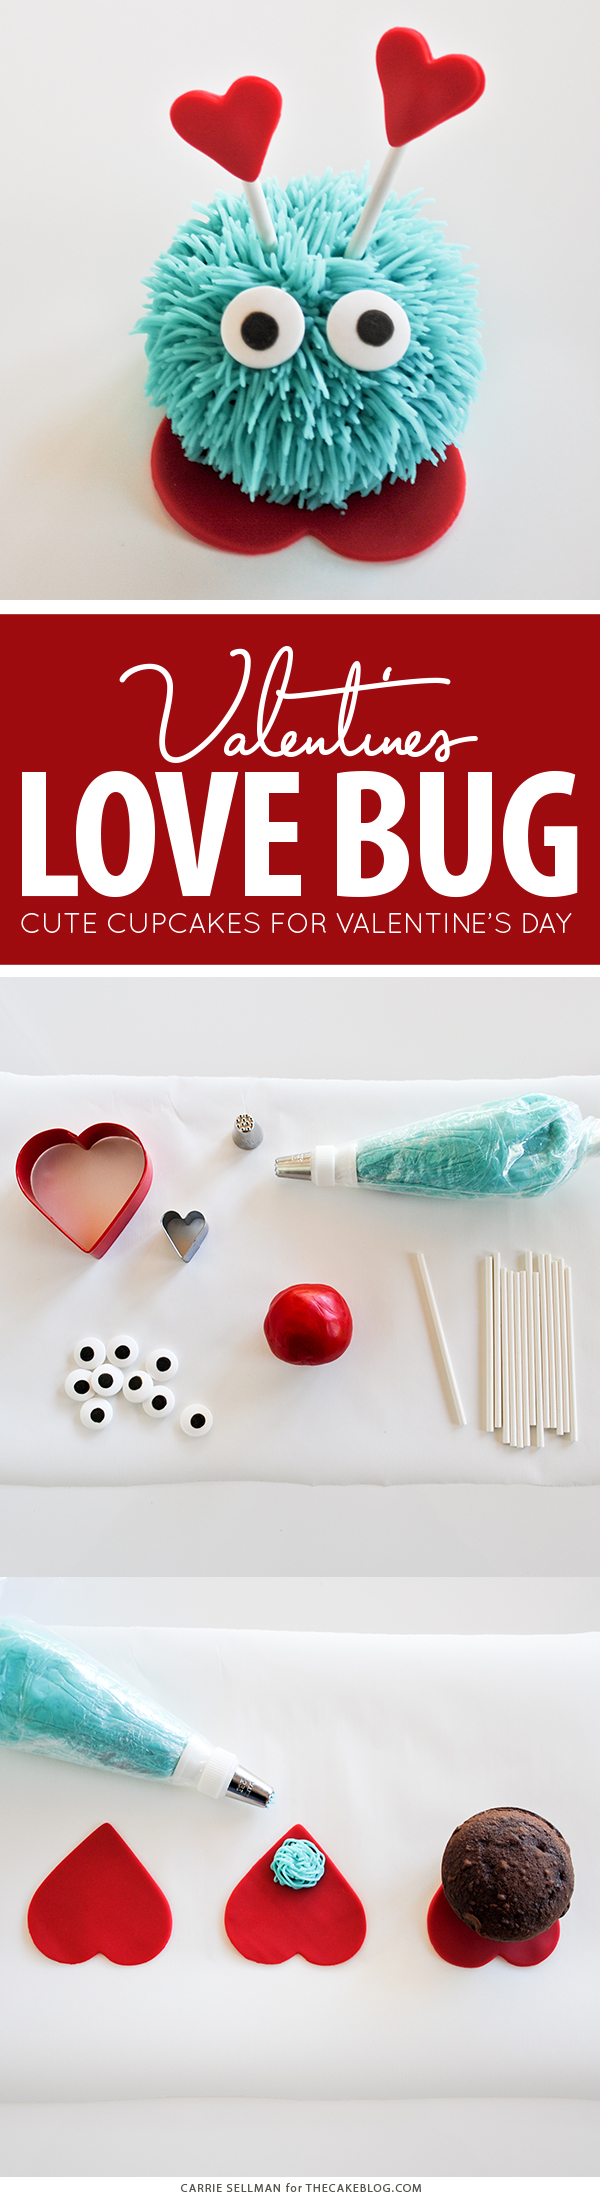
DIY LOVE BUG CUPCAKES
a tutorial by Carrie Sellman
Supplies
cupcakes, baked without wrappers or wrappers removed
buttercream frosting
red fondant
heart shaped cutters, big and small
lollipop sticks
large candy eyeballs
pastry tip #233
STEP 1 : Roll out red fondant and cut out hearts using the large heart cutter.
STEP 2 : Repeat until you have one large heart for each of your cupcakes.
STEP 3 : Roll out more red fondant and cut out hearts using the small heart cutter. Repeat until you have four small hearts for each of your cupcakes.
STEP 4 : Place one small heart, pretty side down onto parchment paper. Place lollipop stick onto heart. Place second heart on top and press down to seal the two hearts together, lollipop stick inside. If fondant is too dry to seal together, lightly wet the inside with a light dab of water.
STEP 5 : Repeat until you have used up all of your small hearts. You should now have two of these sticks for each of your cupcakes. These are the antenna ears.
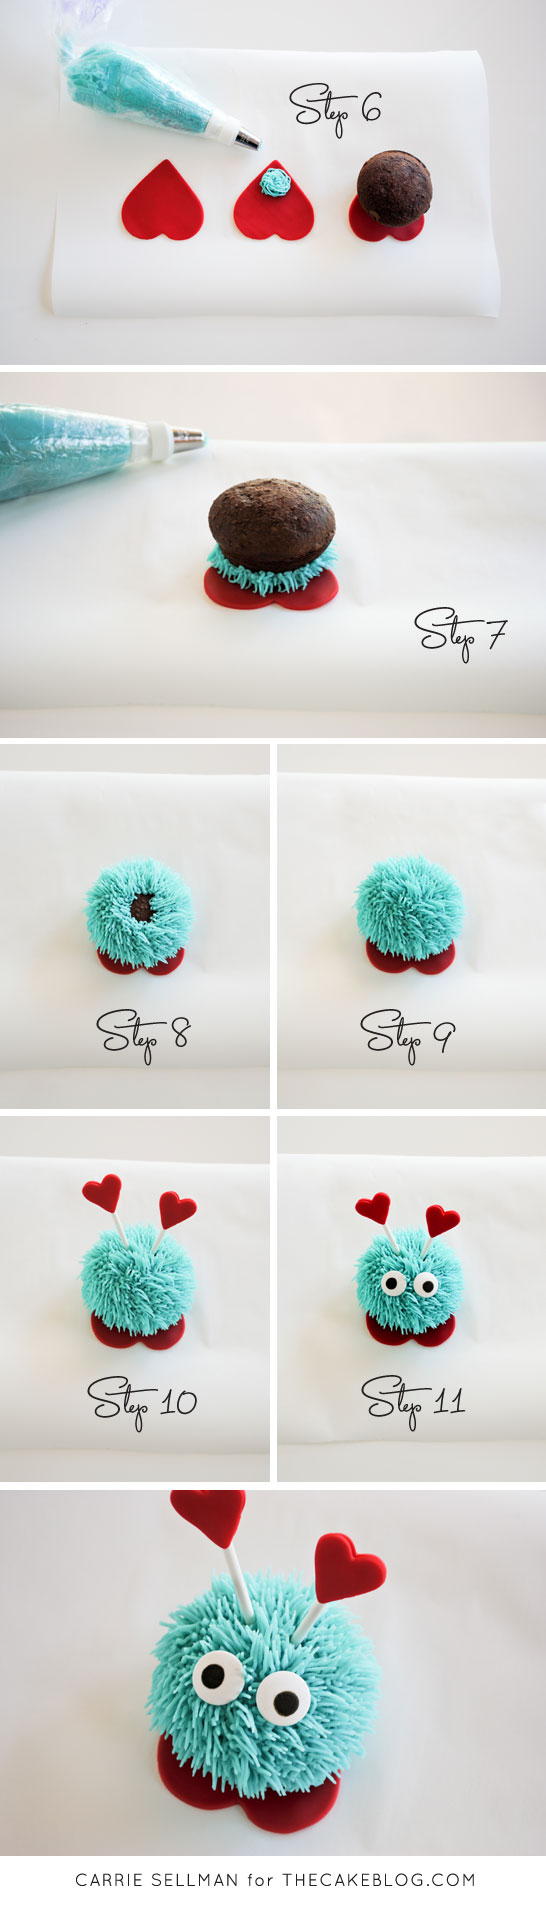
STEP 6 : Place one large heart, pretty side up onto parchment paper. Put a dab of icing onto the pointy end. Place cupcake on top, positioning over the pointy end.
STEP 7 : Fill a pastry bag with buttercream frosting and attach pastry tip #233 (aka, the Grass Tip because you use it to make grass-like decorations). Put the tip up against the cupcake and gently squeeze the bag while pulling straight out and away. Release pressure to finish the strands. Continue making short ‘hairs’ by moving just to the right of your first clump of hair and repeating the same motion to squeeze on more icing. Pipe a complete circle of icing all the way around the base of the cupcake.
NOTE : You may find it easier to gently hold the cupcake in one hand while piping with the other.
STEP 8 : Continue piping to cover the entire cupcake with icing. Circle up the cupcake, row after row.
STEP 9 : You’re almost there! Just a few more squeezes and your Love Bug will be completely covered in yummy icing.
STEP 10 : Insert two ears into top of cupcake.
STEP 11 : Gently push two candy eyes into place on the face area. And now your Love Bug is complete!
YOU MAY ALSO ENJOY:
Red Velvet Cupcakes
Champagne and Raspberry Cupcakes
Pink Ruffle Cupcakes
Chocolate Strawberry Cupcakes
Rose Cake Pops


Thank you for the step by step, super easy to do. Thank you for posting.
Hi Carrie,
These love bug cupcakes are adorable. I’m going to make them for Valentine’s Day! Thank you for sharing your very creative ideas!!
Sincerely,
Christina Reich
simply adorable!
Fantastic idea! Thanks for sharing.
What type of container would you put these in for sharing / gifting since they can’t go in a standard cupcake tray?
You could place the cupcakes in containers that are usually used for cakes.Just attach them to the board with dabs of icing.
Wonderful suggestion Brittany. Thank you!
These are so cute! You solved my problem on what to do for some kids I know. Thanks for sharing.
These cupcakes are adorable to make with my little granddaughter. It’s such a cute project! She’ll love it! Thank you for sharing.
Marvelous … I like the design of the cakes. These are best cakes for Valentines day.
these are just the cutest x
fantastic, will have to try these
Thanks for sharing! Great idea, I’ll try them for Valentines day!
OMG!! I love them- so cute!!! I was going to practice piping flowers this weekend- but I’ going to make these instead 🙂
These are so cute! Would you store them in the fridge or at room temp? Being fondant and buttercream I would think the fondant would go funny In the fridge but buttercream might lose shape/ melt at room temp in humid climate.
I used an American Buttercream recipe (link in post above) and then stored them at room temperature. They held up nicely for several days.
ADORABLE!!!!! Def going to try these… 🙂
Love ur recipes, all r amazing but
really interested in fondant recipe.Kindly post the same
For this recipe, I used pre-made fondant. There’s a link in the supply list above.
If you want to make your own at home, here is a great Marshmallow Fondant recipe HERE!
Aw, going to try these for a friends little girls 4th birthday…
Could any bakers give me some more ideas for the girls birthday, just making little treats like cookies, cupcakes, thanks 🙂
Love them! I have a question about your supplies. I can no longer find those candy eyes anywhere. Wilton’s are awful now, as are the ones from Hobby Lobby. May I ask where you get your eyes??! ☺
I used the Wilton candy eyes. I tried both the small and large eyes and the larger eyes definitely looked better. That’s what is shown in the photos. There’s a link in the supply list above.
so cute my grandkids will love them thanks
Making these today!!! Love your site. Thanks for the great tutorial.
Yummyyyyyyyyyyyyyyyyyyyyyyyyyyyyyyyy
These are absolutely adorable. I’m going to get a mad dash on to make a couple. Thank you for answering the question about transporting them. I too had that question.
Super cute! Will be making these for next week. Thank you for the step by step instructions.
are these from mini cuppys or regular cuppys
Regular sized cupcakes. 🙂
These are fantastic!!! I am so in love with them.
These are the cutest things I’ve ever seen! I just love them.
I went to get a grass tip and all they had at our store was Tip #234. What is the difference? It is a grass tip? maybe bigger or small tip?
Tip #234 and #233 are very similar. The only difference is the strands will be somewhat thicker with #234. They will be thinner and placed closer together with #233.
Either will work!