Welcome to our newest contributor, Tessa Huff, who is here today with her first recipe post…
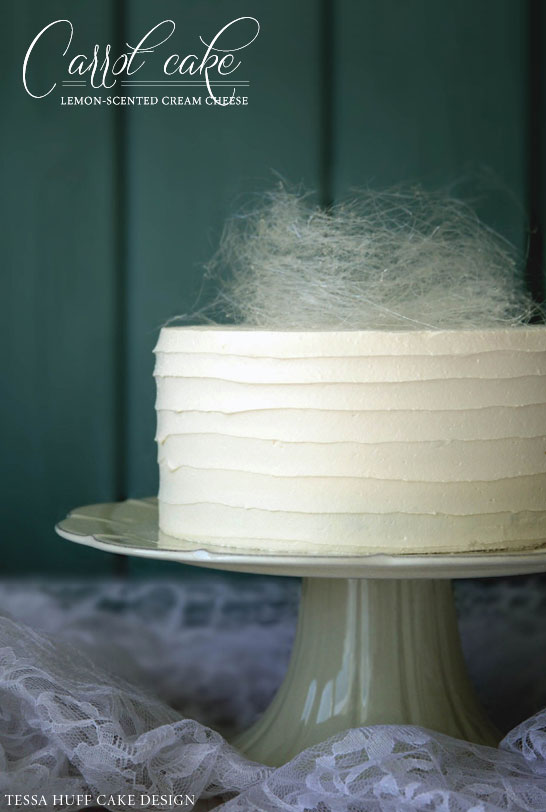
I donʼt know about your neck of the woods, but even up here in the Northwest the sun has given us a sneak peek of the next seasons to come. With Spring quickly on its way, I am slowly making the transition in my kitchen from hearty, comfort foods to light, refreshing flavors. Tessa Lindow Huff here, of Style Sweet CA, and today I am thrilled to share my first of many layer cakes with you: Carrot Cake with Lemon-Scented Cream Cheese Filling.
After spending years as a professional cake decorator, I recently discovered a new passion of flavor pairing. While the sculpted and sky-high wedding cakes I created for my past clients needed stable fillings and structured crumbs to withstand the elements, single-tiered, layer cakes give me more freedom to explore different flavors and textures. I am consistently drawn to seasonal flavors and local ingredients. For this cake, I definitely turned to the upcoming celebration of Easter for inspiration.
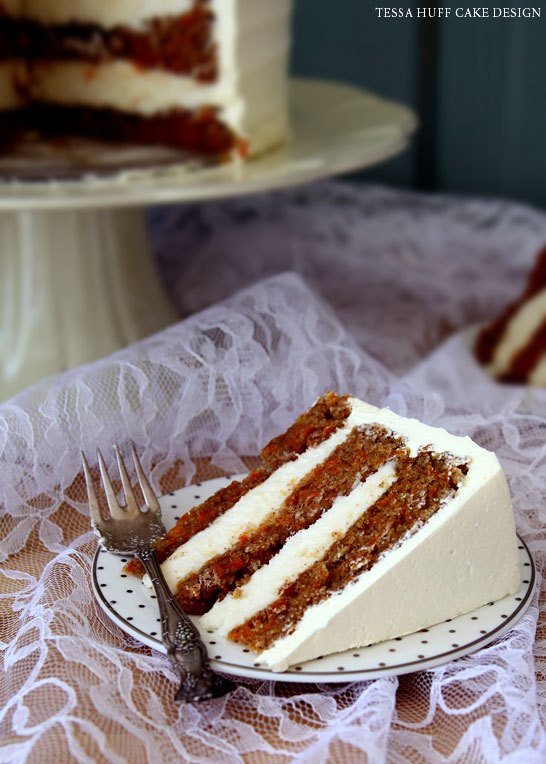
We all have our personal preferences, but I enjoy my carrot cakes straight up. No nuts. No raisins. Occasionally I will stir in some crushed pineapple for a little extra moisture and flavor, but this carrot cake definitely holds its own without any extra flair. The cinnamon and pinch of nutmeg give it a bit of warmth, but definitely feel free to add any of the special ingredients you like to make it your own. I suggest lightly toasting any chopped nuts before adding them into your batter. For this cake, I paired the carrot cake with a lemon-scented cream cheese filling. The lemon gives the flavor an extra punch, while still staying true to the velvety cream cheese frosting that we typically crave when eating carrot cake. Today I decided to frost the cake with a smooth whipped vanilla buttercream, trying not to draw too much attention from our Easter themed cake topper.
This cake was inspired by the celebration of Easter, but it is definitely suitable for any spring brunch, simple gathering, or even a weeknight dessert. Want to impress your guests? Go for the spun-sugar nest topper! Although the idea of boiling sugar and “spinning” it might seem a little daunting, it is not as scary as it seems. Go ahead, give it a whirl! Show off your pastry skills and wow your guests with this simple yet stunning centerpiece.
CARROT CAKE WITH A SPUN SUGAR NEST
a recipe and DIY by Tessa Huff
for the Carrot Cake:
2 cups all purpose flour
2 cups granulated sugar
2 teaspoons baking soda
2 teaspoon baking powder
2 teaspoons cinnamon
3/4 teaspoon salt
pinch nutmeg
4 large eggs
1 cup oil (canola, vegetable, or saffola will do)
3 cups grated carrots
8 ounces crushed pineapple (optional)
1 cup raisins, toasted pecans, or chopped walnuts (optional)
- Pre-heat oven to 350 degrees. Prepare three, 8” round baking pans.
- Sift together dry ingredients and set aside.
- Grate carrots and set aside (or use pre-grated carrots).
- In the bowl of a stand mixer, beat together sugar and oil on medium speed with a paddle attachment.
- With the mixer on medium-low, gradually add in the eggs.
- Carefully mix in the dry ingredients in at least two batches. After mixing, scrape the bottom of the bowl with a rubber spatula.
- Stir in carrots, and other optional ingredients.
- Pour batter into prepared baking pans.
- Bake until the centers of the cake are done, about 20-25 minutes, rotating halfway.
- Remove from oven and cool on a wire rack before inverting.
for the Lemon-Scented Cream Cheese Filling
zest of 1 small/medium lemon, or 1/2 of 1 large lemon
2 tablespoons fresh lemon juice
4 ounces cream cheese
8 ounces unsalted butter, softened
3-3.5 cups confectionerʼs sugar
splash of milk
- In the bowl of a stand mixer, beat softened butter with a paddle attachment on medium speed for 2-3 minutes.
- Add in cream cheese, and continue to beat for another few minutes or until combined.
- With the mixer on low, carefully add in zest, lemon juice, and 3 cups of sugar. Gradually turn the mixer to medium, and beat until smooth and fluffy. Add milk or the remaining sugar until you reach your desired consistency.
for the Whipped Vanilla Buttercream Frosting
1 1/2 cups unsalted butter, softened
3.5- 4 cups confectionerʼs sugar
3 tablespoons whole milk
1 tablespoons pure vanilla extract
- Whip butter using the paddle attachment on an electric mixer on medium speed for 8 minutes.
- Turn the mixer to low speed, and gradually add the remaining ingredients. Slowly increase the speed back up to medium, and beat for another 6 minutes. Continue until nice and creamy!
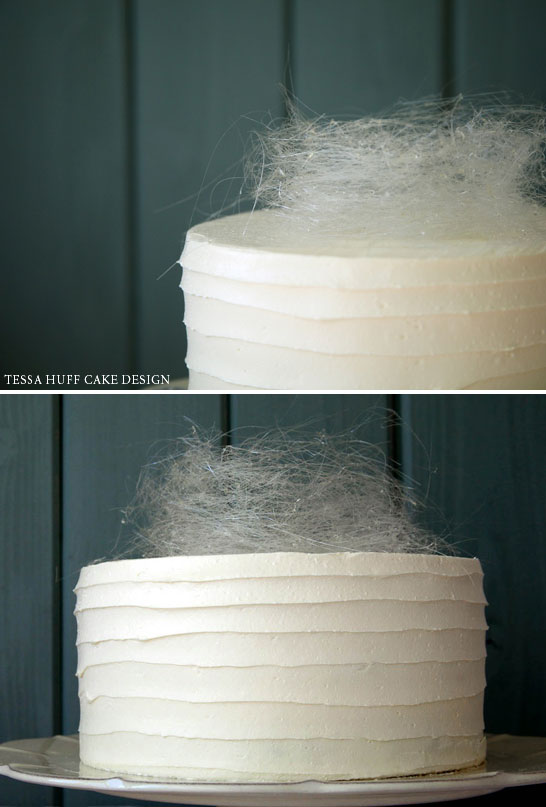
DIY Spun-sugar “Nests”
2 cups granulated or caster sugar
1/2 cup light corn syrup
1/2 cup water
- Place all of the ingredients into a heavy saucepan over high heat.
- Using a candy thermometer, heat sugar mixture until the Hard Crack Stage (about 305 degrees). This could take up to about 15 minutes, but be very careful not to burn your sugar! The last 10-15 degrees will go by rather quickly.
- Meanwhile, prep your workspace. Most spun-sugar instructions will suggest taping a broom handle sticking out from your counter. For a single nest for the home baker, I just used a couple wooden spoon handles anchored across my kitchen sink. This process may get messy, so be sure to clear off your workspace or line it with a dropcloth or parchment paper.
- Once the sugar mixture reaches the appropriate temperature, remove it from the heat. You may want to submerge the bottom of the pan in an ice bath to stop the cooking, or just remove it a few seconds early. Let the sugar stop bubbling before use- just a minute or so.
- Using a wire whisk with the ends cut, or just a couple of large forks, dip the prongs into the sugar and wave them over your spoon or broom handles. You will want to be “waving” at least a foot above, so the sugar will have a chance to create long, stringy pieces. Experiment between using large arm motions to quick flicks of the wrist until strands form.
- Try to work quickly yet methodically. You will want to make sure the sugar does not harden or cool too quickly on you. Be very careful, the sugar is still hot and will be quite painful if it touches the skin.
- For this single nest on an 8” round cake, it only took about 5 minutes or so to create enough sugar strands. Working as you go, very carefully gather your strands and mold them into the shape of a nest. Try not to crush the strands. For this nest, I repeated this process (spun sugar, then gather) about 3 times until I was satisfied with the shape and volume of my nest.
- Soak your pot in water. I get scared almost every time that I have ruined my pot, but the remaining sugar will dissolve away by the end of the day.


LOVE this so much. Thanks for sharing Tessa. Carrot cake is one of my all-time favorite cakes and the spun sugar topping on this one is such a beautiful finish.
So awesome!
This is so beautiful! Looking forward to more posts from you Tessa!
wow this is gorgeous!!!! You inspire me….
Instead of lemon, I typically use white chocolate. But this recipe has got me thinking that maybe I should lighten it up for Easter. Thanks for the inspiration!
Tessa, an absolutely beautiful cake. I’ve already pinned it on my Cake Board and can’t wait to try it out.
Gorgeous cake and beautifully photographed, Tessa
Love the cakes…already miss tasting those sweets back in sac:)
(Probably a stupid question) lol but I have always wondered if cakes needed to be refrigerated after being assembled? Or can they sit in a glass cake stand until finished off?
Not a stupid question at all Ashley! It really depends on the type of frosting and filling used in the cake.
A traditional ‘American Buttercream’ frosting will keep at room temperature for several days. But something like a cream cheese frosting, whipped cream frosting or mousse filling should be refrigerated.
For Tessa’s recipe above, I would refrigerate it due to the cream cheese filling.
If your kitchen is hot or gets a lot of sunlight, then keeping the cake in the fridge is typically the best bet all the way around. Bring it out 20 minutes or so before serving. Cake is best enjoyed at room temp!
omg i made this for easter with the lemon scented icing and it is devine!!!
Silly question but do you need 3 baking tins to make this cake?
This cake looks so good! I am going to make it very soon 🙂
How do you get such a thick filling without it oozing out on the sides? Is there a particular way you fill your cakes?
How far in advance can you make the spun sugar bird’s nest? If creating it for a wedding cake (it will have two little sugarpaste birds inside the nest) I’d like to make it as much ahead of time as possible. Thanks!
HI, I made the cake last night, and had added the pinapple opption, it seemed to make the cake to wet and everything from the filling to the frosting just seemed to be to heavy or something to get the finished look of the cake. It just all colapsed. Help what did I do wrong!!!
Please check the link that is attached to the introductory paragraph of the cake by Tessa Huff. (Carrot Cake with Spun Sugar Nest) Click on the gold colored “Tessa Huff Cake Design” and follow the link. I don’t think you want this to be liked to your professional site. 🙁
Thanks Lura – all fixed now. I appreciate you letting us know.
This is beautiful. I would love to see a video for how to do the spun sugar; it’s really hard for me to visualize this and I’ve never actually seen it done.
So I made this cake and it was delicious !! So my best friend decided to make it again but for my birthday but she said it didn’t rise. She had to remake it and it was great. Tonight I decided to make it again and mine didn’t rise. And I’m so perplexed as to what happened! Any idea on why it’s either hit or miss? Can it be the carrots and their moisture?
HI, I want to make this cake next weekend, but pI don’t understand something. What 1 cup means? I searched on internet and if what I found is right, this means that 3 cups confectionerʼs sugar means almost 700 grams…it seems too much sugar.
I have NEVER seen a carrot cake designed like this. You are doing a great job!
Check out my friend’s carrot cake: https://www.instagram.com/thedessertstudioutah/
Keep up the great work!
Hi I am thinking of making this for my daughters 21st party. I was wondering if i didn’t put the spun sugar on it could I freeze it until the day of the party as we will be on a camping holiday?
Look forward to a speedy reply.
Melanie