• SIGN UP FOR OUR NEWSLETTER ➝
    • Facebook
    • Instagram
    • Pinterest
    • RSS
    • Twitter

The Cake Blog

  • HOME
  • RECIPES
  • TUTORIALS
    • DIY PROJECTS
    • BAKING TIPS
  • HOLIDAYS
    • CHRISTMAS
    • VALENTINE’S DAY
    • ST. PATRICK’S DAY
    • EASTER
    • MOTHER’S DAY
    • GRADUATION
    • FATHER’S DAY
    • FOURTH OF JULY
    • SUMMER FUN
    • FALL
    • HALLOWEEN
  • INSPIRATION
    • CAKES
      • WEDDING CAKES
      • BIRTHDAY CAKES
      • BABY SHOWER CAKES
    • BAKERY TOURS
    • BIRTHDAY PARTIES
    • BABY SHOWERS
    • BRIDAL SHOWERS
    • REAL WEDDINGS
    • DESSERT TABLES
  • ABOUT
    • MEET THE EDITOR
    • MEET THE CONTRIBUTORS
    • CONTACT

Creepy Mice Cakes

October 5, 2015 by Cakegirls

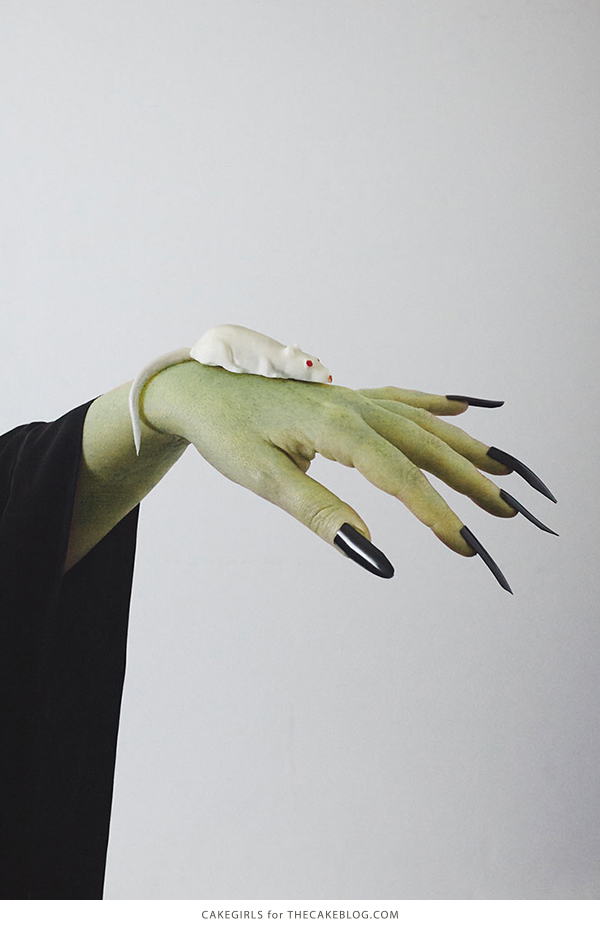
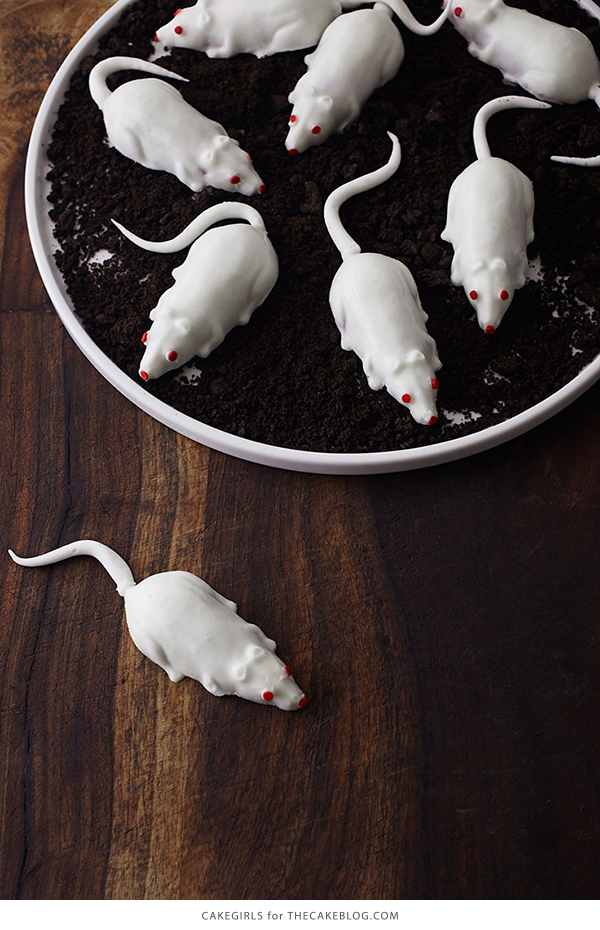
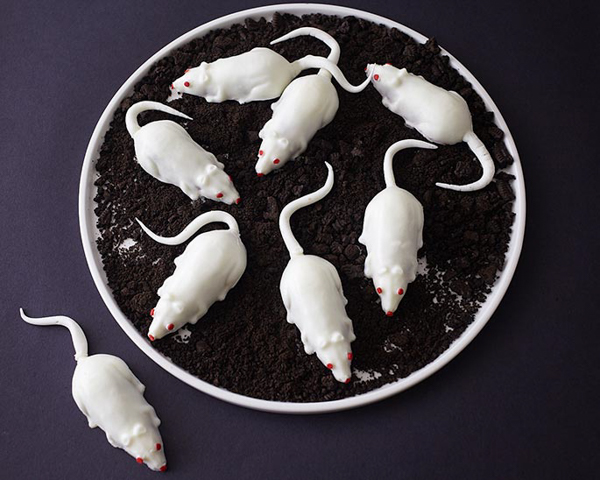
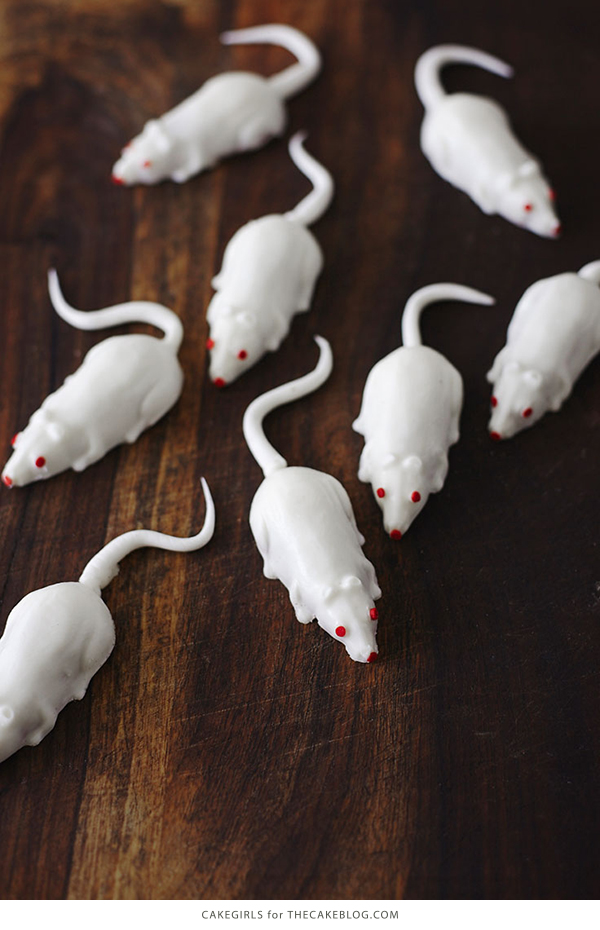
Creepy Mice Cakes! Learn how to make these spooky, red velvet filled, mice cakes — a Halloween food sure to freak out your party guests!  By our contributors, Mary and Brenda Maher of Cakegirls.

Creepy Mice Cakes! Learn how to make these spooky, red velvet filled, mice cakes -- a Halloween food sure to freak out your party guests | Cakegirls for TheCakeBlog.com

Creepy Mice Cakes! Learn how to make these spooky, red velvet filled, mice cakes -- a Halloween food sure to freak out your party guests | Cakegirls for TheCakeBlog.com

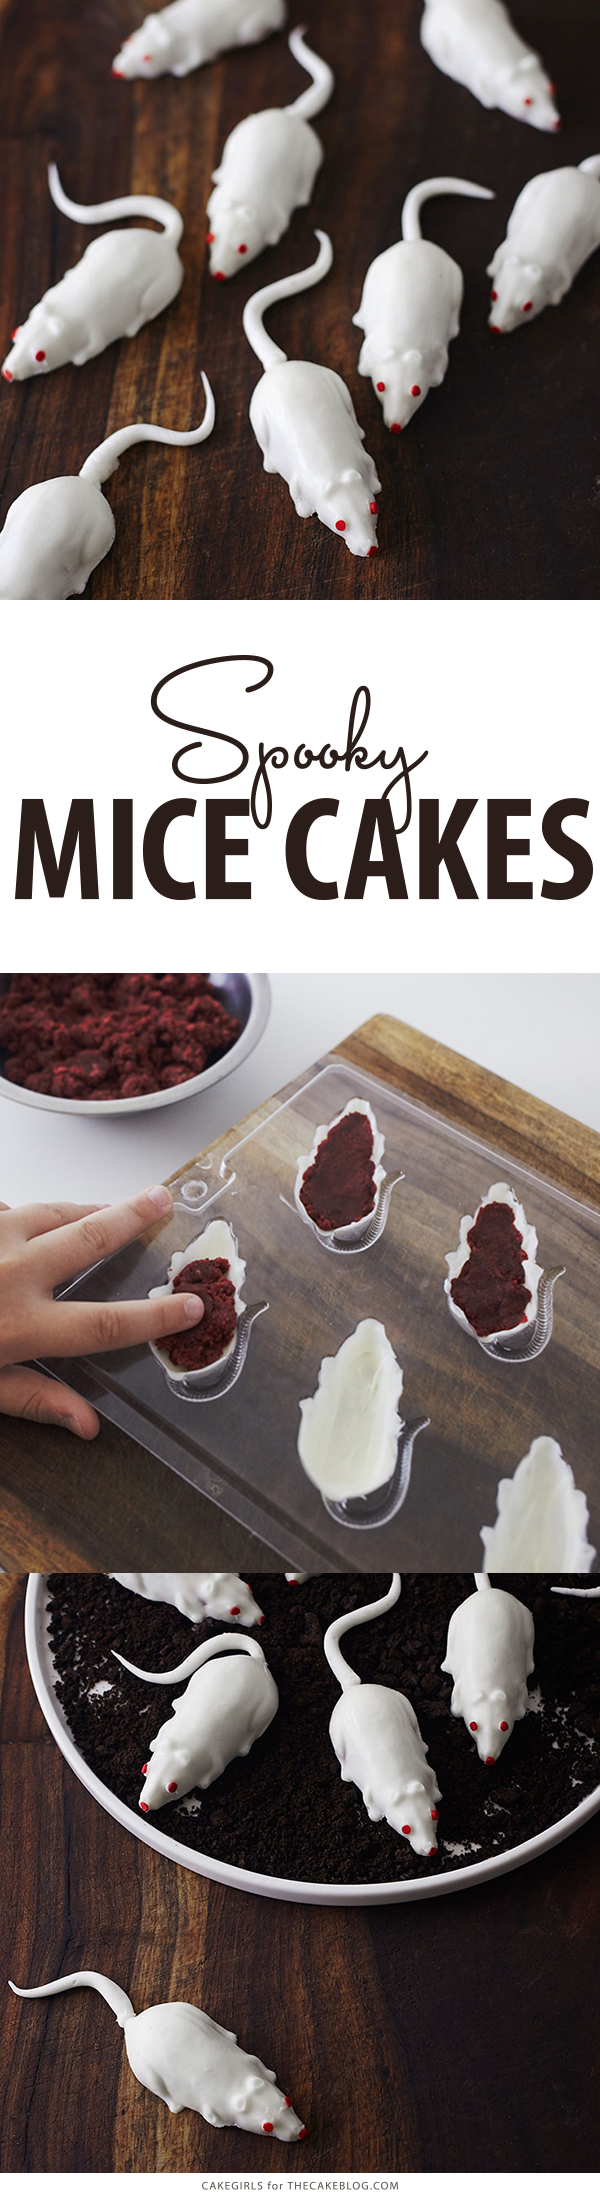
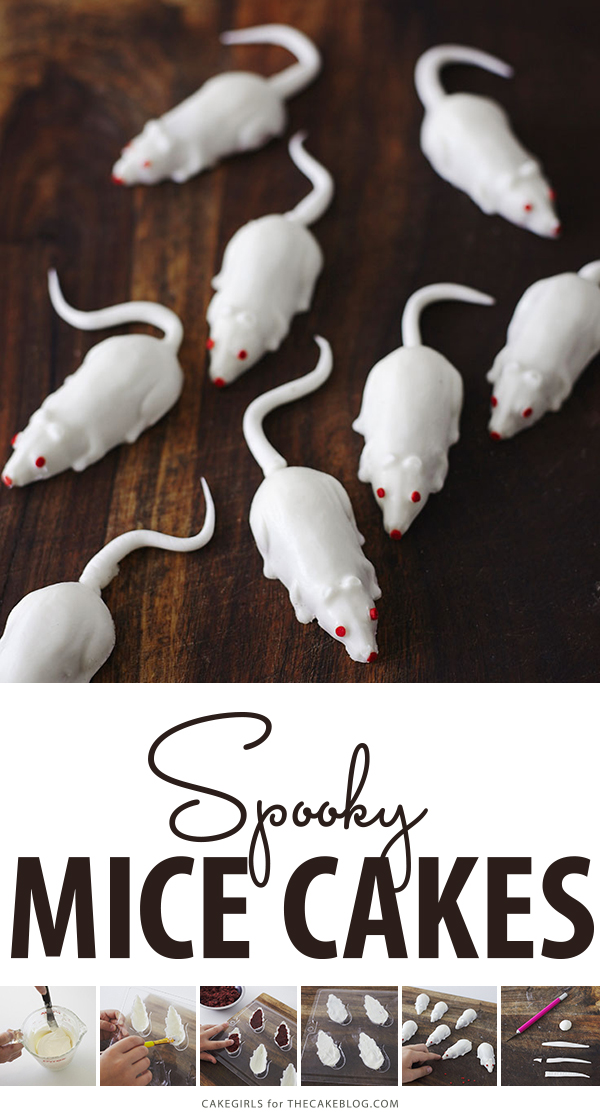
Besides dressing to the nines, one of the many exciting things about Halloween is having that rare opportunity to give people the chills when they’re perusing the party table for treats and snacks.  Breadsticks shaped like human fingers…check!  Eyeballs floating in the punch bowl…check!  Oozing brain jello molds…check!  Well, mini mice cakes are the perfect trompe l’oeil treat to send shivers down your friends’ spines and make the kiddies say EEK!

Creepy Mice Cakes! Learn how to make these spooky, red velvet filled, mice cakes -- a Halloween food sure to freak out your party guests | Cakegirls for TheCakeBlog.com

This project is really easy and fun to make.  Starting with a mice shaped mold helps make these mini cakes fool proof.  Filling them with red velvet only makes the whole affair more gruesome…yet somehow more delicious. Instead of using the prefab tail from the mold, we opted for fondant tails so that each mouse could take on a life of it’s own and leave some room for creativity.  This DIY dessert will leave your guests doubting whether that tray of scurrying mice is the real deal or just a mini mice cake infestation.

Creepy Mice Cakes! Learn how to make these spooky, red velvet filled, mice cakes -- a Halloween food sure to freak out your party guests | Cakegirls for TheCakeBlog.com


CREEPY MICE CAKES VIDEO TUTORIAL


MINI MICE CAKES
a tutorial by Cakegirls

Supplies:
1 Cup Red Velvet Cake Pop Filling
16 oz. Bag White Candy Coating
Mice Chocolate Mold
Primary Confetti Quin Sprinkles
Paintbrushes
Small Portion of White Fondant

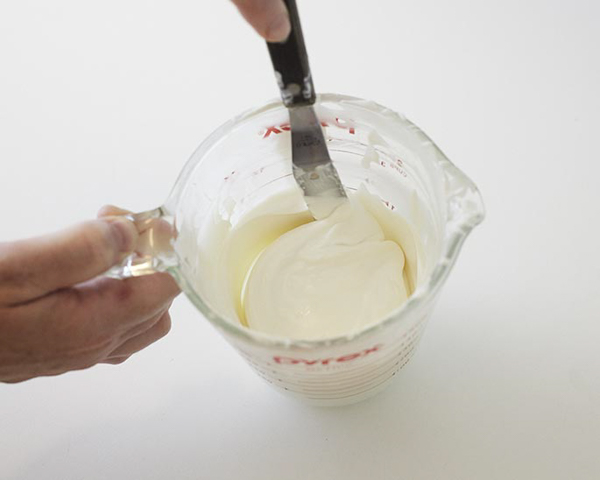
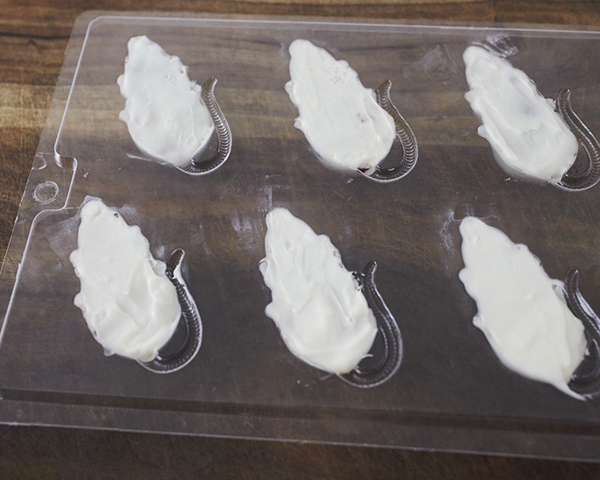
Start by placing some of the white candy coating in a heat proof cup or bowl.  Heat on half power in the microwave, removing to stir every 30 seconds until thoroughly melted.  Do not overheat the coating or it could burn, so keep a close eye on it!

Creepy Mice Cakes! Learn how to make these spooky, red velvet filled, mice cakes -- a Halloween food sure to freak out your party guests | Cakegirls for TheCakeBlog.com

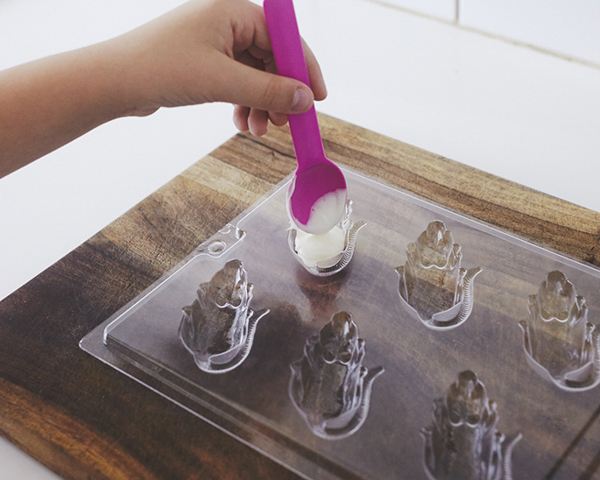
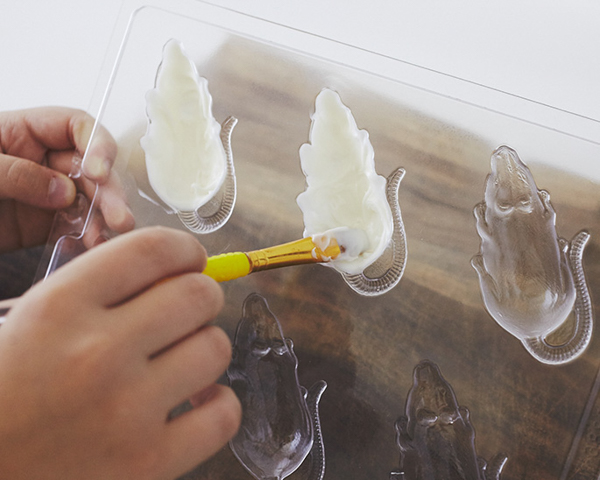
Drop a teaspoon or so of the melted coating into a mouse mold cavity and then use your paintbrush to dab and spread the coating up the sides of the mold to create a shell, making sure to fill the details of the feet.  Do not fill the mouse’s tail.   You want the shell to be sturdy enough to hold the cake filling so don’t paint the layer too thin.  Once the shell hardens, you can go back and dab coating in any thin spots.  Your shell should be about 1/8″ thick.   Place the entire mold in the fridge for 5 minutes to harden.

Creepy Mice Cakes! Learn how to make these spooky, red velvet filled, mice cakes -- a Halloween food sure to freak out your party guests | Cakegirls for TheCakeBlog.com

Creepy Mice Cakes! Learn how to make these spooky, red velvet filled, mice cakes -- a Halloween food sure to freak out your party guests | Cakegirls for TheCakeBlog.com

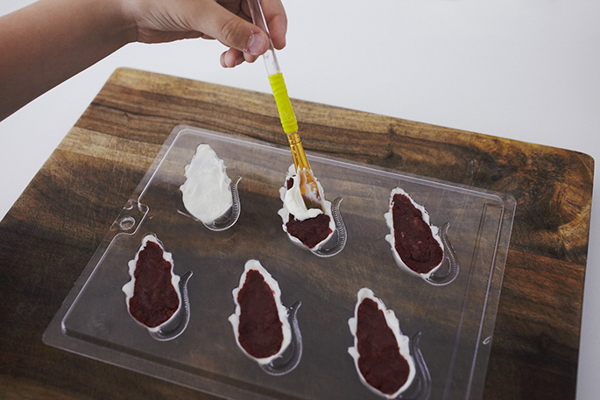
Once the shells have hardened, push a tablespoon or so of red velvet cake pop filling into each cavity.  Leave a gap so that you have room to seal the mold.

Creepy Mice Cakes! Learn how to make these spooky, red velvet filled, mice cakes -- a Halloween food sure to freak out your party guests | Cakegirls for TheCakeBlog.com

Scoop and brush some additional coating on the back of each mouse to seal the mold.  Place the entire mold in the freezer for 10 minutes until very firm.

Creepy Mice Cakes! Learn how to make these spooky, red velvet filled, mice cakes -- a Halloween food sure to freak out your party guests | Cakegirls for TheCakeBlog.com

Creepy Mice Cakes! Learn how to make these spooky, red velvet filled, mice cakes -- a Halloween food sure to freak out your party guests | Cakegirls for TheCakeBlog.com

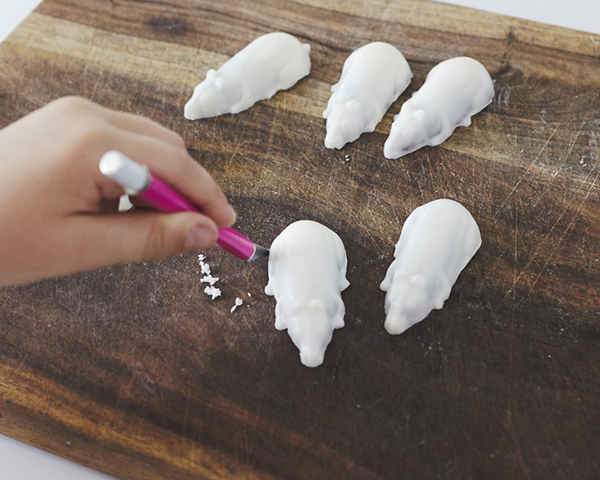
Pop the mice out onto a cutting surface and let them come back to room temperature. If you feel like the edges of the mice are messy or need to be cleaned up a bit, use a craft knife or paring knife to trim off any hanging coating.

Creepy Mice Cakes! Learn how to make these spooky, red velvet filled, mice cakes -- a Halloween food sure to freak out your party guests | Cakegirls for TheCakeBlog.com

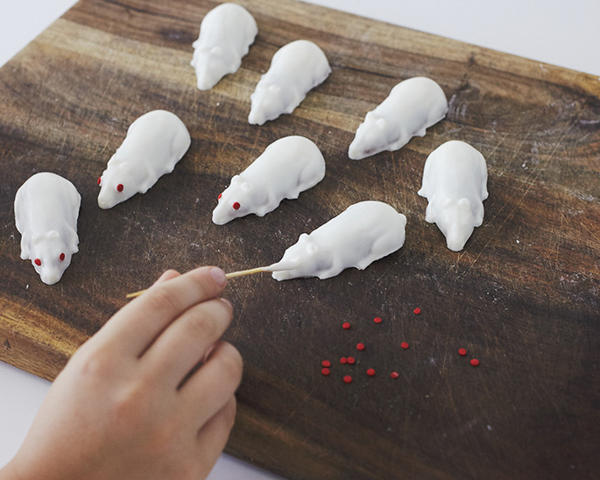
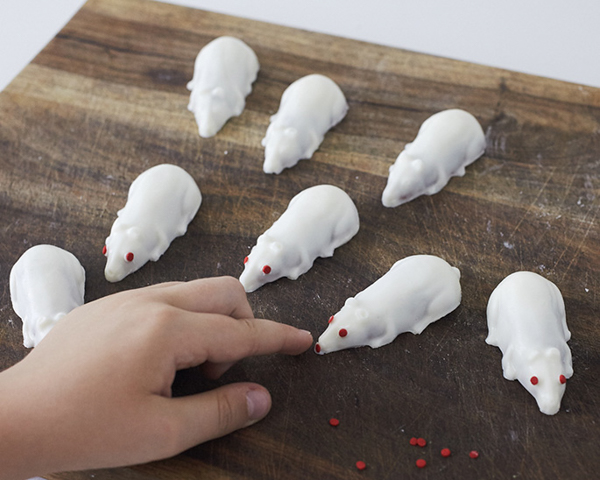
Pour out the primary confettiquin sprinkles and separate out a handful of red confetti.  Use a toothpick to add a dab of coating on each eye and nose and attach a red confetti.

Creepy Mice Cakes! Learn how to make these spooky, red velvet filled, mice cakes -- a Halloween food sure to freak out your party guests | Cakegirls for TheCakeBlog.com

Creepy Mice Cakes! Learn how to make these spooky, red velvet filled, mice cakes -- a Halloween food sure to freak out your party guests | Cakegirls for TheCakeBlog.com

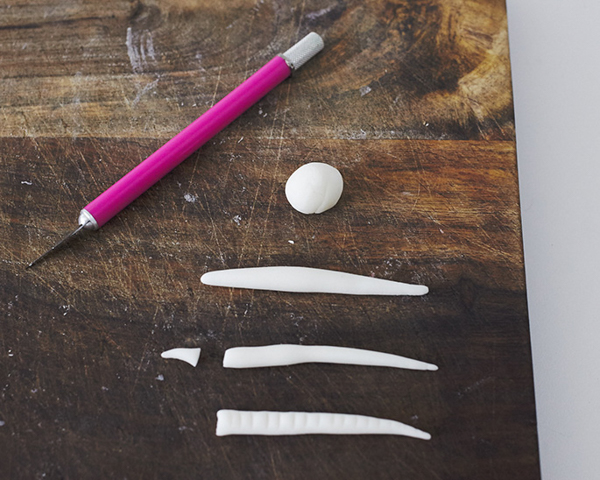
Now, the mice are ready for some tails!  Roll a pea sized piece of white fondant into a thin rope and taper it at one end. Cut the other end blunt so it can be attached to the back of the mouse.

Creepy Mice Cakes! Learn how to make these spooky, red velvet filled, mice cakes -- a Halloween food sure to freak out your party guests | Cakegirls for TheCakeBlog.com

Dip the blunt end of the tail in some melted coating and then attach it to the back of each mouse.  Make sure to curl each tail a different way so that every mouse looks a little bit different.

Creepy Mice Cakes! Learn how to make these spooky, red velvet filled, mice cakes -- a Halloween food sure to freak out your party guests | Cakegirls for TheCakeBlog.com

Let the tails dry for a bit and then the mice can be transferred to a serving tray if desired.

Creepy Mice Cakes! Learn how to make these spooky, red velvet filled, mice cakes -- a Halloween food sure to freak out your party guests | Cakegirls for TheCakeBlog.com

Creepy Mice Cakes! Learn how to make these spooky, red velvet filled, mice cakes -- a Halloween food sure to freak out your party guests | Cakegirls for TheCakeBlog.com


YOU MAY ALSO ENJOY:
Black Cat Cake
Monster Eye Cake
Black Crow Cake
Spiderweb Cake
Black Cat Cupcakes

October 5, 2015 by Cakegirls

Cakegirls , CONTRIBUTORS

Cakegirls are sisters Mary and Brenda Maher. After years of making cakes professionally, they now share their tips and tricks at www.thecakegirls.com, an online store where you can buy cake supplies, party accents and see D.I.Y. ideas for the inspired home baker. Read more about Mary and Brenda on their bio page.

connect with Cakegirls :

Make the most of citrus season with one of these cake recipes!

« Pumpkin Spice Season
Apple & Goat Cheese Cake »

Comments

  1. Ashley says

    October 15, 2015 at 11:40 pm

    Very cute! I hate to be a stickler about it but, that is a rat mold! I have a rat as a pet and I can tell from the ridges on the tail and the length of the snout. I’ll be making some to look just like my buddy, with gray spots! I’m sure he’ll snag one. The kids will love em’! What a fun project. Mouse or rat, all make for a fun Halloween!

  2. Krista says

    October 19, 2015 at 7:40 pm

    I came across this on pinterest and LOVE it! I have always sucked at cake pops because getting them to stay on sticks is hard and they look too messy when I make them just as balls, not on sticks. Lol. I don’t have a rat mold but have a brain and eyeball mold that I will likely use this same idea for. I can’t wait!

  3. Terry Chase says

    October 31, 2015 at 4:33 pm

    Used your molds and directions. Just finished making 24 for the neighborhood party. Not quite as pretty as yours….but can’t wait to see their faces when they bite into them.

  4. Candy Lover says

    September 2, 2016 at 7:01 am

    Where can I find a mold? I love this idea!!

    • Carrie Sellman says

      September 7, 2016 at 2:29 pm

      There’s a link for the mold in the supply list above. It came from Cakegirls!

  5. Marilyn says

    October 24, 2016 at 10:06 pm

    How far in advance do you recommend making them for? For example I have a party of Friday and Sunday would I be able to make them as early has Tuesday?

    • Carrie Sellman says

      October 25, 2016 at 10:26 am

      Good question Marilyn. Because the exterior is coated with ‘chocolate’ candy, these will keep for about a week, refrigerated in an airtight container. Count your seven days starting the day you bake the cake. So Tuesday totally works unless you’re sending these home with your guests to eat later. Then maybe go later in the week so they have more time to enjoy! =)

  6. Dawn Roberts says

    October 25, 2016 at 11:46 pm

    We had a blast making mice cakes! What an intregeging idea. Now we have turn them into mice Jell-O shots! Sure creepy and very cool❤️✌🏼️🆒

  7. Holly L Morgan says

    September 25, 2017 at 8:02 pm

    Is cake pop filling different than plan cake?

    • Carrie Sellman says

      September 27, 2017 at 11:52 am

      Yes, but it’s just cake and frosting mixed together. Bake your cake, let it cool, then crumble into a large bowl. Use a spoon to mix in your choice of frosting until the mixture is moist enough to roll into a ball and hold its shape. Hope that helps!

      • Maribel says

        October 23, 2017 at 10:10 pm

        So do you bake your cake as usual, then add one container of cream cheese frosting to the mix, if not very moist do you keep adding frosting into mixture?

        • Carrie Sellman says

          October 24, 2017 at 8:58 am

          Yes, bake your cake as usual. Let it cool. Then crumble the cake into a large bowl. Stir frosting into the crumbled cake. You can add as little or as much frosting as you want – just make sure it’s moist enough to hold it’s shape if you try to roll it into a ball or clump it in your hand. Hope that makes sense.

  8. martine says

    November 12, 2017 at 12:54 pm

    Génial, dommage que ce moule n’existe pas en France.

  9. Rosa says

    October 19, 2018 at 11:26 am

    I want to make 24 to bring as birthday treats for my sons class. How much cake pop batter would I need? I’m planning on using a box cake mix and cream cheese frosting so am wondering how many cake boxes I’d need? Thank you in advance!

Trackbacks

  1. 25 Ghoulishly Delicious Homemade Halloween Candy Recipes - DIY & Crafts says:
    November 13, 2018 at 8:51 am

    […] Recipe: thecakeblog […]

  2. 20 Halloween Cookie Ideas You Can Actually DIY -Relaxwoman says:
    October 10, 2019 at 3:55 pm

    […] Get the recipe at  Mini Mice Cakes […]

  3. 100 Best Halloween Desserts – Daily Easy Recipes says:
    October 27, 2019 at 11:51 pm

    […] Creepy Mice Cakes from The Cake Blog […]

  4. 8 Creative Pinterest-Perfect Snacks For A Halloween Party - Infidelisto says:
    November 3, 2019 at 10:30 pm

    […] 3. Mini Mice CakesThese white mice are pretty realistic, and they’re basically cake pops with a red velvet filling. Bloody rodent goodness! All you need is a simple mice mold that the author links you to, and you can play with the way each tail curls, and put them on your shoulders to freak guests out. […]

SEARCH

The Cake Blog is a community of bakers and cake lovers. If you’re looking for beautiful cake inspiration, projects, tutorials and recipes -- you’ve come to the right place. MEET OUR TEAM ➝

LET’S CELEBRATE

SIGN UP FOR OUR NEWSLETTER

BAKING RESOURCES

  • How To Build a Cake Like a Pro
  • Is Your Oven Accurate – And Why It Matters
  • Can You Overmix A Cake
  • Egg Free Baking

HOME   |   ADVERTISE   |   PRIVACY POLICY

Copyright © 2023 · The Cake Blog