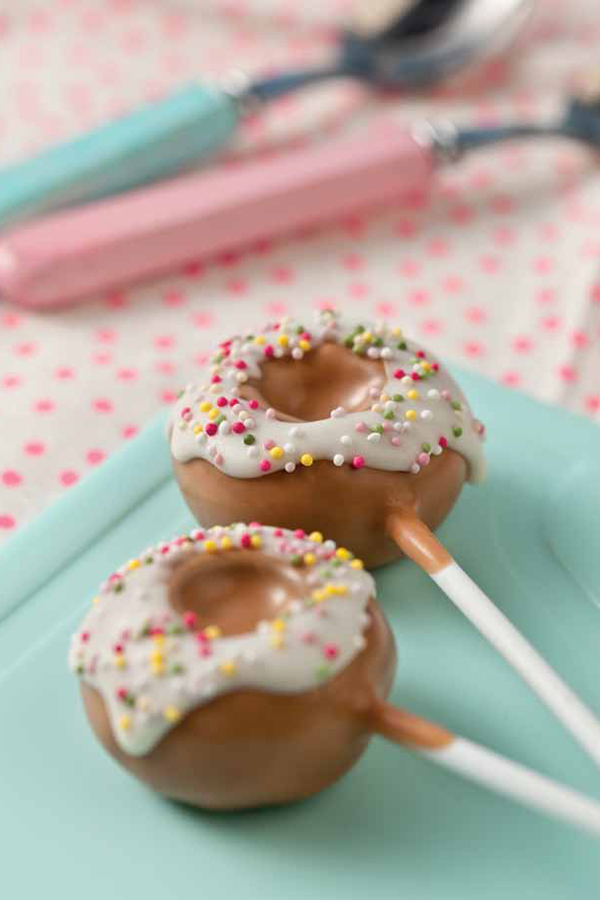
Okay, what’s not to love about today’s featured cake goodness? It combines so many fun trends into one little bite of sweetness. It’s got cake + a stick + the charm of a donut…. Oh my! I’m not sure if it gets more adorable than this? Created by Molly Bakes and featured in her new book, Crazy for Cake Pops, you’re going to love these incredibly cute Donut Cake Pops!
Donut Cake Pops
makes 20 pops
Supplies:
20 medium cake balls, chilled
1 (12-ounce) bag light brown candy melts
½ (12-ounce) bag white candy melts
Rainbow Nonpareils, to decorate
Medium ball tool
Take the cake balls and flatten them to form a donut shape. Next take the ball tool and gently push it into the center of the donut to make a dent. Make sure you make enough of a dent for it to show through when the pop has been dipped in the candy. Chill for 10 minutes.
Melt and mix together the brown candy melts and three-quarters of the white candy melts to create a caramel color.
Dip the end of each lollipop stick ¾ inch deep into the melted candy and insert a stick through the side of each donut about halfway in. Leave to set. Dip the donut pops in the candy and tap off the excess into the bowl. Place in a polystyrene block to dry.
In a separate bowl, melt the rest of the white candy. It’s important that this is runnier than usual so add an extra drop of vegetable oil. Now take the teaspoon and drizzle the candy around the dent of the donuts. Shake on the sprinkles as you go. Place the pops back in the polystyrene block to dry.
Reprinted with permission from Crazy for Cake Pops. Published by Ulysses Press.
YOU MAY ALSO ENJOY:
Rose Cake Pops
Baby Rattle Cake Pops
Cake Gems
Mini Mice Cakes


How cute 😉
I am going home right now to try these, so cute.
Wow these are so cool!! I will definitely have to try these out and make them for my friends!!
these are just too cute!
Super cute! Love this!
These are so, so cute!
Awww, such a cute idea! Greetings form Germany.
These are just SO adorable! I keep saying I’m going to try my hand at Cake Pops but I never have the time!
These are cute, but how do you make cake balls?
I love these! We’re having a sleepover themed party for my daughter, these would be so cute. How do you make the cake balls though?
These are so cute! I might just have to try making some for my little goddaughter.
Here is a basic cake ball recipe from the queen of cake balls… Bakerella. It should get you started!!
https://www.bakerella.com/red-velvet-cake-balls/
Be sure to let us know if you make these little cuties… and how they turn out! Happy Baking!
These are so adorable!!
I have to plan an entire party for two girls and I am wondering why they left the planning up to a 13 year old. I love this idea and it will save me a lot of work.
Thank you!
These are so cute!
What a great idea! Well done!
These are so cute! Thankyou for the idea! 🙂
I can’t seem to get that golden caramel color down. It’s just light brown with the mix of the two colors.