As seen on the cover of Country Living Magazine, October 2013!
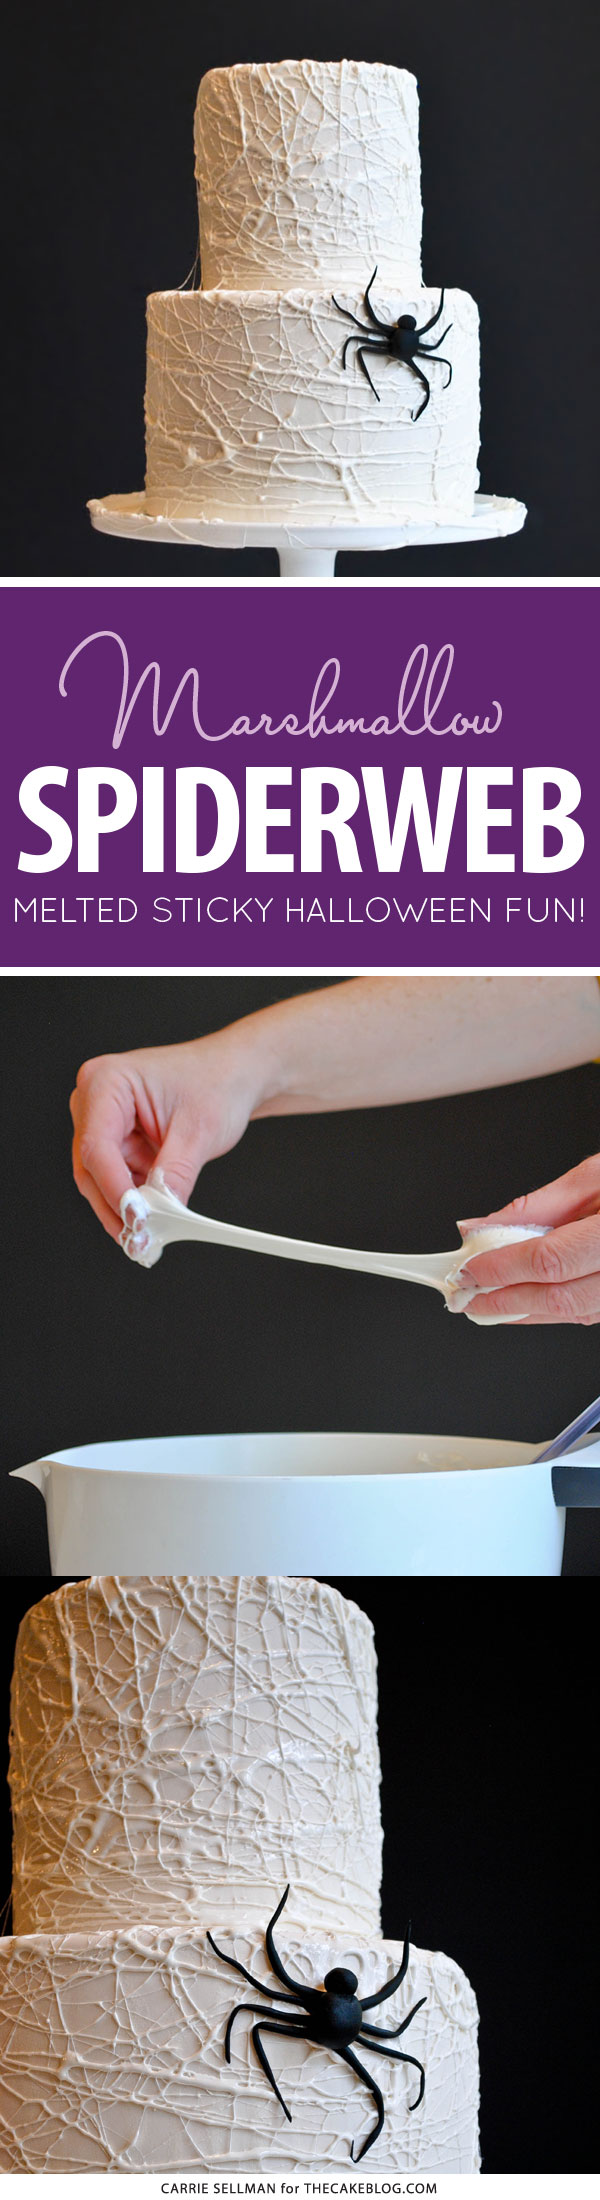
Now that we’re officially in the Halloween spirit and inspired to bake, here is a super easy DIY for you to try at home. There’s no piping, no painting and no wrong way to do it! You just need marshmallows, two hands and some imagination! It’s a creepy, crawly Marshmallow Spiderweb Cake! And I have a simple tutorial to show you how to do it!
You know how marshmallows get stringy when melted? Well that makes for a super sticky, super easy spiderweb!
I think this cake would be a fun project, no matter your experience or skill level. If you’re a medium to advanced baker, this cake will seem super easy and you’ll be finished in no time flat. Beginners…. your end result will look more challenging than it actually was. Bonus for you! And you certainly don’t have to tell anyone how easy it was. And if you really just don’t bake at all, why not try out the marshmallow technique on a plain white cake from the market. It could be a fun way to get your hands a little sticky and surprise everyone, including yourself. There’s really no right or wrong way for a spiderweb to look… so just go for it!
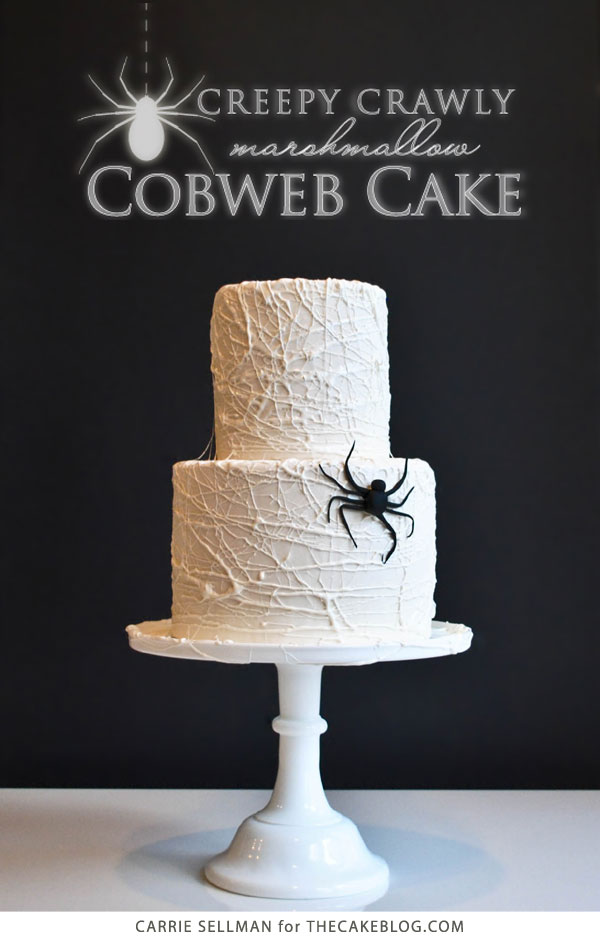
MARSHMALLOW SPIDERWEB CAKE
a DIY by Carrie Sellman
Supplies
- Cake
- White Fondant
- Marshmallows (8 oz)
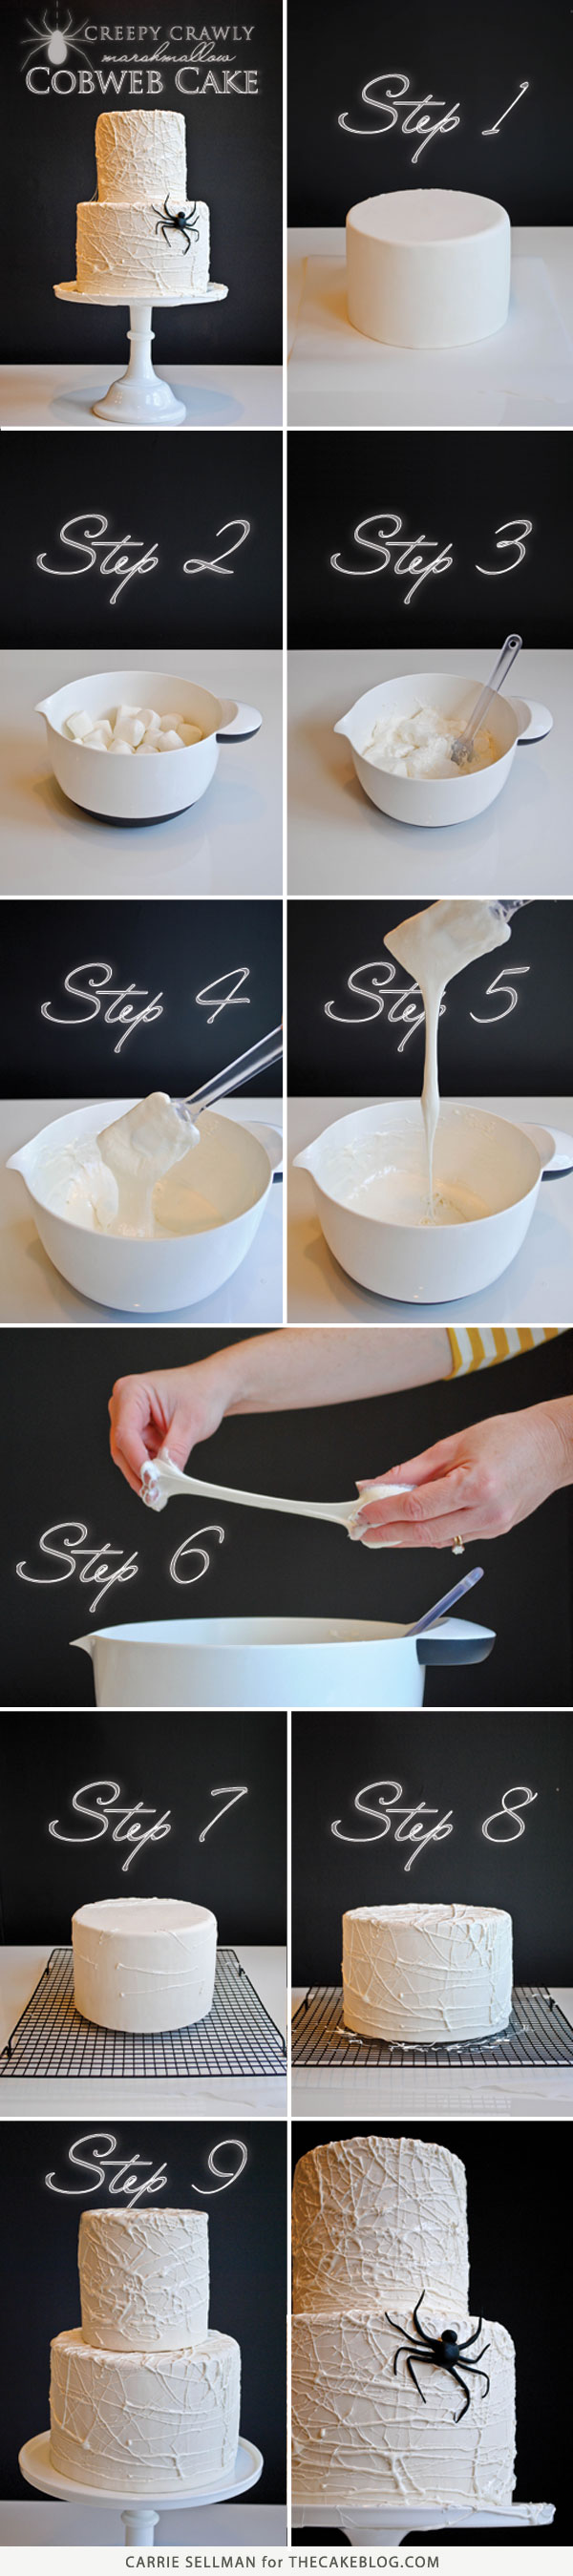
STEP 1 : Cover your cake(s) in white fondant.
STEP 2 : Place marshmallows into a microwave-safe bowl. Heat for 30 seconds.
STEP 3 : Stir marshmallows. {Warning. Hot marshmallows will burn. And it hurts!}
STEP 4 : Keep stirring.
STEP 5 : Stir, stir, stir some more! Stir until marshmallows are cool enough to touch.
STEP 6 : This is where it gets messy. Or fun, depending on how you look at things. Using both hands, stretch a small glob of marshmallow out into a long, thin, stringy strand. Way, way longer and thinner than what is shown above (it was hard to get a picture of this exactly… especially with marshmallow covered hands).
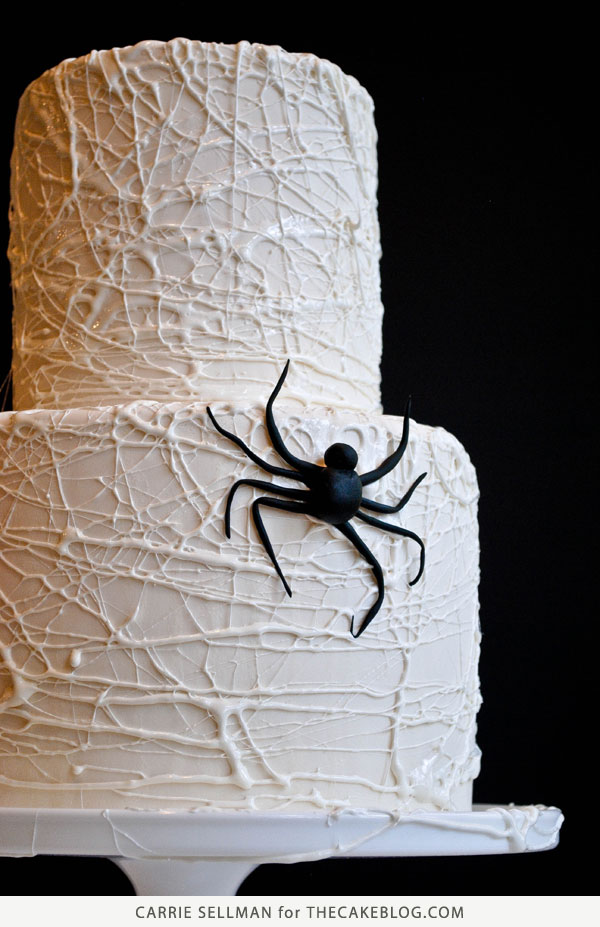
STEP 7 : Start wrapping the stringy marshmallow around your cake. Go up, down, around and around. Diagonal. Every which way. There is no right or wrong way for a spider web to look. Just start wrapping. Go light at first until you get the hang of it. Less is more! And thinner strands look better in the end.
STEP 8 : Continue to pull, stretch and drape marshmallow strings. Going every direction way you possibly can.
STEP 9: Cover second tier in marshmallow strings. Stack both tiers together.
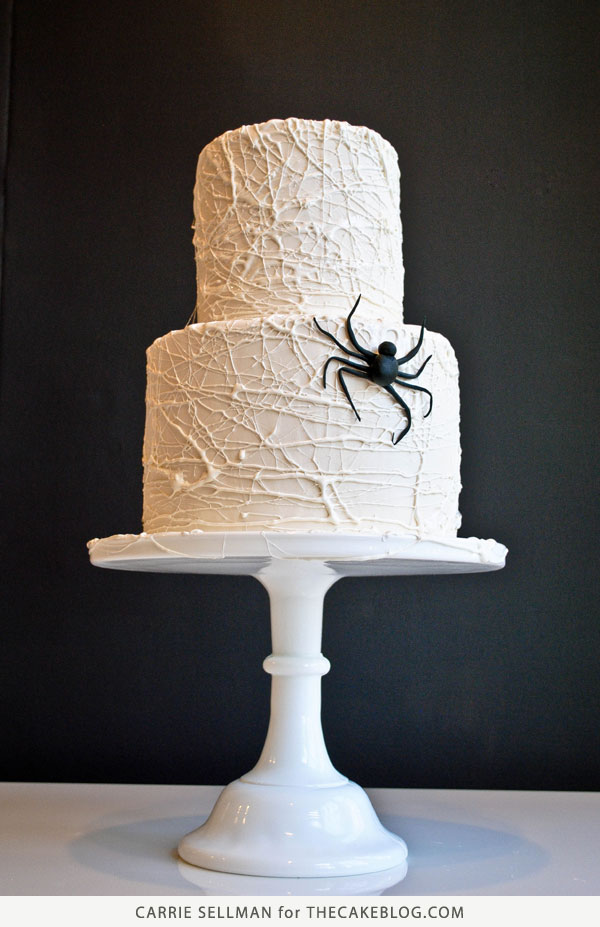
STEP 10 : Add additional marshmallow strings to both tiers, draping some from one tier to the next. Add a spider with long, spindly legs. And you’re done!
BAKERS NOTE : I should have taken pictures while making the spider. My bad. But he’s made of fondant and very straightforward. One oval for his body. A smaller circle for his head. And eight very long, exaggerated legs to make him extra creepy! Hey, a big spider had to be responsible for such a crazy cobweb!
ADDITIONAL NOTE : I realize I could have written this tutorial with much fewer steps. But I was having fun with sticky marshmallows and my new chalkboard backdrop! What to do you think? Do you like it? Want to see more of it in future posts?
I hope you give my creepy, crawly Marshmallow Spiderweb Cake a try! I think even the kiddos would enjoy this tutorial. Just make sure the marshmallow is cool enough for them to handle safely and be prepared to clean up some sticky hands. And faces. And tables. You get the idea!
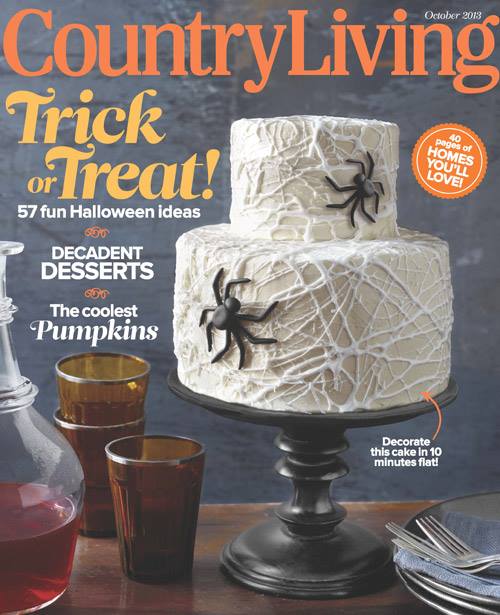
UPDATE: I was tremendously honored to work with Country Living Magazine on their 2013 October issue. As it turns out, they enjoyed playing with melted marshmallows too! I’m honored that my sticky spiderweb concept made the cover!
YOU MAY ALSO ENJOY:
Poison Apple Cake
Black Cat Cake
Monster Eye Cake
Mini Mice Cakes
The Birds Cake


cool
such a cool idea , I am going to do this ,TFS
Thanks so much for this great idea! I made a cobweb cake too and I referred back to your post. My post is here… https://dwyersfarmhouse.blogspot.ca/2013/10/a-marshmallow-cobweb-halloween-cake.html
So cute Brenda! Thanks for sharing your cake – love seeing everyone’s sticky spiderwebs!
Hello Carrie,
The Cake looks fantastic! Question for you, would this work on a meringue buttercream covered cake instead of a fondant covered cake?
Thanks so much!
Yes, it should Maria! I would refrigerate your frosted cake so that it’s nice and firm before applying the melted marshmallow. That way your frosting doesn’t melt!
I love this idea and was really excited to bring this cake to a Halloween party. Realize now that I should have made chocolate buttercream for a chocolate cake, and the marshmallows are just too sticky to even pull out a strand. Disappointed this didn’t work out. Think I’ll just cover the cake in chocolate sprinkles and call it a night.
Oh, I’m sorry to hear that this didn’t work out for you Erin. I think the marshmallows can get really hard to pull if they are heated too much. Maybe that’s what happened?
Excellent Cake! Great Design, Look and feel is very good.
This is so cool!
I love Halloween and I love this idea! A few questions:
1- How would this look as only one tier?
2- How far in advance can it be made?
Thanks!
I think it would be great as a one tier cake! You can make it a day or so in advance, it will hold up fine. Enjoy!
I made this cake with Swiss buttercream and two tiers, but I think it would look just as great with one tier! Perhaps a tall cake, 5 or 6 inches?
As far as timing, I made mine one day in advance and stored the cake in a cardboard box in the fridge. The marshmallows stayed the same on the cake. It may have been a little shiny, but it didn’t droop or melt off my cake.
Hope this helps in time. 🙂
Hi, I made this cake and it came out quite successfully. I wanted to share with anyone interested that this absolutely works with Swiss meringue buttercream. I iced and stacked a two-tier cake with Swiss and let it sit in the fridge for at least an hour. Then, I melted marshmallows, stirred it around, and let it cool to neutral temperature. This allowed me to decorate with the stringy “cobweb” without melting the buttercream. Working with the marshmallows was a sticky, tricky mess, you’ll soon develop techniques on wrapping the cobwebs. Lol But the cake came out fabulous!!
Thanks Camille, glad to hear it worked well for you! Even on the Swiss Meringue Buttercream! Appreciate your feedback!
So glad I found this tutorial! I’m making a “Nightmare Before Christmas” Birthday cake. The bottom tier is black and I wanted to do a drop string spiderweb design. The cake has to be transported over a mountain and I worried that the delicate, buttercream string work wouldn’t survive the trip. This is just the perfect answer! Thank you so much for posting the directions AND the idea!
Oh, this would work perfectly for you Sandy! Definitely sturdy enough to handle mountain terrain, lol!
Can you melt the marshmallow on the stove? I don’t have a microwave.
I haven’t tried it on the stove, but in theory it should work just fine.
Hi! I loved this cake and I am a party chef by trade but I still make mistakes of course. I’m only human. I had marshmallow fluff on hand and figured I try it for the spider web detail but it was “melting” down the side of the cake. I did very thin strands and then even thinner wispy strands but I’m afraid my shortcut may have given me a “nailed it” result. Any ideas? Do you experience any drooping in your marshmallow?
The drooping was most likely caused by the marshmallow fluff. I’m not sure the exact ingredients of marshmallow fluff but it’s a softer consistency at room temperature than an actual marshmallow. The melted marshmallow sets up firm again once it completely cools – so there’s no drooping. If you decide to try it again next Halloween, definitely go for the real marshmallows!