Winter Buttercream Greenery – how to pipe buttercream leaves, branches, pine and seasonal greenery fit for a wintry holiday cake. A new video tutorial!
Today I’m showing you how to create the wintry buttercream decorations from this Eggnog Cake that I shared earlier in the week. Your response to the buttercream flowers on my Pumpkin Spice Cake inspired me to do something similar with this cake, only tweaked for the winter holidays. I love the look of fresh greenery mixed with wood toned neutrals, so I went for lots of mossy green leaves, much like silver dollar eucalyptus, mixed with broken cinnamon sticks and whole nutmeg. The end result looks like the holidays, smells like the holidays and tastes like holiday cheer!

The best part about this buttercream work is that it’s really forgiving. Which is definitely needed, as I’m no piping expert. But I’m really loving that buttercream has come back into the forefront over the last 4 years because it just tastes so much better than fondant. And who can possibly look at all the Korean buttercream flower cakes on Instagram and not long to be that talented!! Thank goodness for me — this cake is all about imperfect leaves that when grouped together look more impressive than they really are. Which makes this a win for buttercream wannabes everywhere!
In the spirit of the holiday season, I tried to make a video tutorial for you all. This is my first video tutorial ever and it’s definitely a little rough around the edges — there’s such a learning curve creating video and I have a sad, sad smartphone that is on its last leg. But hopefully it gives you a feel for how this cake comes together, better than the still photography we typically publish. I’m not sure if videos will become prolific here on The Cake Blog… but let me know if you find it valuable. Below you’ll find the written steps followed by the video. Enjoy!
WINTER BUTTERCREAM GREENERY
a tutorial by Carrie Sellman
Supplies:
Eggnog Cake with an extra batch of plain Swiss Meringue Buttercream
Soft Gel Paste Food Colors (green, brown and black)
Piping Bags
Couplers
Piping Tip #104
Piping Tip #233
Piping Tip #352
Piping Tip #2
Piping Tip #8
Flower Nail
Parchment Paper cut into squares
Whole cinnamon sticks, broken
Whole nutmeg
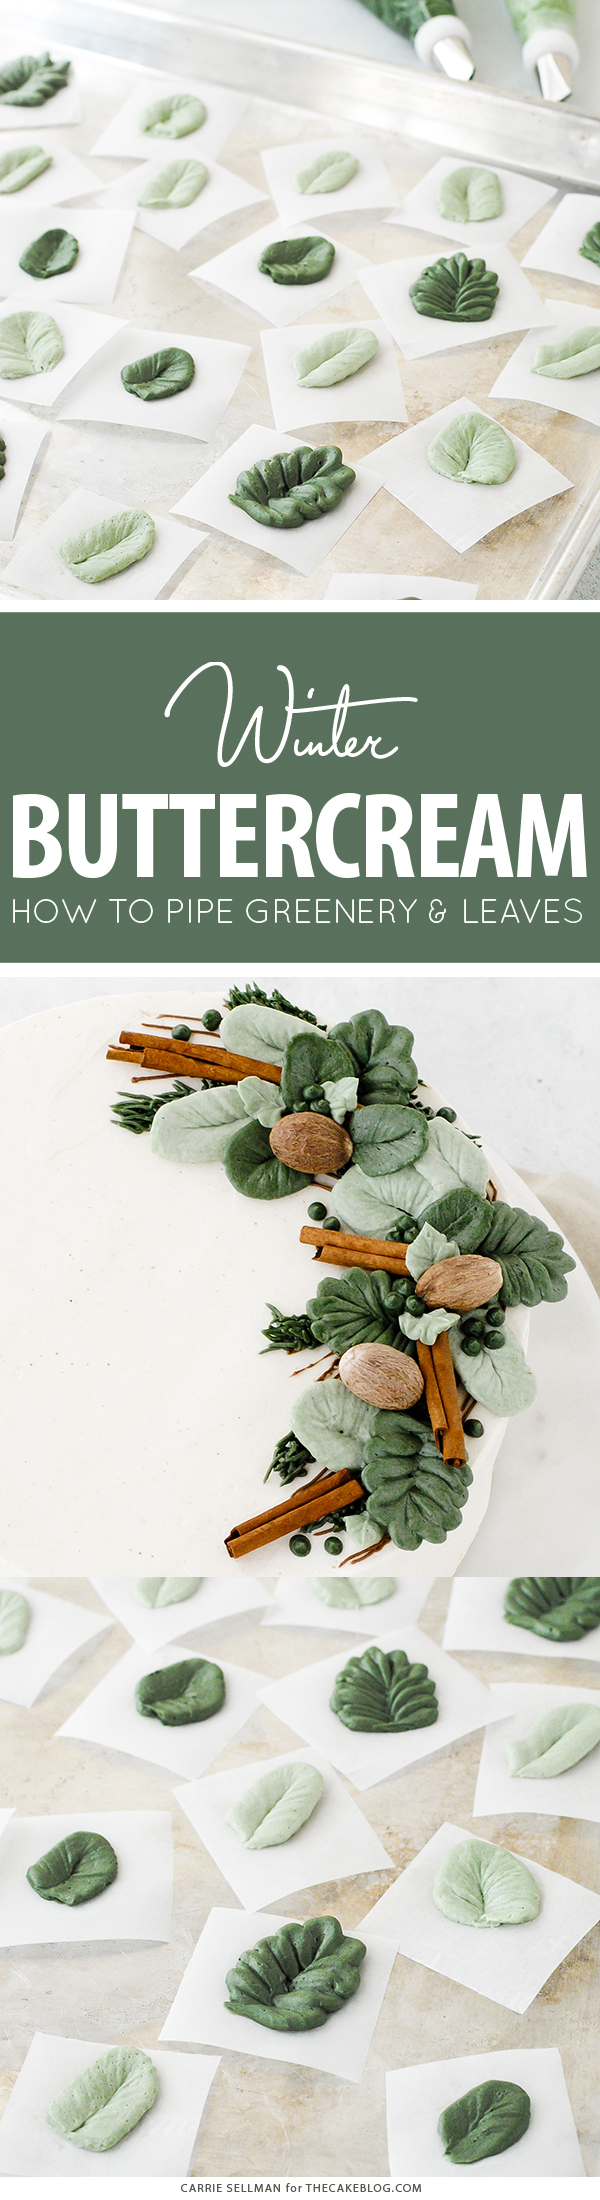
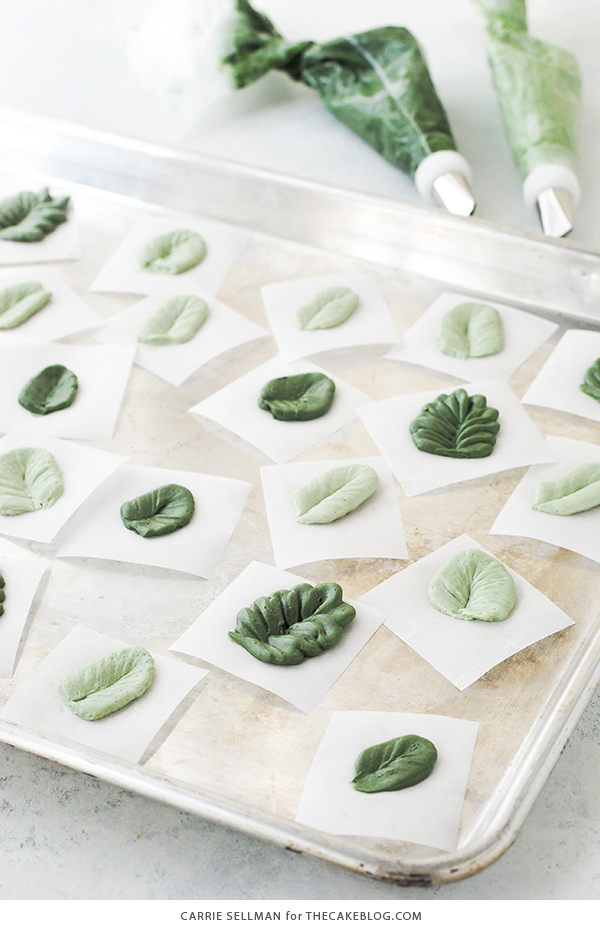
Divide buttercream into four bowls. Color one bowl a dark moss green using green, brown and a small amount of black gel color until you have a dark shade that you like, keeping in mind that it will darken with exposure to the air and time. Scoop a small spoonful of the dark moss green and mix it into a bowl of white buttercream to easily create a light green that complements the dark green. Color the third bowl brown, using just the brown gel color. Leave the remaining bowl white. Fill four piping bags, fitted with couplers, with the individual buttercreams.
Using a #2 tip on the white buttercream, place a small dot of frosting directly on to the flower nail. Place a square of parchment paper on top and press down to firmly attach parchment to the nail.
To make the large rippled leaves: Using a #104 tip on the dark green buttercream, hold the bag so that the skinny end of the tip is in the middle and the wide end of the tip is towards the outside. Squeeze and wiggle the bag to create ripples of frosting while moving the tip in an upside-down U shape. Stop squeezing and release when U is complete.
To make the small smooth leaves: Using a #104 tip on the dark green buttercream, hold the bag so that the skinny end of the tip is in the middle and the wide end of the tip is towards the outside. Squeeze the bag while gliding (no wiggle) up and back down in a very tight upside-down U shape. Think up, tight turn, and right back down. Stop squeezing and release when U is complete. You can play around with this one and make them longer, shorter, wider or thinner with just changing the shape of the U.
Make more of the rippled leaves and smooth leaves in light green. It’s always best to make more than you think you’ll need! Refrigerate all leaves until they are completely solid.
Using a #2 tip on the brown buttercream, draw thin lines in a crescent shape to look like branches. Do not worry too much about these as only a little will show at the end.
Using a #233 tip on the dark green buttercream, pipe “grass” in a crescent shape to look like pine branches.
Remove chilled leaves from refrigerator and place them as desired on the cake. Fill in gaps with broken pieces of cinnamon sticks. Add in the whole nutmeg. Add additional leaves as needed.
Using a #352 tip, pipe small leaves to fill in any gaps. Then pipe small dark green berries using a tip #7 or #8 round.
WINTER BUTTERCREAM GREENERY TUTORIAL VIDEO
YOU MAY ALSO ENJOY:
Eggnog Cake
Gingerbread Cupcakes
Hot Chocolate Cake
Walnut Cake
Peppermint Red Velvet
Sweet Potato and Marshmallow Cake


Ahhhh this amazing! You make it look so easy – I almost think I could attempt it 😉 Thanks for putting together the video – I wouldve never guessed it was a first attempt! Lovely. Can’t wait to try it this holiday season.
Thank you Kate! I hope you give it a try!
Oh my God!!! In 1,2,3 you create such a beauty, looks so easy, am watching the video over and over to see if learn something…
Thanks for sharing!
Thank you Elym!
Hi Carrie. May i know the exact colour names that you used for the green and brown please? Thank you.
Leaf green and chocolate brown. Both are included in the Americolor set linked in the supply list.
LOVE it! Being new to cake decorating, I never would have thought to use a grass tip to make pine needles! Thanks so much for sharing.
Brad Day
Port Orchard, WA
Yes, you can do a lot with a grass tip! It works wonderful for fur too!
Thanks so much! I have a December birthday celebration for my sister and this might be the perfect decoration on the cake!
Wow, thank you for the video. It looks so easy to create these pretty leaves. I have to try it!!
THANKS!!
I love your blog. With thus particular decoration, I would like to use all edible. Is there a way to make something edible that looks like the while nutmeg and cinnamon sticks?
You could make long chocolate curls to replace the cinnamon sticks. Or just pipe additional buttercream to replace the cinnamon sticks and nutmeg.
Do you have the recipe for the buttercream? Thanks!
The full cake recipe, with the buttercream, is posted here: https://thecakeblog.com/2017/11/eggnog-layer-cake.html
This is one of the loveliest cakes I have ever seen. So simple but elegant. So glad I stumbled onto your blog.
Thank you Patricia! I’m glad you found us!
Buttercream is all i have ever decorated with in my 37 years of decorating. I love this cake. Your video was great. Thank you for sharing.
Wow – I’m sure you could show us all a thing or two Sandy! Cheers to 37 years of buttercream!!
Carrie you have such a genius artful eye for design – I just love this! Thanks for the helpful video, definitely will try this cute leaf shape! This cake is perfect! Xo
Awe, thank you sweet friend! I hope you are doing well!!
Very nice video. If I want to space out the construction of the cake I’m wondering how far in advance I can make the flowers. Can I put them in the freezer after they get solid in fridge?
One possible (edible) substitute for the cinnamon sticks is pirouette cookies – the thin rolled wafer cookies with chocolate filling – they look a bit like twigs.
I’m thinking I’ll make a wreath continuously around the cake.