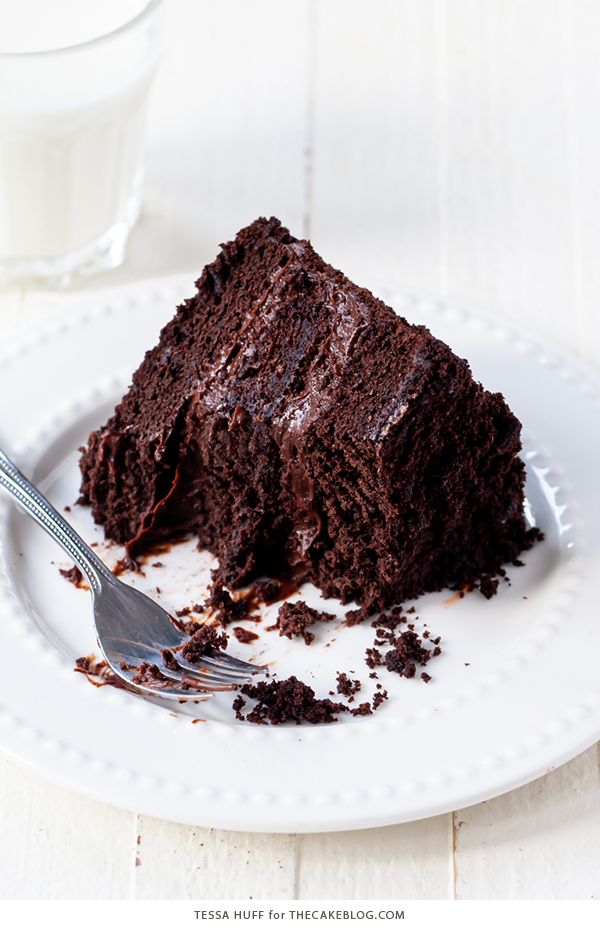
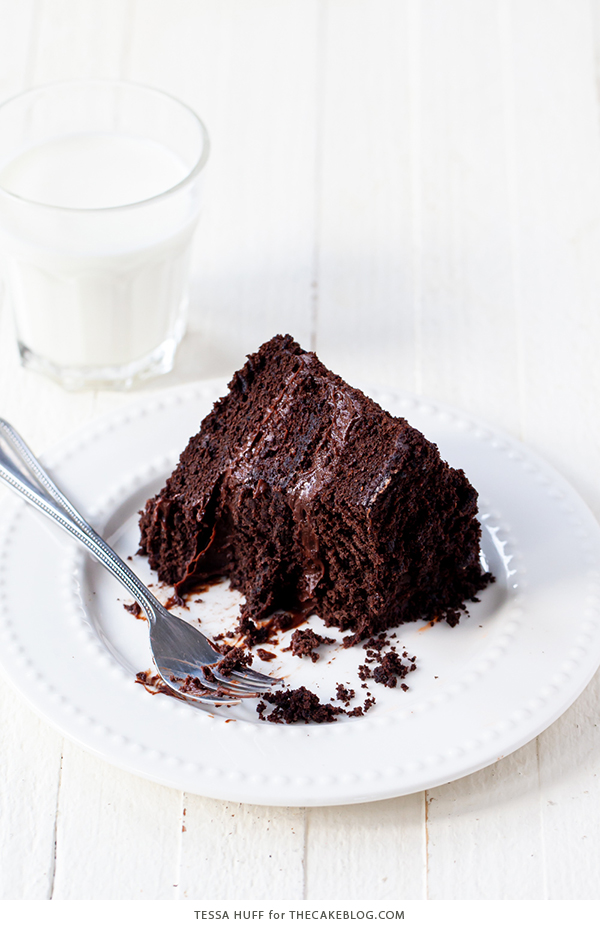
Brooklyn Blackout Cake – a decadent chocolate cake made with black cocoa and filled with fudgy chocolate pudding frosting. A new cake recipe by our contributor, Tessa Huff.
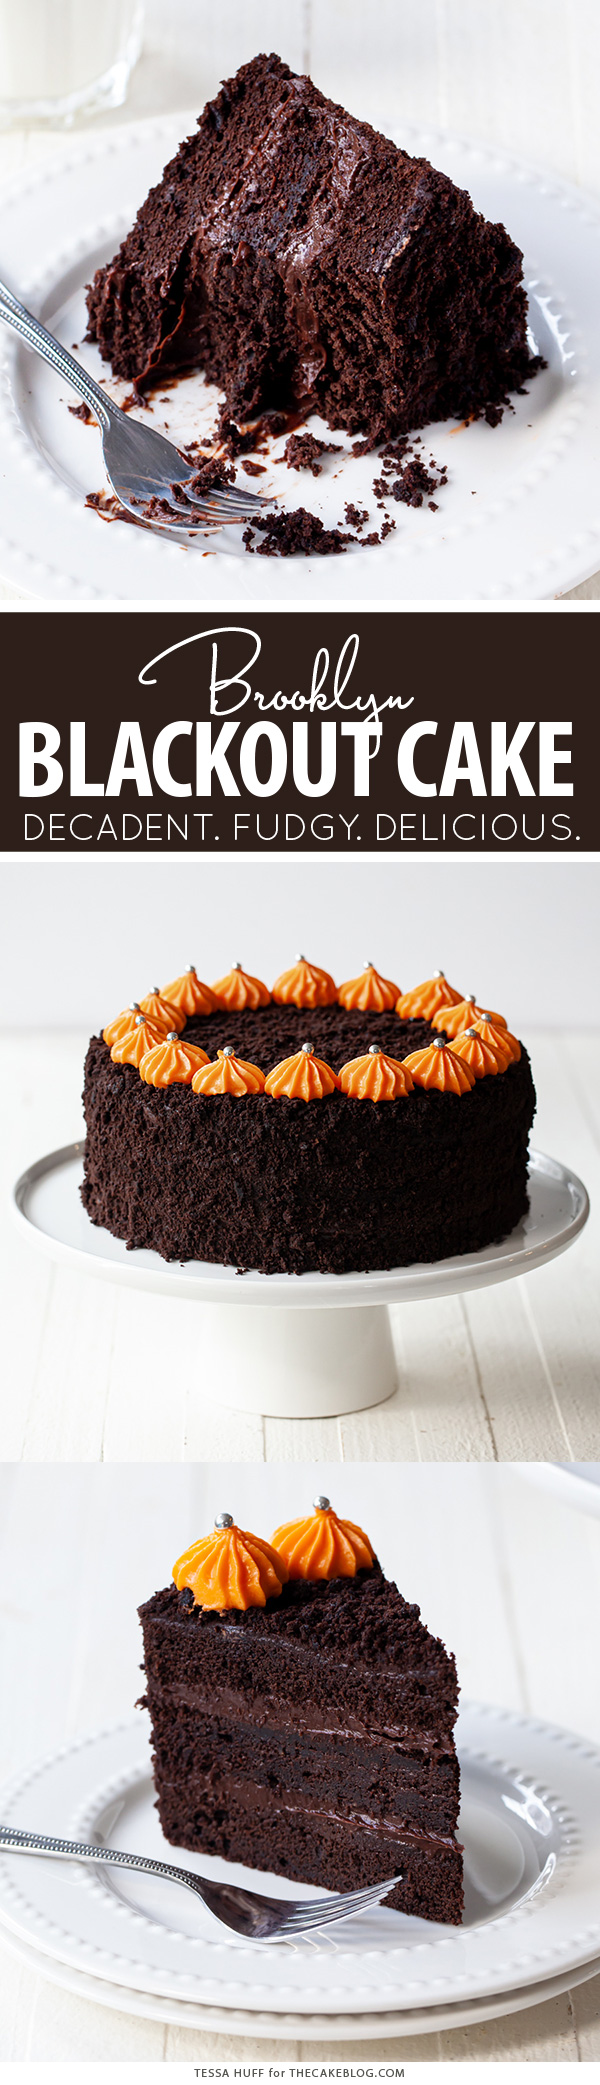
This hauntingly dark and extremely fudgy cake is perfect for Halloween. Dating back to World War 2, this legendary cake was first created at Ebinger’s Bakery (1898 – 1972) – a long-standing bakery chain based out of Brooklyn. It’s chocolate cake crumb exterior and pudding filling is a nod to the mandatory blackouts of that time to protect the Brooklyn Navy Yard.
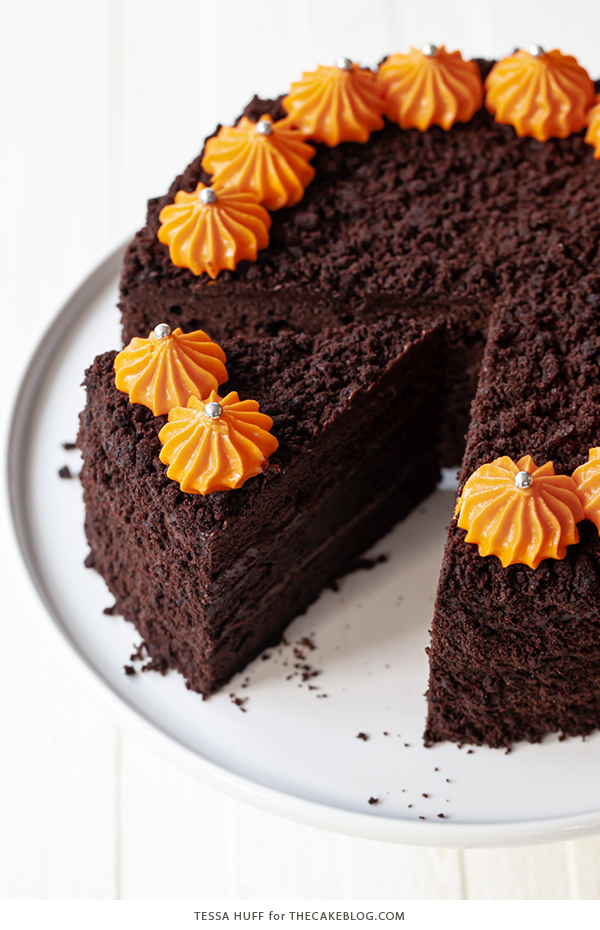
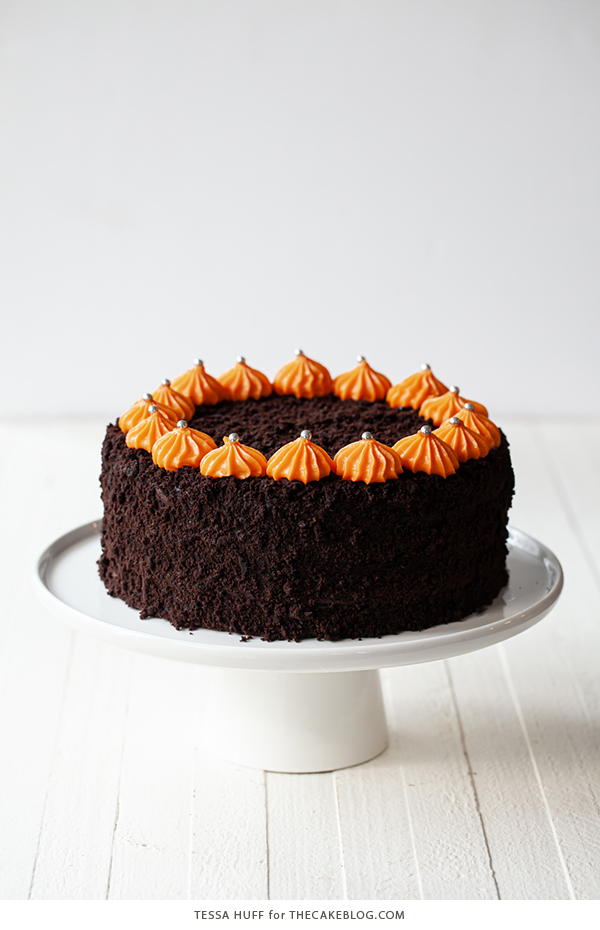
The Devil’s Food cake has a nice tender crumb. Using a touch of black cocoa deepens the chocolate flavor and color. If you can’t find black cocoa, regular Dutch-processed unsweetened cocoa will work just fine. The filling and frosting is fairly unconventional. It can be a bit tricky to work with, but the fudgy flavor is so worth it. If at any time it is giving you trouble, pop the cake back into the fridge to help the pudding stiffen back up. When it comes to adding the cake crumbs to the sides and top of the cake, use this opportunity to press any sliding layers back into place.
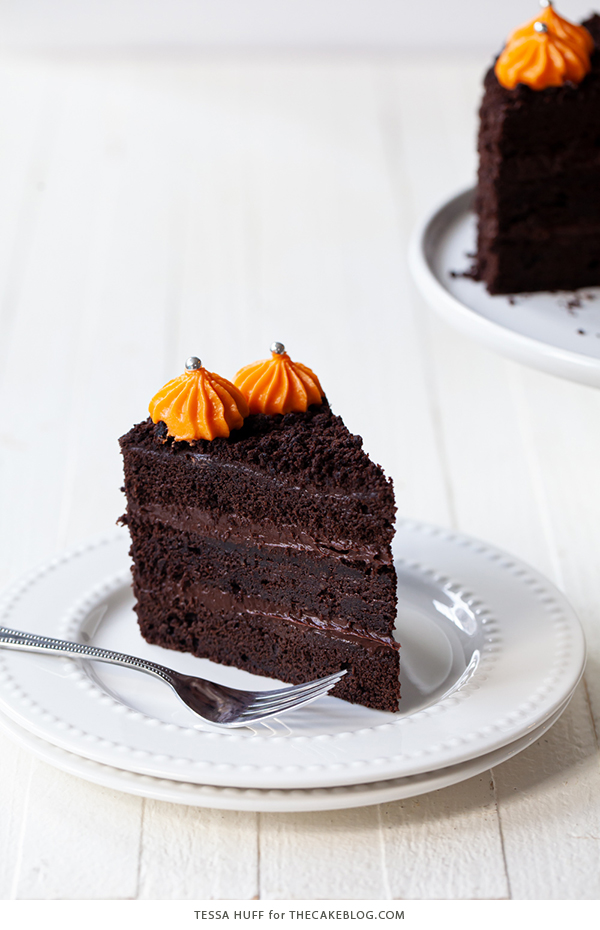
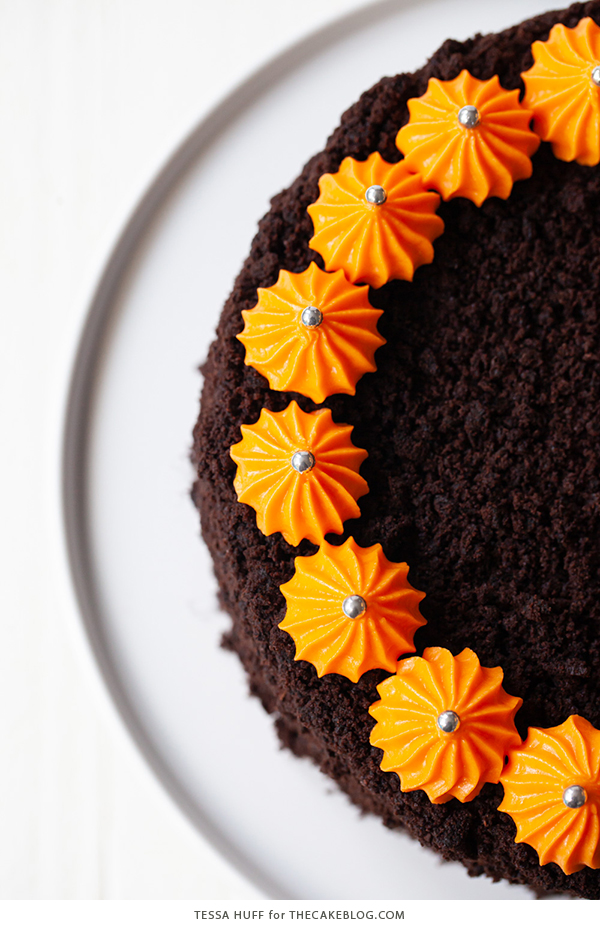
The buttercream piping is purely for decoration. It adds festive flair and a bit of creamy sweetness that offsets the fudgy cake perfectly, but it is completely optional. Alternatively, think of the cake crumbs as “dirt” and decorate with gummy worms or turn the top into an edible graveyard!
Brooklyn Blackout Cake

Brooklyn Blackout Cake – a decadent chocolate cake made with black cocoa and filled with fudgy chocolate pudding frosting.
- Yield: One 8" Round Cake (3 layers)
- Category: Dessert
- Cuisine: Cake
Ingredients
For the Chocolate Pudding/Frosting:
- ½ cup unsweetened Dutch-processed cocoa powder
- 1 cup water
- 1 cup milk
- ¾ cup granulated sugar, divided
- 4 egg yolks
- 1/3 cup cornstarch
- 2 ounces semi-sweet chocolate, chopped
- 2 tablespoons unsalted butter, cubed
- 1 teaspoon pure vanilla extract
- pinch salt
For the Devil’s Food Cake:
- 3 ounces bittersweet chocolate, finely chopped
- ¾ cup boiling water
- 1 tablespoon instant espresso powder
- 2 cup all-purpose flour
- ½ cup unsweetened cocoa powder
- ¼ cup unsweetened black cocoa powder
- 1 teaspoon baking soda
- ¾ teaspoon baking powder
- ¾ teaspoon salt
- ¾ cup unsalted butter, softened
- 3 tablespoons canola oil
- ¾ cup packed brown sugar
- ¾ cup white sugar
- 4 large eggs
- 2 egg yolks
- ¾ cup milk
To Decorate (optional):
- 4 tablespoons unsalted butter, softened
- 1 cup confectioners’ sugar
- 1 to 2 teaspoons milk or heavy cream
- ¼ teaspoon vanilla extract
- gel food coloring
- silver dragees or sugar pearls
Instructions
Make the Chocolate Pudding/Frosting:
- In a medium saucepan, whisk together the cocoa powder, water, milk, and ¼ cup sugar. Place over medium-high heat and bring to a simmer.
- Meanwhile, whisk together the egg yolks and the remaining ½ cup of sugar in a separate mixing bowl. Just before the milk mixture simmers, stir the cornstarch into the egg mixture.
- Temper the simmering milk into the egg mixture by slowly whisking in a little bit of the hot milk at a time. Return the egg-milk mixture back to the saucepan and heat over medium-low.
- Cook the pudding mixture, while slowly stirring, until it thickens and large bubbles pop at the surface. Add the chopped chocolate and butter. Whisk until completely smooth.
- Strain the pudding with a mesh sieve into a clean bowl. Stir in the vanilla and the salt. Press a piece of plastic wrap directly onto the surface of the pudding and chill in the refrigerator until completely cool and thick, about 4 hours or overnight.
Make the Devil’s Food Cake:
- Pre-heat the oven to 350°F. Grease and line the bottoms of three 8-inch cake pans with parchment paper and set aside.
- Place the chopped chocolate and espresso powder in a large coffee mug or heat-safe bowl. Pour the boiling water over the top and whisk to combine. Place one of the cake pans on top of the mug to keep the contents hot and set aside.
- Sift the flour, cocoa powders, baking soda, baking powder, and salt together and set aside.
- In the bowl on a stand mixer fitted with a paddle attachment, add the butter and mix on medium until smooth. Add in the brown and white sugars and mix until light and fluffy, 2 to 3 minutes. Turn the mixer to low and add in the eggs and yolks, one at a time. Stop the mixer and scrape down the bottom of the bowl.
- With the mixer on low, slowly add in half of the flour mixture and mix until combined. Stream in the milk and mix until absorbed. Add in the remaining flour and mix until combined. Stream in the melted chocolate mixture and mix until smooth.
- Evenly divide the batter into the prepared pans and bake for 22 to 25 minutes or until a toothpick inserted into the center of the cakes comes out clean. Cool cakes on a wire rack for 15 to 20 minutes before removing the cakes from their pans.
- Once the cakes have completely cooled, use a long serrated knife to cut the tops off of the cakes. Be generous here, but do not eat the scraps! We need them.
Assemble the Cake:
- Remove the pudding from the fridge and gently whisk to loosen. Place one layer of cake on a cake board or serving dish. Spread on about 1/3 of the chocolate pudding with an offset spatula. Top with the next layer of cake and repeat. Place the last layer of cake on top (cut-side down). Chill the cake for about 10 minutes to set.
- Once chilled, use the remaining pudding to frost the cake in a thin layer. Return the cake to the fridge for an additional 5 to 10 to slightly set.
- Meanwhile, crumble the cake tops. You may use a food processor, a box grater, or just your hands. The cake crumbs should be fairly fine.
- Remove the cake from the fridge and press the cake crumbs to the sides and top of the cake. This can get a bit messy, so work over a rimmed baking sheet for easier clean up. Reuse any cake crumbs that fall back onto the sheet pan and press onto the cake.
- Store the cake in a cake box to prevent drying before ready to serve.
Decorate the Cake (optional):
- Whip up a small batch of buttercream by mixing the butter and sugar until combined. Add the milk and vanilla, then mix on medium-high until light and creamy. Tint the buttercream your color of choice and mix to combine.
- Place the buttercream in a piping bag fitted with a star tip. Holding the piping bag straight down, pipe stars around the top of the cake. Place dragees or sugar pearls on the tops of the stars.
MORE HALLOWEEN CAKES TO MAKE:


If one were to use this cake recipe to make cupcakes, how long would you bake them?
Hi Susan! I don’t work for the Cake Blog, but saw your comment and just wanted to offer some insight. Most cupcakes bake for anywhere from 15-20 or so minutes, depending on the batter/variety. I read somewhere that you turn a cake into cupcakes by baking them for half the time the cake is baked, but here the cake bakes for 22-25 minutes, and I feel like 11-12 /13 minutes might not be exactly right for cupcakes, but I think you should start with that and just keep a close eye on the cakes, testing them with a toothpick after the timer goes off. Hope that helps!
When is the oil added to the cake?
When is the oil added??!!
Hi ladies! I don’t work for the Cake Blog, but I did see your comments and wanted to at least try and offer some insight; I bake very often, and after assessing the recipe and the method for mixing the batter, I think the oil would be added either with the butter (cream them together), or perhaps with one of the eggs. Most recipes have their ingredients listed according to which are added first and etcetera, and since the oil is listed right after the butter and before the eggs, I assume it would be added either with the butter or with the eggs. Since the amount of oil is so minimal, I don’t think it’s the make-or-break ingredient, but oil adds moisture, so even a small amount might add a little additional moisture to the cake. But I wouldn’t think your cakes would fail, for those who left it out 🙂 Hope that’s helpful to you and any others who might be experiencing the same dilemma!
I’m a bit annoyed the oil wasn’t mentioned on the method…as I missed it out! I hope it doesn’t alter the cake, after all the effort!
Hi,
I would love to make this cake but your recipe uses cups, and I couldn’t find a conversion chart on your website. As the way you ‘cup’ the flour affects the amount that is used I don’t to try and guess the amount of flour. An ounce or gram alternative would be very useful or a conversion chart. Thank you.
Hi Irene! Here’s a weight conversion chart from Baking A Moment that you might find useful: https://bakingamoment.com/weight-conversions-for-baking/ It’s a printable PDF, so you can print it out and keep it taped to your pantry door or fridge and easily refer to it 🙂
Hi,
Is the oil for greasing the cake tins, as I didn’t notice its use in the instructions.
It is sad that no one answers the queries, I guess the site only wants comments and not queries about the recipes. I also find the video picture for a different baking topic continually getting in the way of reading the text.
I am really disappointed, and if no one is available to answer queries I don’t see the point of continuing to subscribe.
Why is this recipe COMPLETELY different from the same brooklyn blackout cake of your “Layered” cookbook?